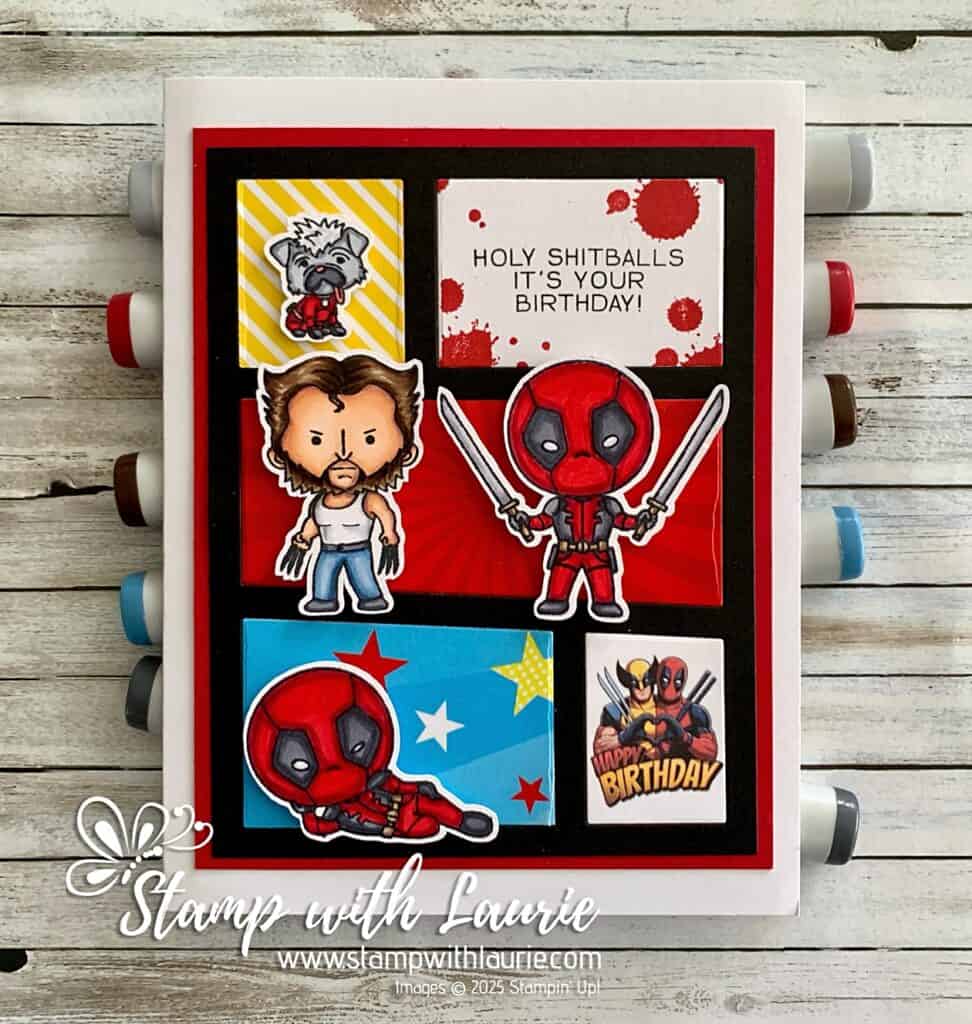
Hello Crafty Friends! It’s Laurie here to share my It’s Your Birthday Card using the Ride Your Dreams Stamp Set by Kindred Stamps. A good friend’s birthday was recent, and he loves a certain movie and comic book. So, I couldn’t resist creating this card for him using this stamp set!
The Details of It’s Your Birthday Card
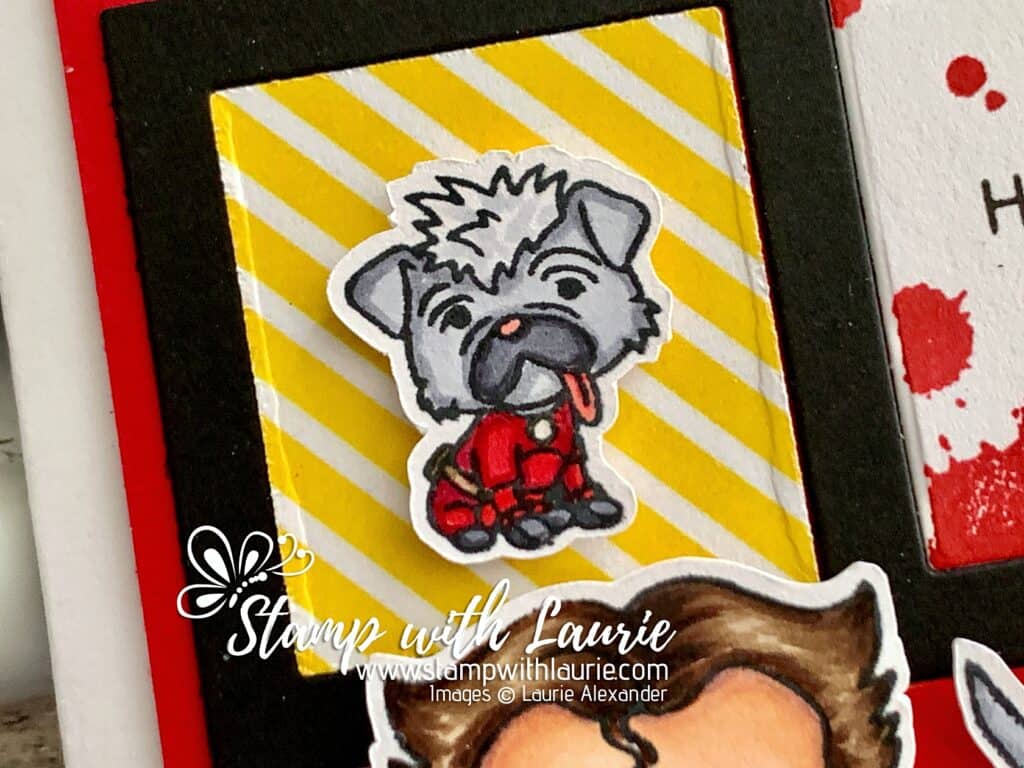
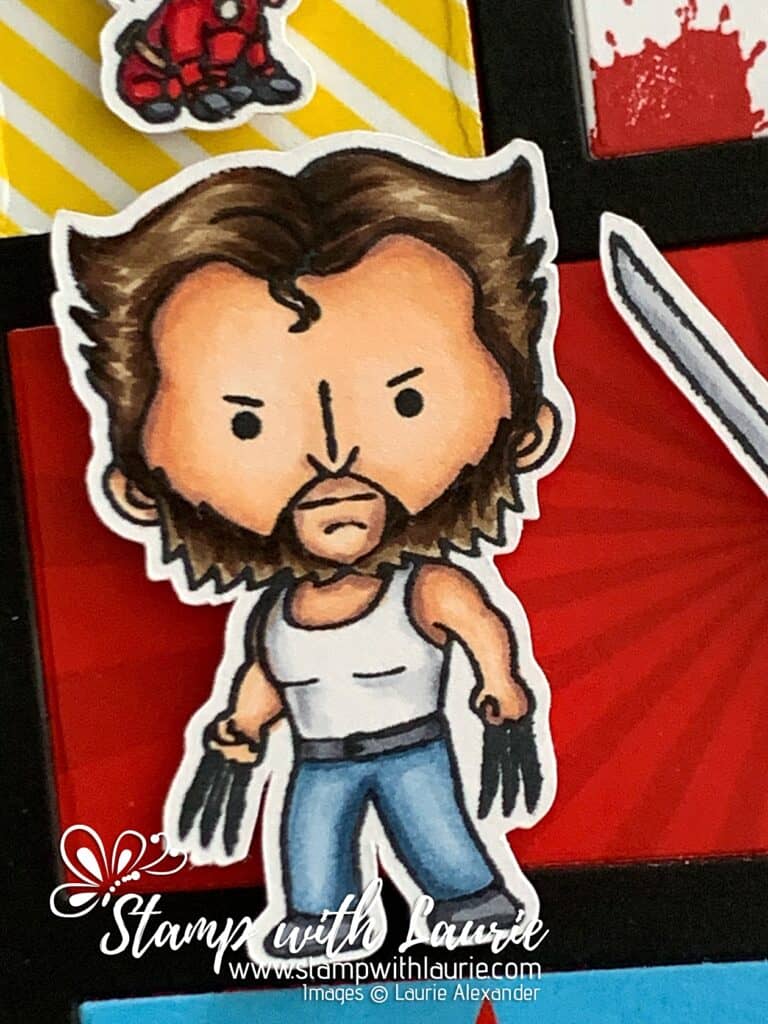
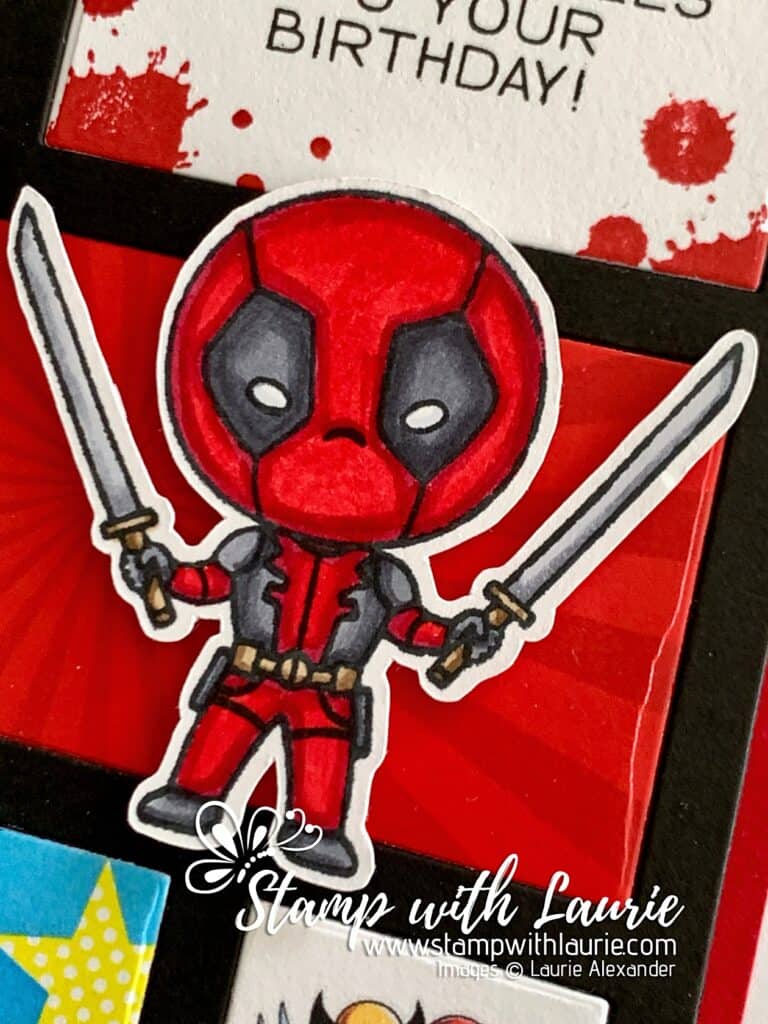
For my card, I had a lot of fun colouring the characters with my Copic markers and then cutting them out with my Brother Scan n’ Cut.
Next, I thought it would be fun to create comic book style card using the Comic Mat Die from Stamp Anniething. Of course, the paper sheets from the Save the Day by Stamp Anniething were perfect for my background behind the characters.
The sentiment was stamped in black with red blood splatter since there is a lot of blood in the movie. Lol! Please excuse the language of the sentiment, but it is appropriate considering the movie.
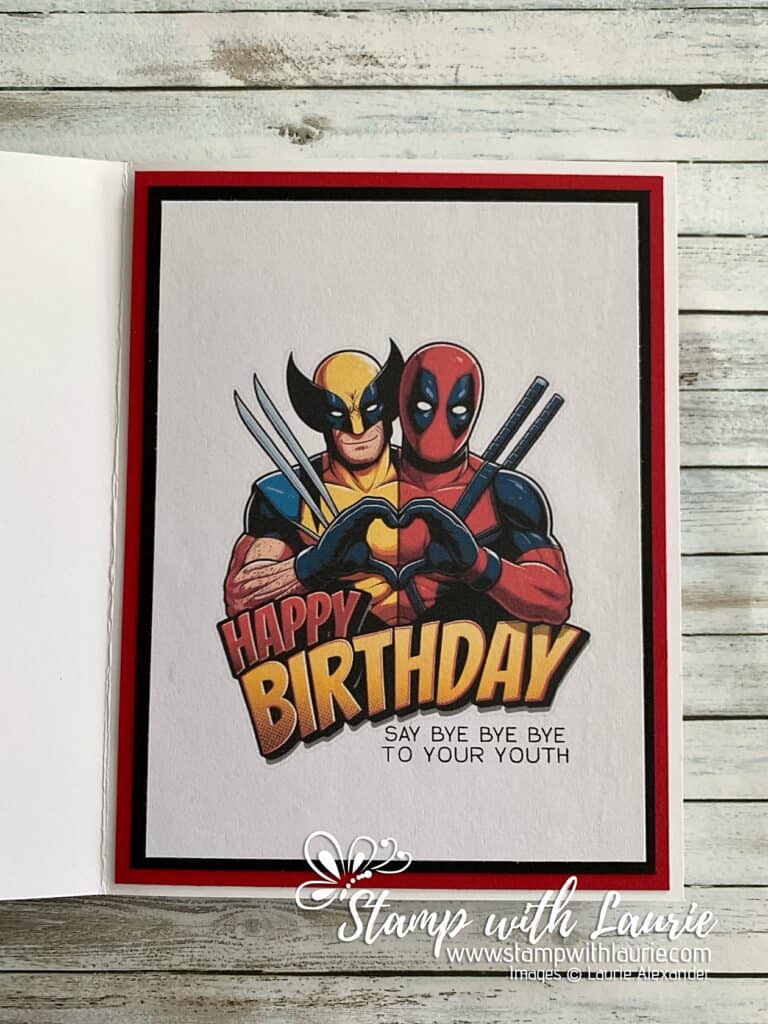
Inside of Card
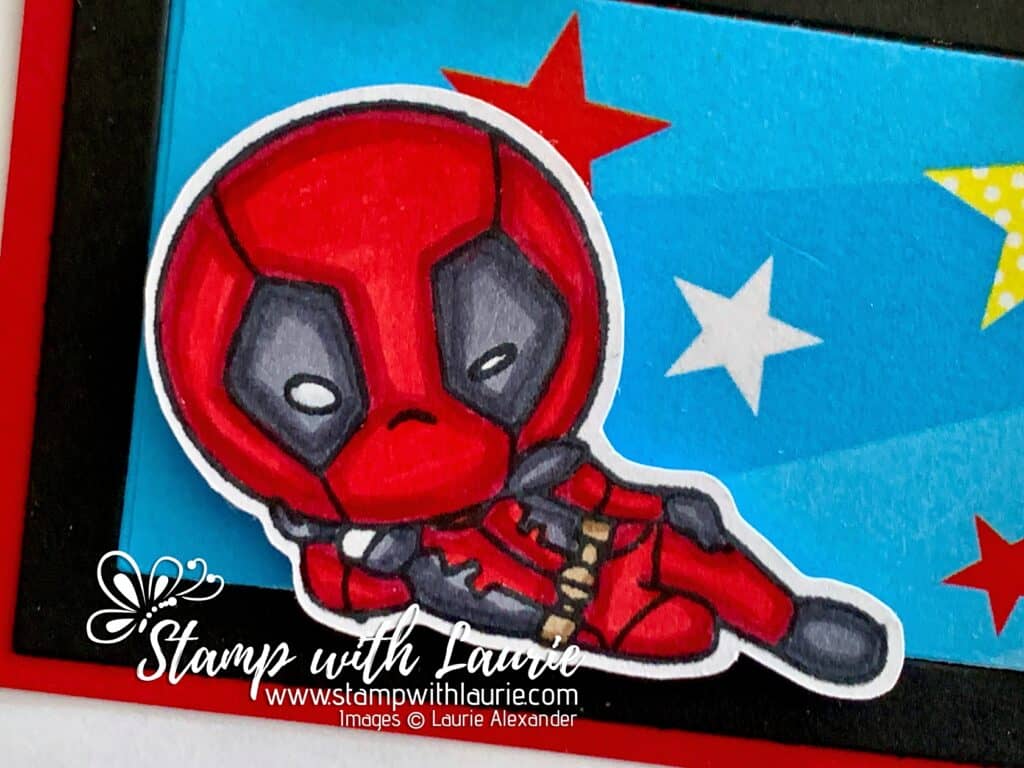
Since I had one square leftover on the front cover, I decided to print of a Cake Topper of the characters that I bought on Etsy in two different sizes. One for the front and the other for the inside. For the inside, I stamped another sentiment from the stamp set beneath the characters on the inside.
————————–
Copic Markers:
Pup Sidekick Fur: C4/C3/C2 Hair: C2/C1 Muzzle: C7/C6/C5 Tongue: R32 Outfit: R39/R37/R35/C7/C4/C3/Gold Gelly Roll Pen for dog tag Belt: E44/E43
Pup Sidekick
Hunk with the Claws (aka Wolverine) Skin: E04/E11/E21/E00/E000 Hair: E49/E47/E44/E43 Shirt: C3/C1/0 Pants: B97/B95/B93/B91 Belt/Shoes: C7/C4/C3
Ride Your Dreams, Kindred Stamps Paper Basics – Stamper’s Select White Cardstock, Papertrey Ink Save the Day Paper Sheets, Stamp Anniething Comic Mat Die, Stamp Anniething Gorgeous Grunge Stamp Set, Stampin’ Up! Real Red Ink Pad, Stampin’ Up! Tuxedo Black Memento Ink, Stampin’ Up! Brother Scan n’ Cut Gold Gelly Roll Pen, Sakura Deadpool & Wolverine Cake Topper, Kiwi Art Present Real Red and Basic Black Card Stock Stampin’ Up!
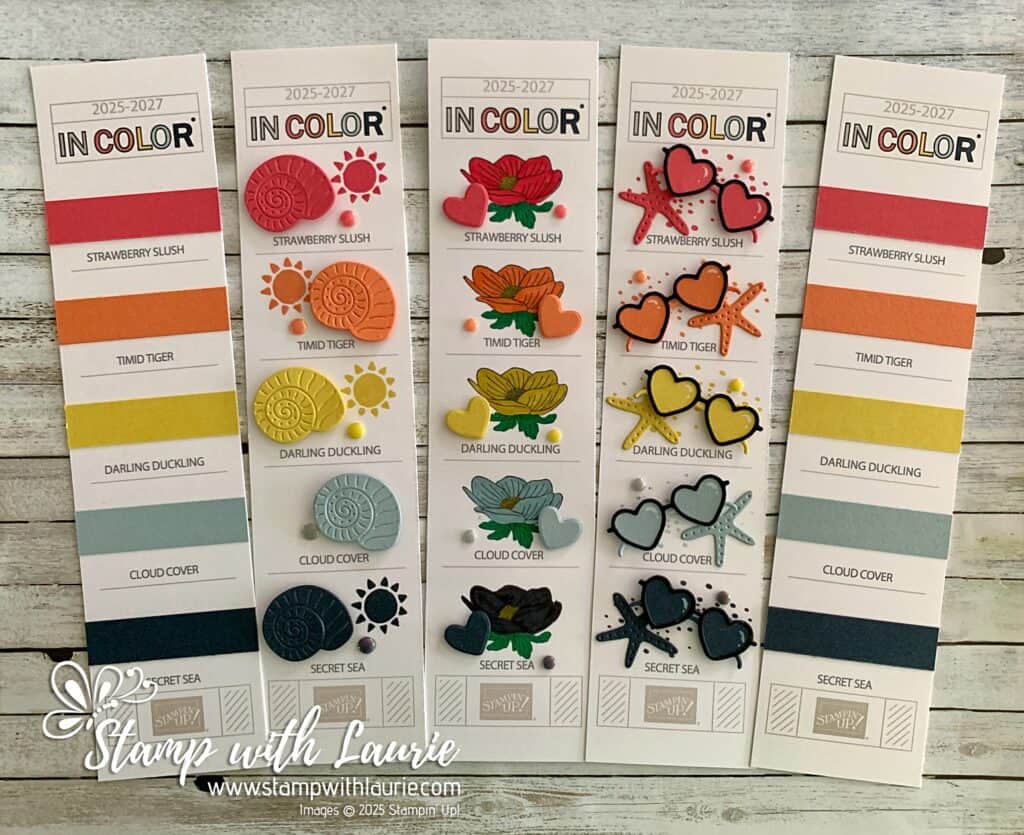
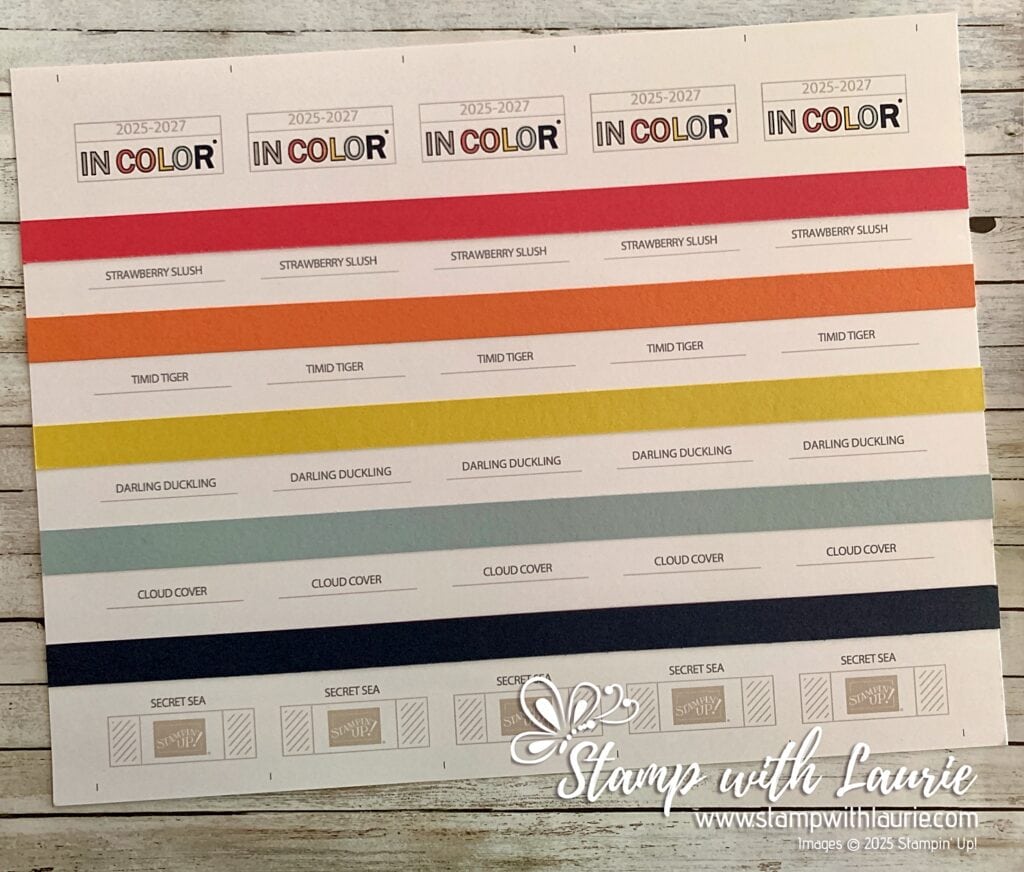
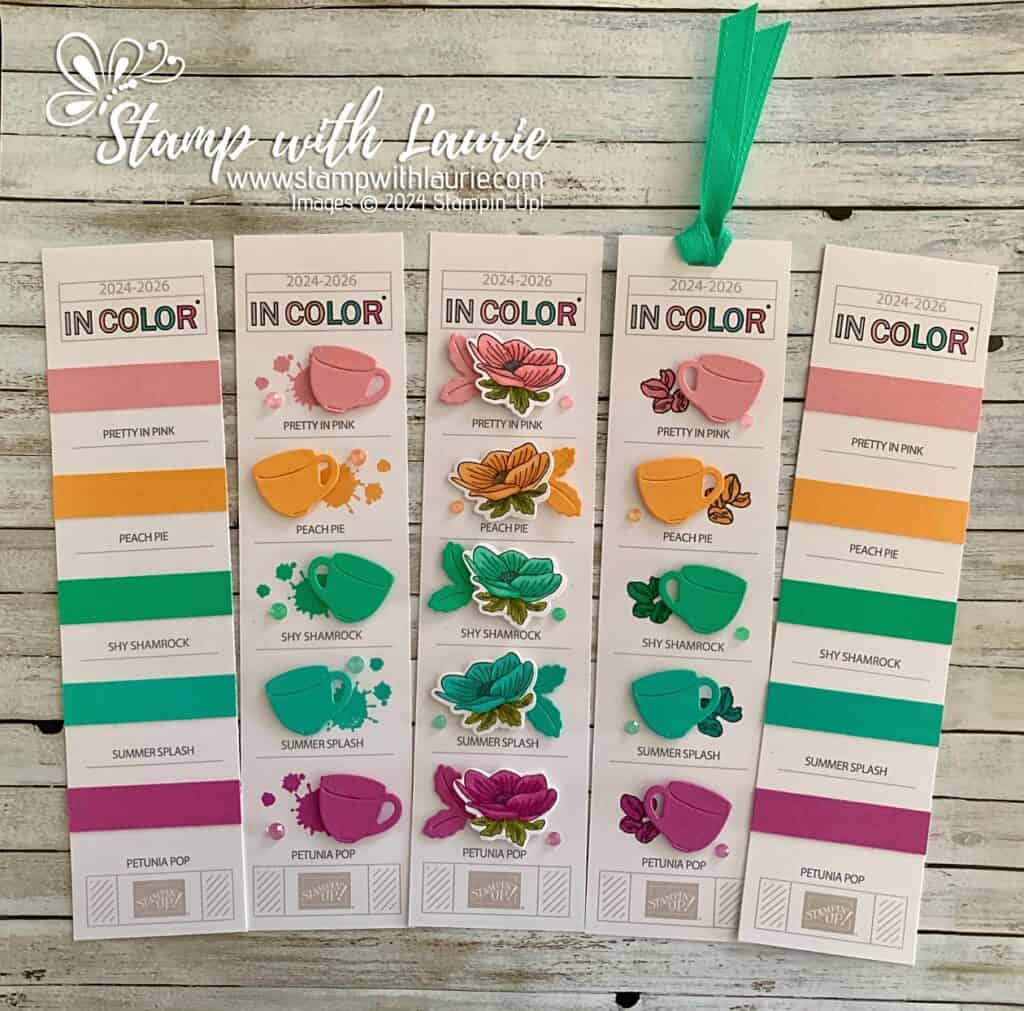
Hello Crafty Friends! Laurie here again! Every year I am asked to create a Stampin’ Up! In Color bookmark file. So, I am sharing my 2025-27 In Color Bookmarks using my PDF file that I created for this purpose. When you download the PDF files print them with the fit to page setting in the Adobe Acrobat on Basic White. All files are at the end of this post including a French version, as well as the files for the 2024-26 In Colors from last year.
Inks/Card Stock Bookmark – Version 1
For this bookmark, I used the new May release the Notes & Totes Bundle. I love this Bundle and some of the images and dies are the perfect size to use on the bookmarks.
Inks/Card Stock Bookmark – Version 1
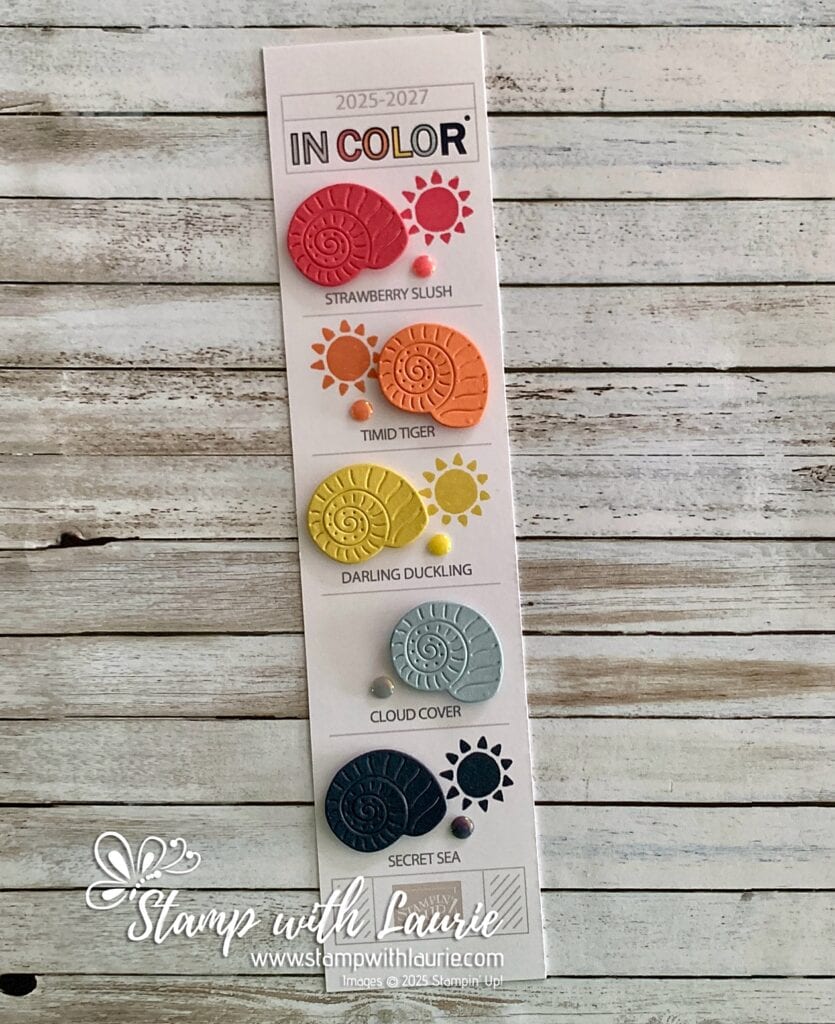
So, I stamped all the suns except the Cloud Cover since it hasn’t been released yet. Stampin’ Up! is still working on the formula. Then, I die cut a shell from each colour card stock. The finishing touch was to use a matching 2025–2027 In Color Flat Pearls for each colour.
Close Up of Inks/Card Stock Bookmark – Version 1
Inks/Card Stock Bookmark – Version 2
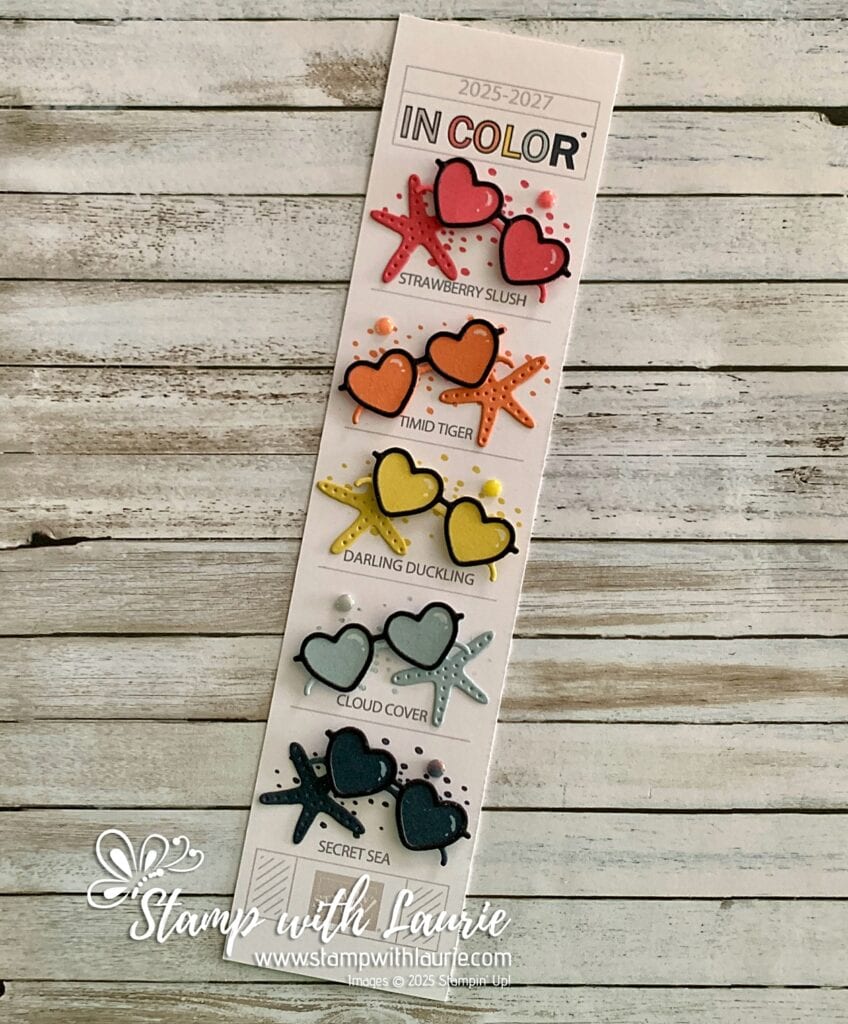
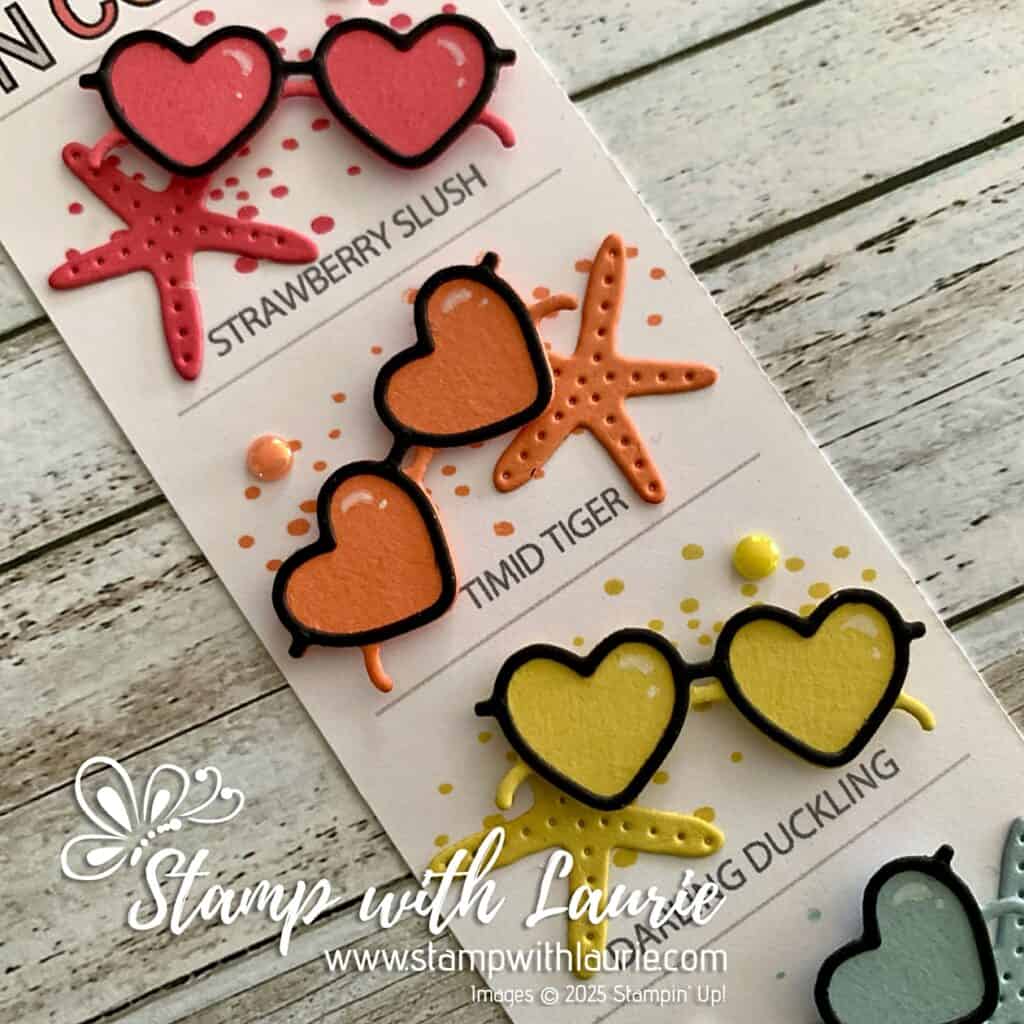
I love those cute sunglasses in the new May release the Notes & Totes Bundle so much that I had to create a bookmark using them!
Inks/Card Stock Bookmark – Version 2
So, I stamped the “sand speckles” twice in each colour as my backdrop. For the Cloud Cover one, I used my Cloud Cover Stampin’ Write Marker and coloured the stamp and then did the “Huff Technique” to moisten it. Lol! It didn’t come out perfect, but you can still see it. I added a die cut starfish in the appropriate card stock colours. Then, I die cut my glasses and framed them in Basic Black. To add some dimensions to the glasses, I added some shine using my inked Craft White Ink Pad and a Blender Pen. The finishing touch was to use a matching 2025–2027 In Color Flat Pearls for each colour.
Close Up of Inks/Card Stock Bookmark – Version 2
Card Stock/Stampin’ Write Markers Bookmark
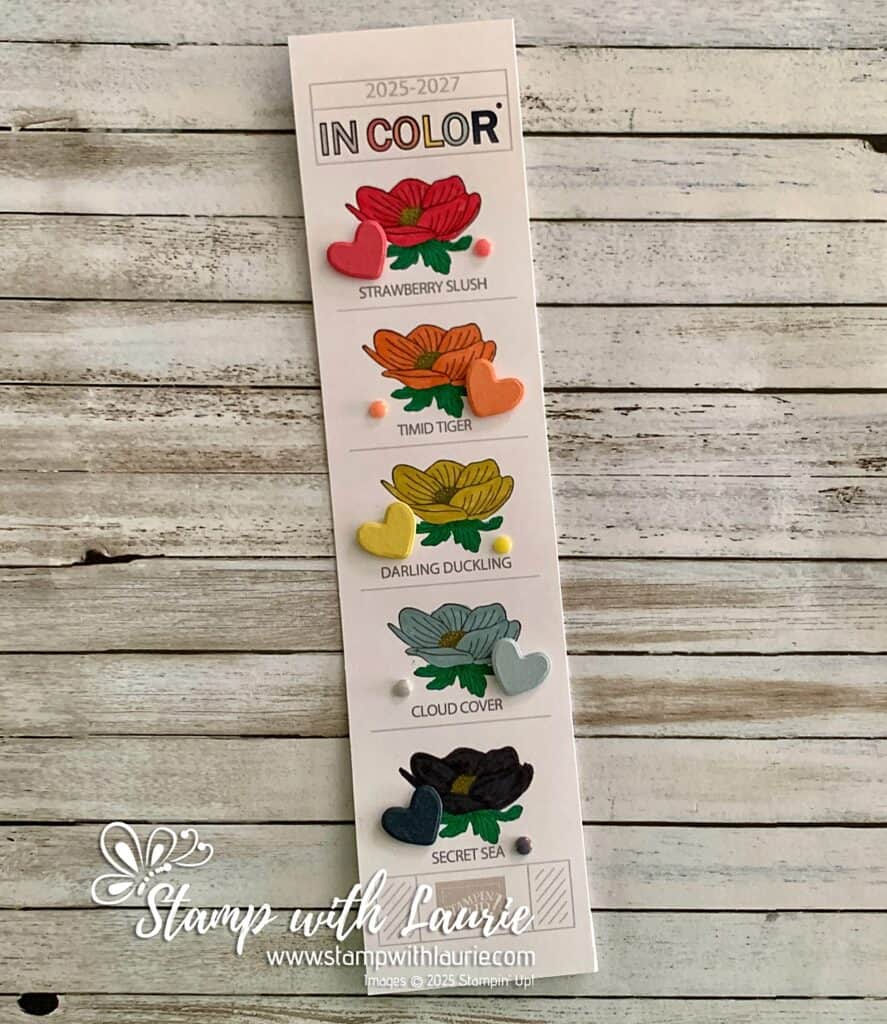
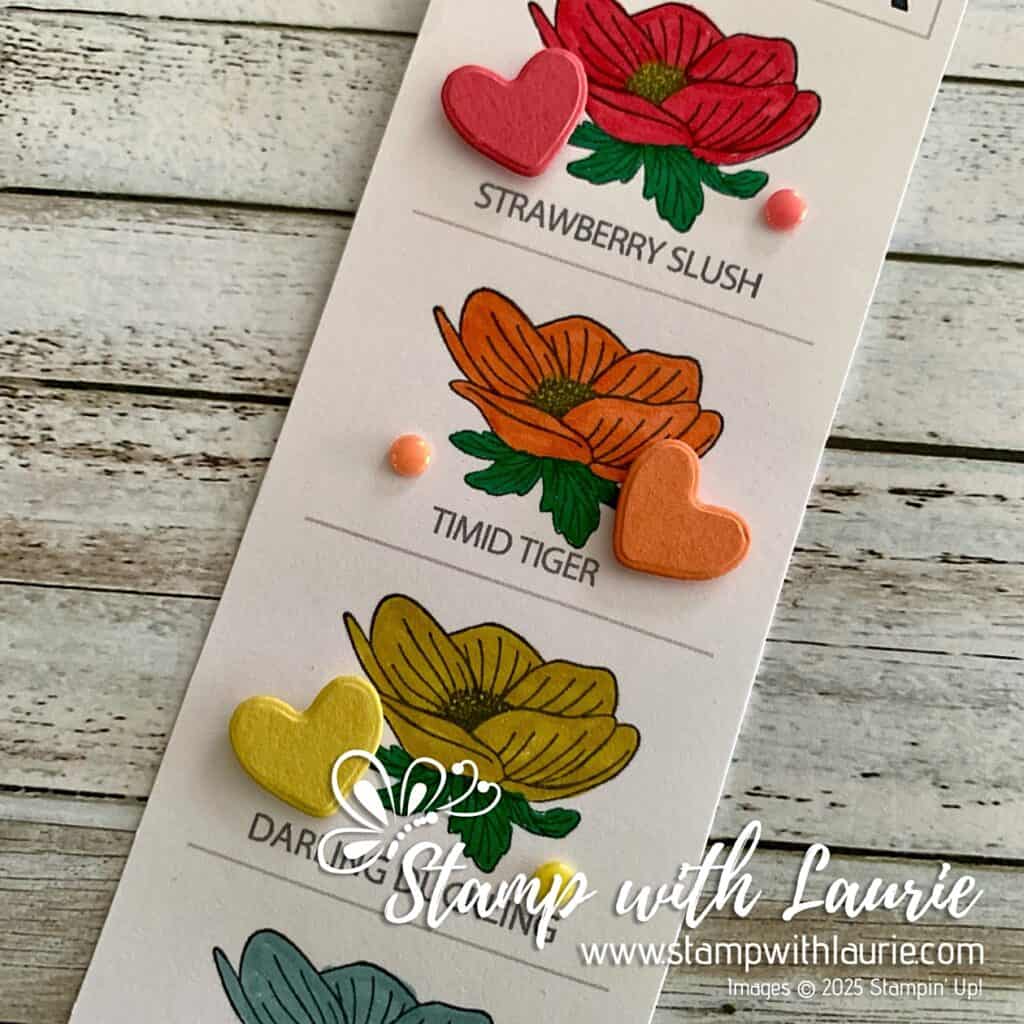
For my next bookmark, I stamped in Memento Ink the flowers from the Lifetime of Love Stamp Set directly onto the bookmark and coloured them with the Stampin’ Write Markers. I coloured the flowers in the matching colours and used Shy Shamrock Stampin’ Write Marker for the leaves and Darling Duckling for the flower centres.
Card Stock/Stampin’ Write Markers Bookmark
I had some die cut hearts leftover from the sunglasses in my previous bookmark. So, I place the matching coloured card stock hearts where appropriate. Finally, I add the smaller 2025–2027 In Color Flat Pearls for each colour.
Close Up of Card Stock/Stampin’ Write Markers Bookmark
Easy Card Stock Bookmarks
For my last set of bookmarks, I cut a ½” x 11” strip of card stock for each colour. I glue them directly to the print out before cropping the bookmarks down. I them cut them apart creating 5 bookmarks. Fast and easy!
Easy Card Stock Bookmarks
Supplies:
Stamps: Notes & Totes Bundle (165241), Lifetime of Love Stamp Set (162574)
Inks: Strawberry Slush Classic Stampin’ Pad (165286), Timid Tiger Classic Stampin’ Pad (165278), Darling Duckling Classic Stampin’ Pad (165277), Secret Sea Classic Stampin’ Pad (165285), Memento Ink (132708)
Accessories: 2025–2027 In Color Flat Pearls (165192), 2025–2027 In Color Stampin’ Write MarkersAssortment (165292), 2024–2026 In Color Stampin’ Write Markers Assortment (163829), Uniked Srampin’ Pad & White Craft Refill (147277), Blender Pens (102845), Stampin’ Paper Trimmer (152392), Stampin’ Dimensionals (104430), Mini Stampin’ Dimensionals (144108), Stampin’ Seal (152813), Multipurpose Liquid Glue (110755)
Three Fancy Bookmarks
For Further Information on My 2025-27 In Color Bookmarks:
Hello Crafty Friends! Laurie here again! I am sharing My Storybook Easter Card using the Storybook Friends Bundle which includes the Storybook Friends Stamp Set and the Storybook Friends Dies with Storybook Moments Specialty Designer Series Paper by Stampin’ Up! I thought this DSP with its die-cut designs would make a fast and fun Easter card for my in-laws! In fact, my Mother-in-law loved Peter Rabbit. So, I knew she would get a kick out of my card!
The Details of My Storybook Easter Card
For my card, I thought a double z-fold card would create a perfect Easter scene. So, I used the soil-shaped die from the Storybook Garden Patch Dies to create the ground panel. I very carefully lined up the die three times to cut it along the top of the 11” x 1 ½” piece of Crumb Cake.
Top View of Double Z-Fold Card
Next, I embossed it with the retired Textured Embossing Folder to give the ground some interest and to cover up where the soil-shaped die left indents in the card stock. Once that was done, I brushed Crumb Cake Ink with my Blending Brush along the edges to make it look more like dirt. I popped up my ground piece with dimensionals on the front and on the last panel.
To make the carrots, I used the spade from the Storybook Garden Patch Dies and trimmed off the handle part. Then, I added the Old Olive die cut leaves. I love that the soil-shaped die has cuts in the ground that the carrots can be inserted to look like they are growing out of the ground!
Front of Card
For the front panel of the card, I used the Storybook Friends Dies to die cut a house from the DSP and frame it with the Wood Textured Specialty Paper. Since I wanted to add the pre-cut fence and ground infront of the house, I made sure that the house I picked was towards to top of the frame. I added some Lost Lagoon DSP that reminded me of wallpaper behind my frame.
Inside of Card
For my background scene on the other two panels, I made sure that I cut the DSP to create a continuous scene.
I love how easy it is to decorate my card with the die-cut designs! I added the momma bunny and child bunny to the front of the z-fold. Then, I added the mouse carrying water to the middle panel of the z-fold. And, finally, I added the squirrel with the rake to the third panel. I popped up the bunnies, but adherred the mouse and squirrel directly to the ground piece. When the card is closed, the carrots hide the mouse and squirrel from view. How cool is that!
Side View of Card
For the popped up sentiment, I used one of the stitched banners from the Stylish Shapes Dies to die cut my Lost Lagoon Easter Greetings. A die-cut butterfly was added for whimsy.
The finishing touch was to add three Antique Pearls with two on the front and one beside the sentiment.
I placed a Basic White piece on the back for the message.
Supplies:
Stamps/Bundles/Dies: Storybook Friends Bundle (164675), Storybook Garden Patch Dies (164666), Stylish Shapes Dies (159183)
Inks: Crumb Cake Classic Stampin’ Pad (147116), Lost Lagoon Classic Stampin’ Pad (161678)
Paper: Crumb Cake (120953), Basic White (166780), Calypso Coral (122925), Old Olive (100702), Wood Textured Specialty Paper (163770), Storybook Moments Specialty Designer Series (164662)
Accessories: Blending Brushes (153611), Antique Pearls (164679), Paper Snips (103579), Stampin’ Paper Trimmer (152392), Bone Folder (102300), Stampin’ Dimensionals (104430), Mini Stampin’ Dimensionals (144108), Stampin’ Seal (152813), Multipurpose Liquid Glue (110755)
Card Laid Flat
Measurements:
Crumb Cake (2 pieces):
11” x 4 ¼” scored at 2 ¾” and 5 ½”
11” x 1 ½” scored at 5 ½” and 8 ¼”
Basic White (2 pieces):
4” x 5 ¼” (for Back)
Scrap for Sentiment
Calypso Coral:
Scrap for Carrots
Old Olive:
Scrap for Carrot Tops
Storybook Moments Specialty Designer Series (10 Pieces):
2-5/8” x 4-1/8” (Front Panel)
2-5/8” x 4-1/8 (Middle Panel)
5-3/8”” x 4-1/8 (Back Panel)
1 ¾” x 2 ¾” (House)
2 Rabbits, Mouse, Squirrel, Fence, Butterfly Die Cut Designs
More Information on My Storybook Easter Card
Here is another card that I made recently just with the die-cut designs. I even have a third card that I will share later. I just love this Suite for those quick cards!!
Another Card Using Die-Cut Designs
For more of my Stampin’ Up! cards, please click here.
You will find the items listed above in my online store.
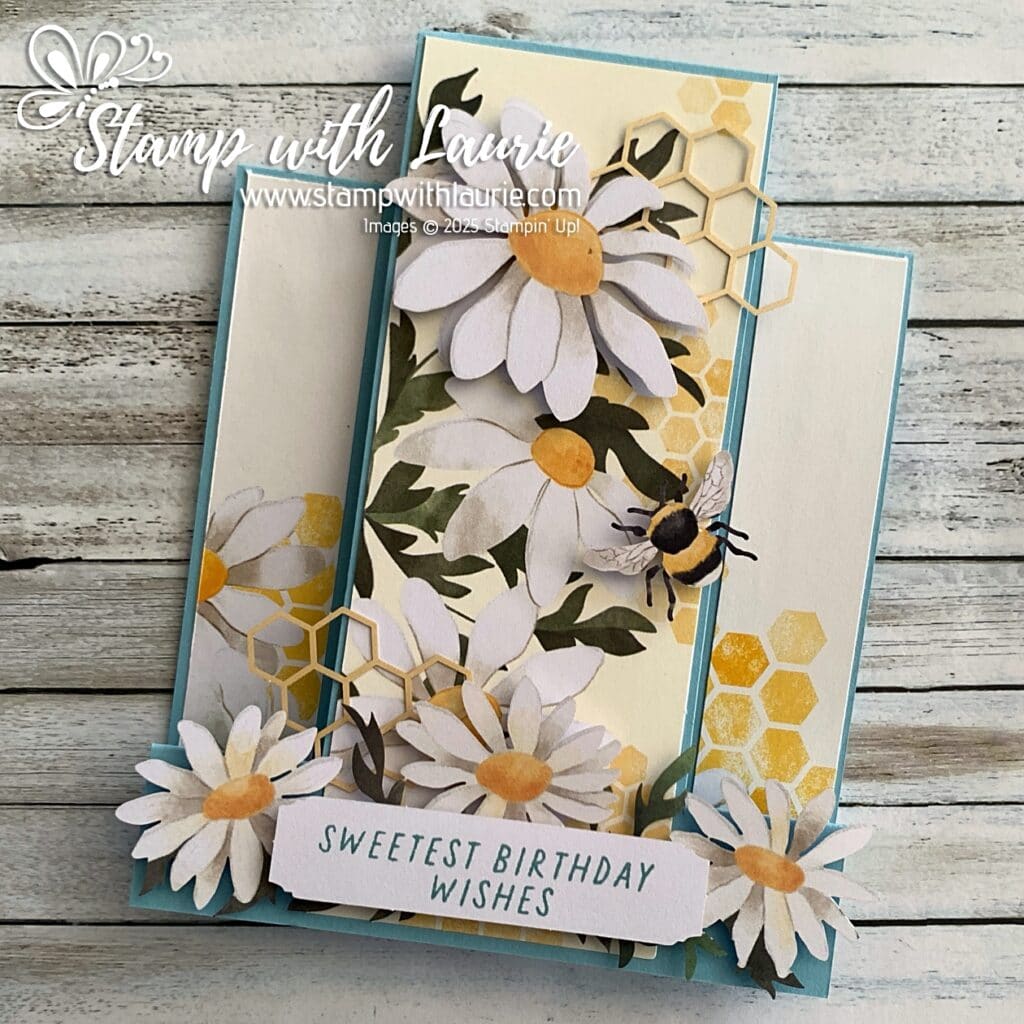
Hello Crafty Friends! Laurie here again! I am sharing my Daisy Daydream Alternative Cards using the Daisy Daydream March 2025 Paper Pumpkin Kit by Stampin’ Up! I loved this kit with its pretty paper pieces (especially those bees!), printed cards and envelopes! So, I made five alternative cards with only adding Balmy Blue card stock to two of them.
But, first, here are the three cards that the kit makes. Perfect for all occasions, these beautifully crafted cards bring a touch of nature-inspired charm to your handmade creations.
Daisy Daydream March 2025 Paper Pumpkin Kit
The Details of My Daisy Daydream Alternative Cards
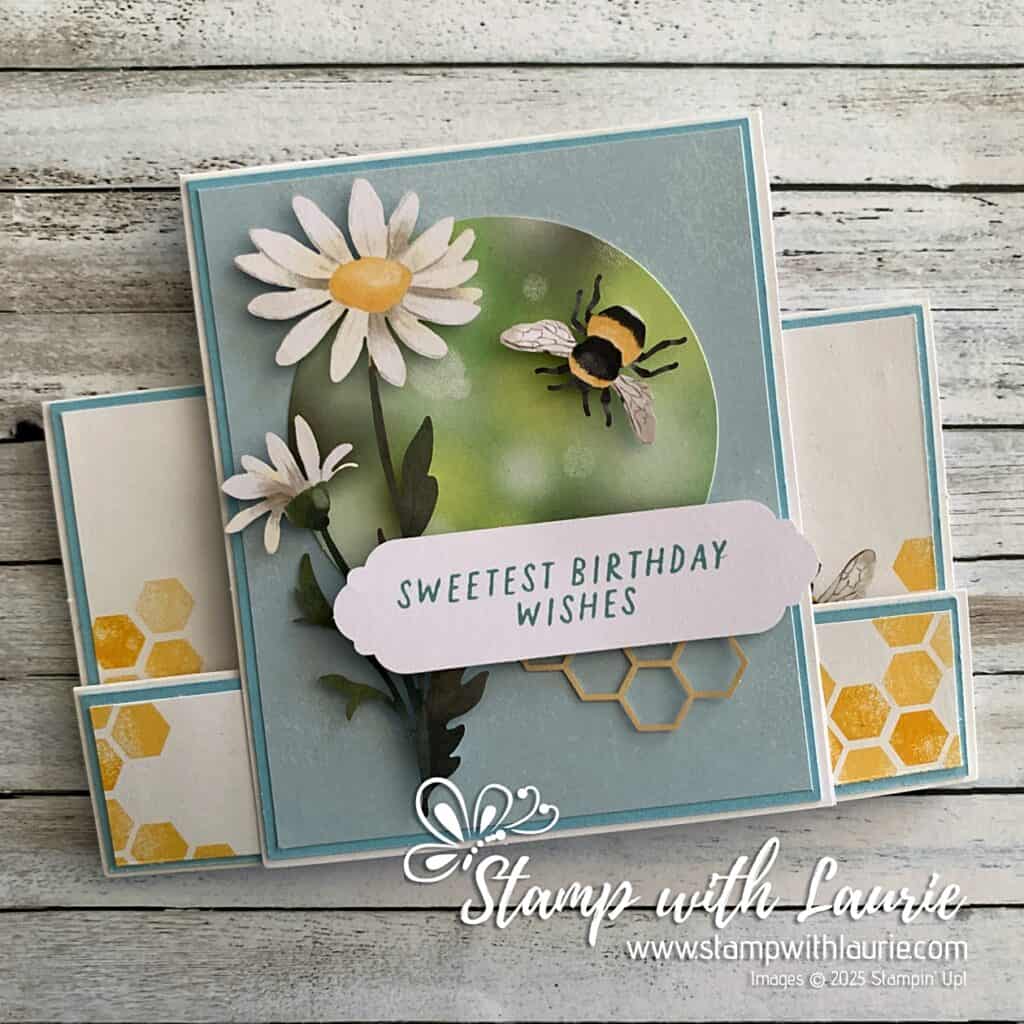
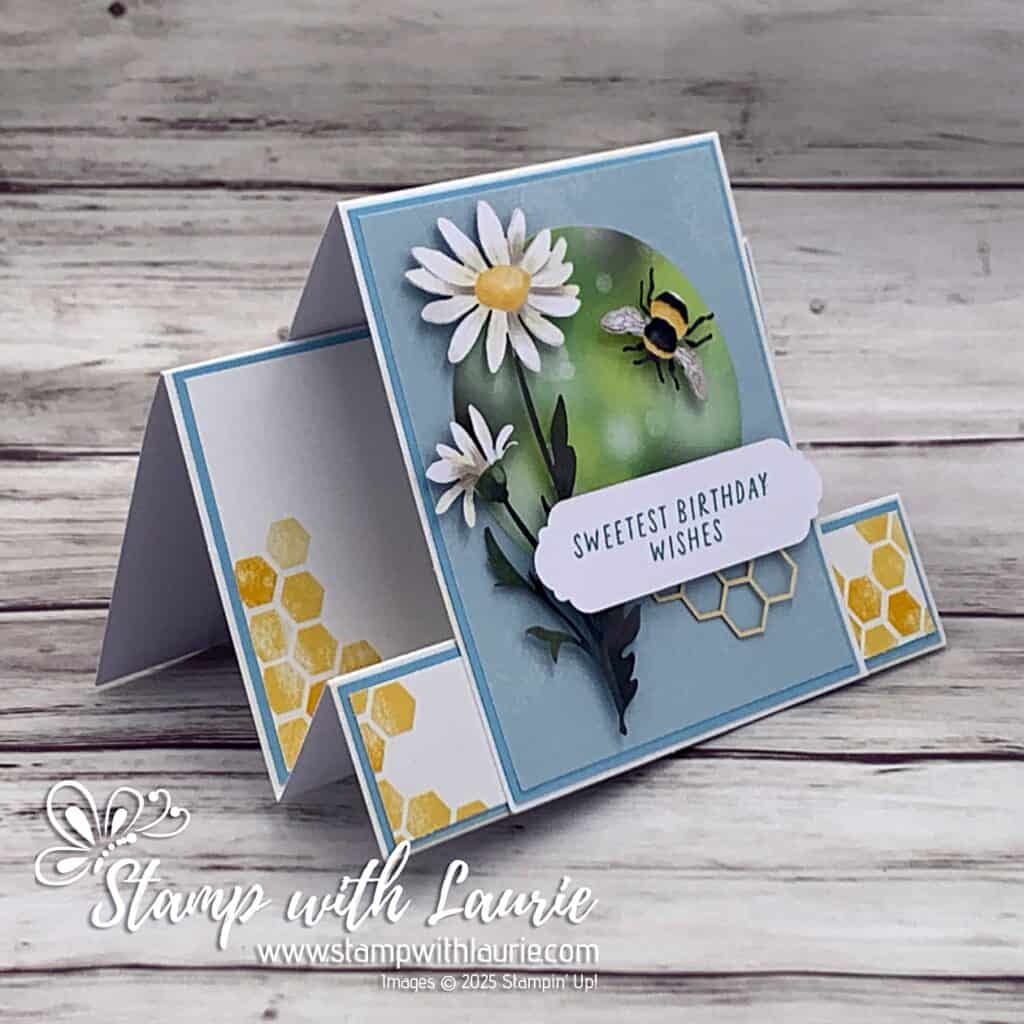
My Centre-Step Card
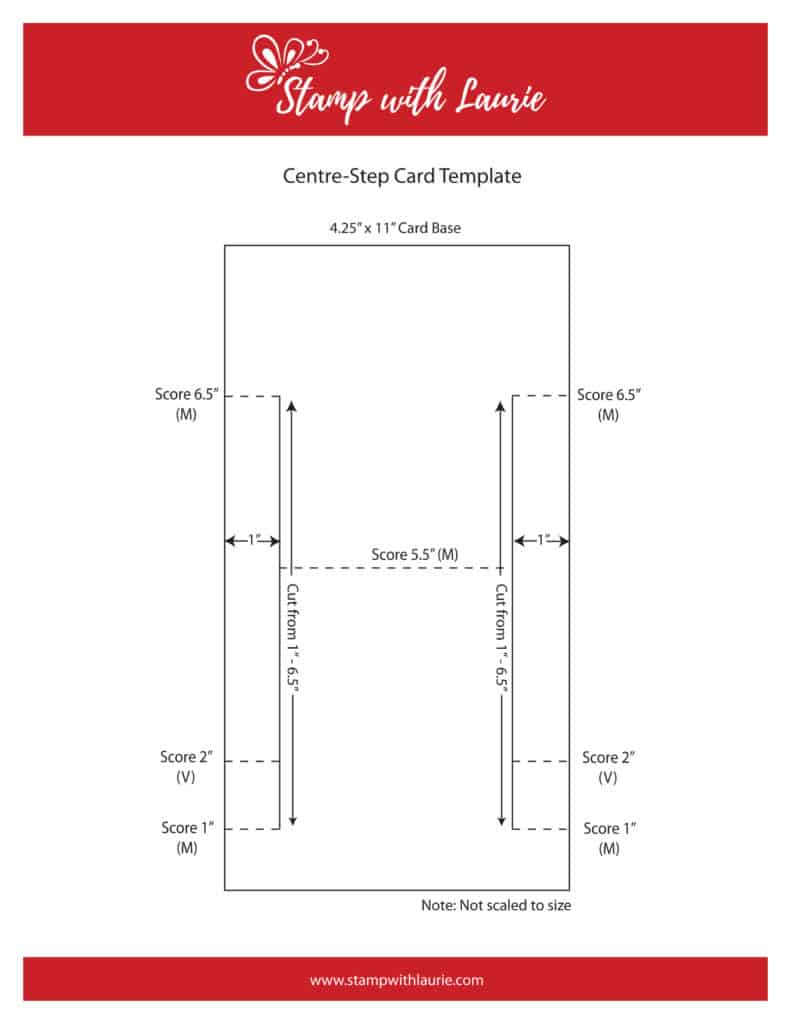
For my first alternative card, I used my favourite fun fold and create a centre-step card! The beautiful printed card bases lend themselves to this fun fold. The only extra product that I added was the Balmy Blue card base which was cut and scored according to the template below.
My Centre-Step Card
For the centre panel, I cut the front of one of the daisy cards in half and used the right side for my centre panel. Next, I popped up a large daisy at the top and tucked in a honeycomb piece so that it hung off the edge.
The side panels were from the envelope with the daisies on the front that I cut apart. Since the panels were so thin, I was able to cut both panels using just the front left side of the envelope.
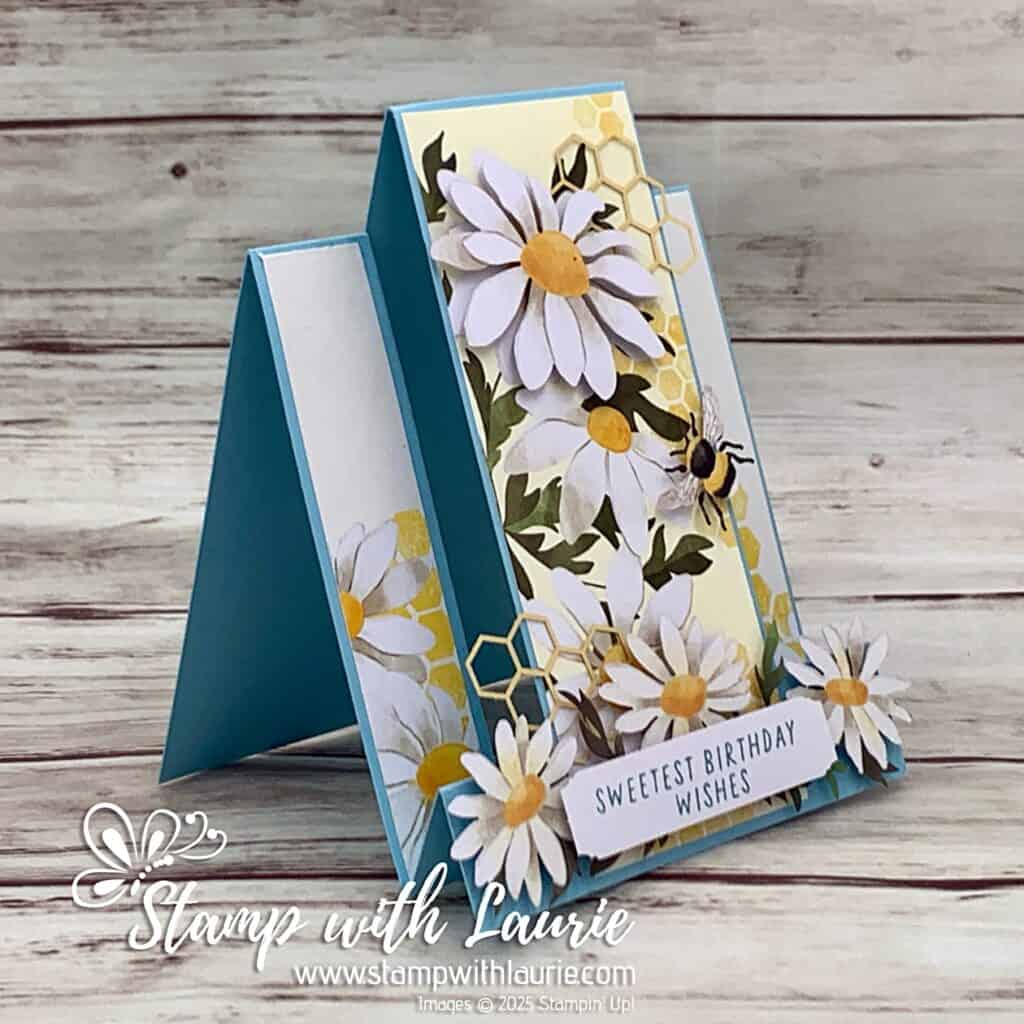
Side View of Centre-Step Card
For the bottom panel, I added the daisy chain behind my sentiment and tucked in another honeycomb hanging off the edge of the centre panel. The daisy chain was a little long. So, I used my paper snips and trimmed off the green leaves on either side of it.
The finishing touch was the bee popped up on the centre panel. You might notice that I again had the bee hanging off the edge of the centre panel. I loved this look which added visual interest and brought the eye to the back panels.
Measurements:
Card Base:
11” x 4 ¼” cut/scored according to template below
Centre Panel:
2-1/8” x 5-3/8”
2 Side Strips (from Envelope):
7/8” x 4-3/8”
Other Pieces from Kit:
Daisy Precut Paper Pieces
Bee Precut Paper Piece
Honeycomb Paper Pieces
Sentiment Piece
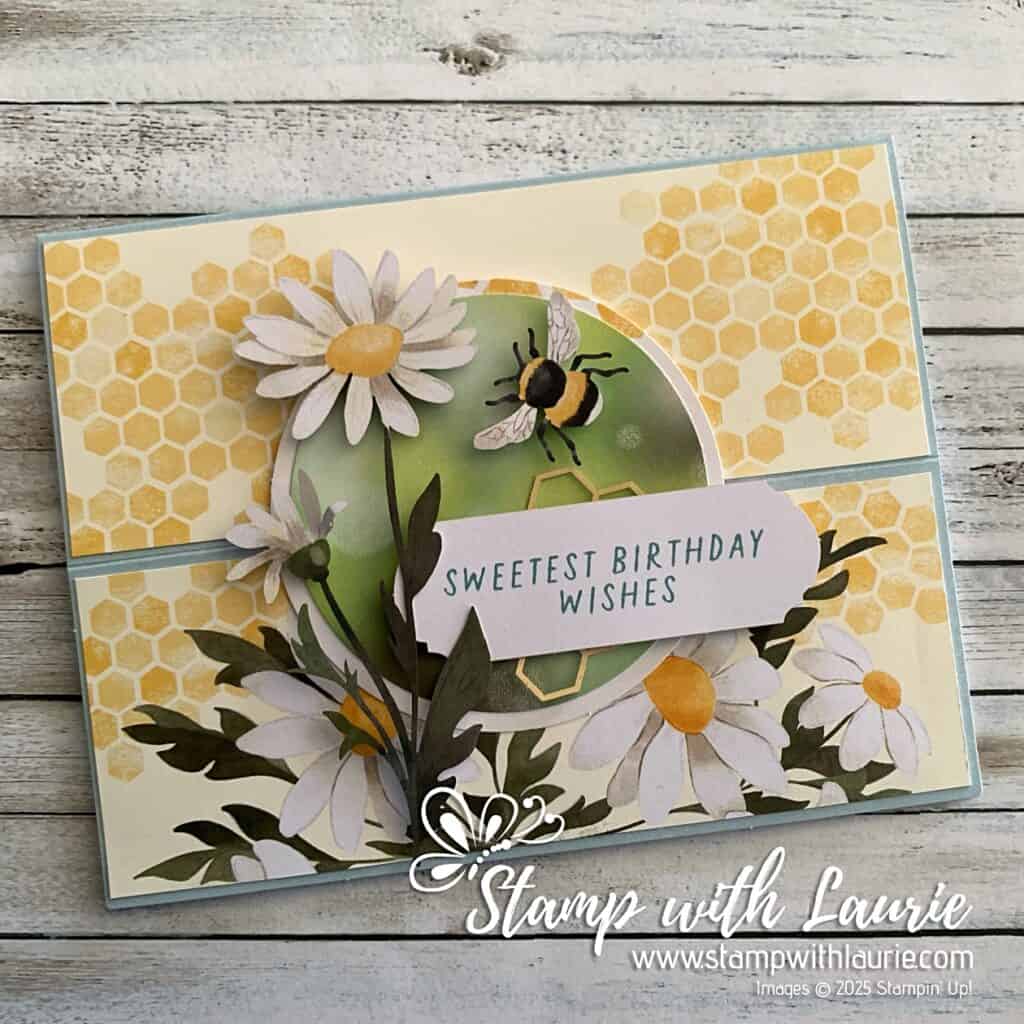
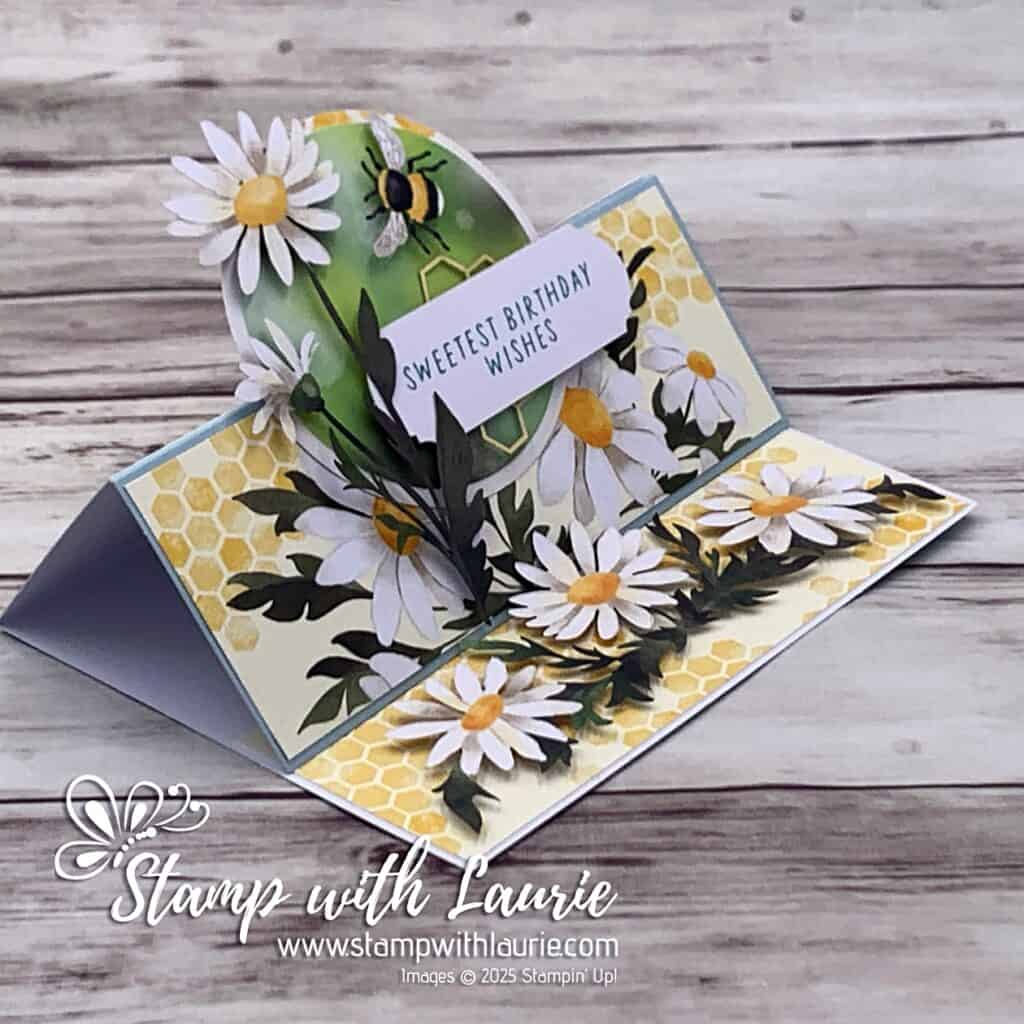
My Easel Card
For my second alternative card, I decided to create an easel card with the daisy chain being used inside as my stopper. So, I scored the front of the Blue Card Base from the Kit in half at 2-1/8” to create my fold.
I used the remaining half of the Daisy card front and cut the back of that card base in half to use one panel for the front and the other panel on the inside.
My Easel Card
For my focal point, I layered several elements from the Kit. I used the leftover circle from the Circle Layered piece to matt the green circle. Then, I added the full-length daisy making sure that when the card was in easel layout that the daisy did not extend beyond the card at the bottom. I tucked in a honeycomb behind my sentiment and popped up the bee. Note: Only add adhesive to the bottom of this circle focal point.
Easel Card Open
For the inside, I added the final panel from the daisy card base and popped up the daisy chain to create the stopper. I love how this looks when the card is in easel form with the daisy chain mirroring the daisies on the card front.
Measurements:
Blue Card base (from Kit):
4 ¼” x 5 ½” scored at 2-1/8”
Daisy Card Base (3 Pieces):
2” x 5-3/8”
Other Pieces from Kit:
Daisy Precut Paper Pieces
Bee Precut Paper Piece
Honeycomb Paper Piece
Green Circle
Leftover Circle
Sentiment Piece
My Faux-Step Card
For my next alternative card using the Daisy Daydream March 2025 Paper Pumpkin Kit, I made a faux-step card.
I used two of the yellow card bases from the kit to create my card. One I trimmed 3 ½” off the full card base to create my centre panel. For the back panels, I used a full card base and scored it according to the measurements listed below. There was a score from the original card that I ignored. Once that panel with the original score was covered up with the card stock and the printed envelop, it was not noticeable. Hence why my mats are 1/8” instead of ¼” …less card base showing.
My Faux-Step Card
For this card, the only extra product that I used was some Balmy Blue Card Stock to mat my pieces. The rest was from envelops which included the front right of the blue envelop and the envelope with the bee on the front. Once the envelope with the bee was cut apart, I was able to use the front piece for the back panel that ran the length of the card. Then, I used the back of the envelope for the bottom panel.
Side of My Faux-Step Card
Again, for my focal point, I layered several pieces from the kit together.
Measurements:
2 Yellow Card Bases:
4 ¼” x 5 ½” scored at 1 ¼”, 2 ½” and 5 ½”
3 ½” x 8 ½” scored at 4 ¼”
Balmy Blue (3 Pieces):
3-3/8” x 4-1/8” (Centre Panel)
1-1/8” x 5-3/8” (Bottom Panel)
2-7/8” x 5-3/8” (Back Panel)
Envelope Pieces:
3 ¼” x 4” (Blue Envelope)
1” x 5 ¼”
2 ¾’ x 5 ¼”
Other Pieces from Kit:
Daisy Precut Paper Piece
Bee Precut Paper Piece
Honeycomb Paper Piece
Green Circle
Sentiment Piece
My Birthday Card
For this alternative card, I decided to use the circle layer on top of the daisy card to create a peekaboo to the daisies below. I added several Daisy Pre-cut Paper Pieces around the sentiment and popped up the bee.
My Birthday Card
Measurements:
Pieces from Kit:
Daisy Card Base
Circle Layer
Daisy Precut Paper Pieces
Bee Precut Paper Piece
Sentiment Piece
My Thank You Card
For my last alternative card, I had the daisy part leftover from the blue envelop and thought it would be pretty peeking through the circle layer.
My Thank You Card
The daisy just fit in the circle to the point that I adhered it directly to the circle layer. If I had popped it up, the edges would have been noticeable. So, instead, I popped up the whole circle layer.
Once again, I layered several pieces, including a large daisy, sentiment, honeycomb, vellum and a bee, from the kit for my focal point. I added an extra bee since I had one leftover.
Measurements:
Blue Envelope
Leftover from faux-step card
Other Pieces from Kit:
Blue Card Base
Circle Layer
Daisy Precut Paper Piece
Bee Precut Paper Pieces
Honeycomb Paper Piece
Vellum Piece
Sentiment Piece
More Information on My Daisy Daydream Alternative Cards
Downloadable Centre-Step Card Template
To download a PDF of the Centre-Step Card Template, please click here or on the picture.
Centre-Step Card Template
For more of my Stampin’ Up! Paper Pumpkin cards, please click here.
You will find the items listed above in my online store.
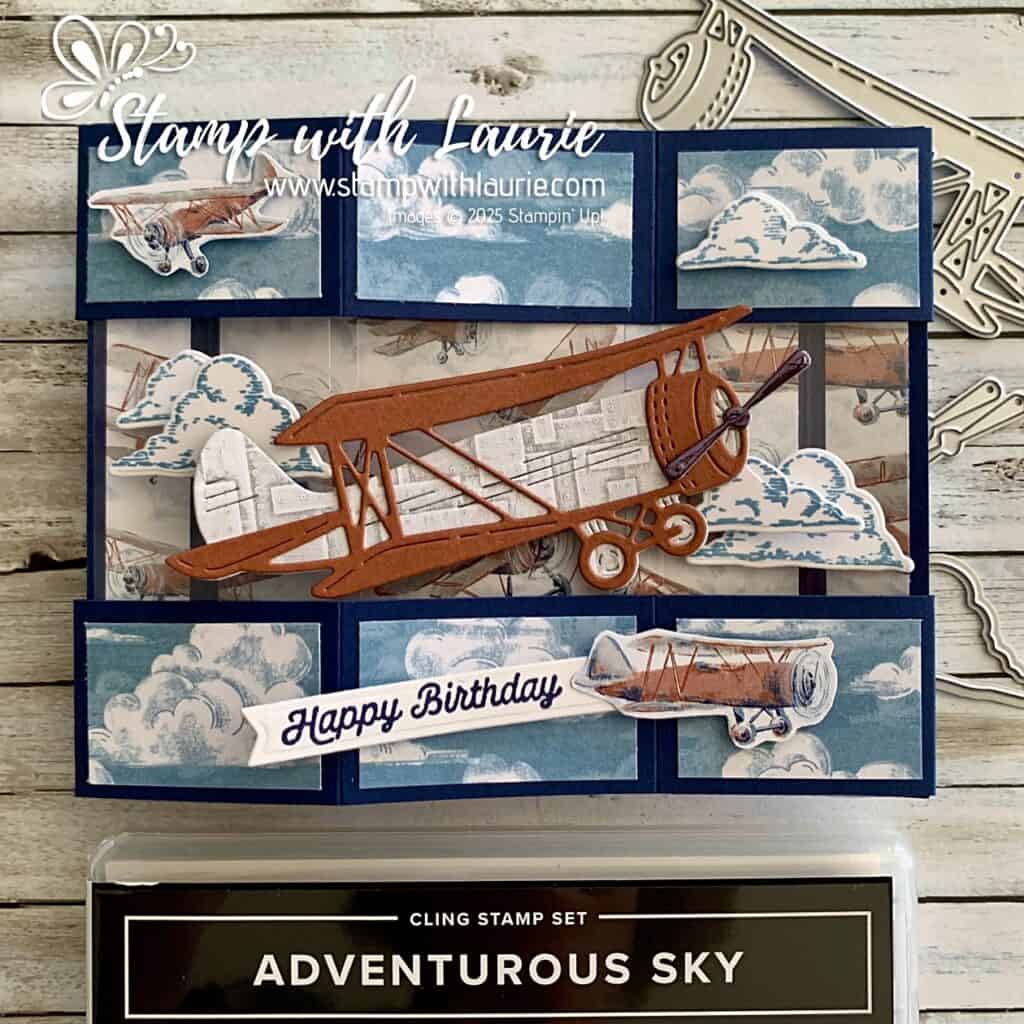
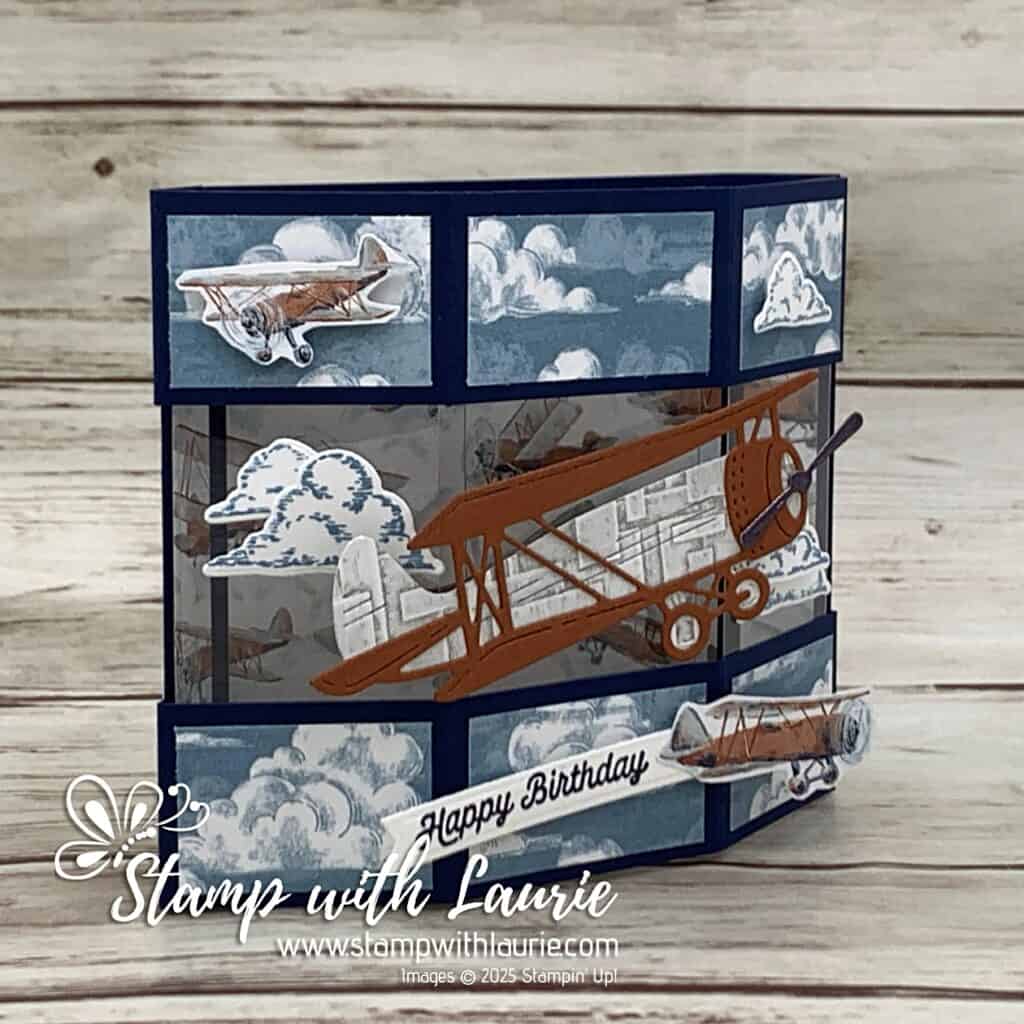
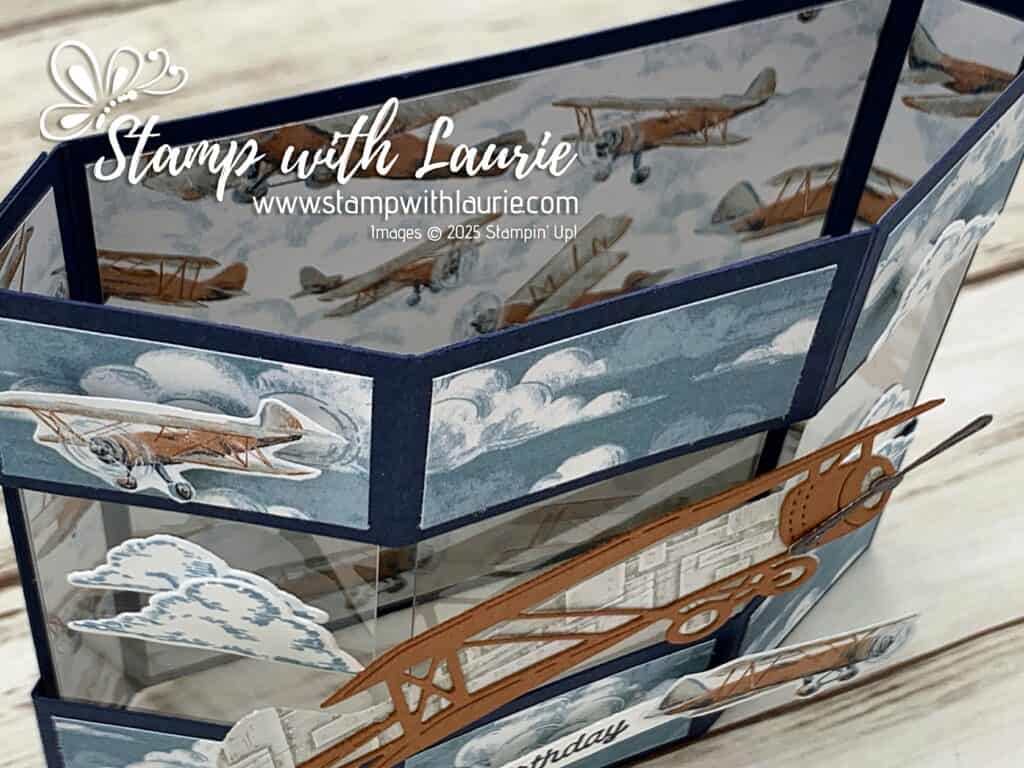
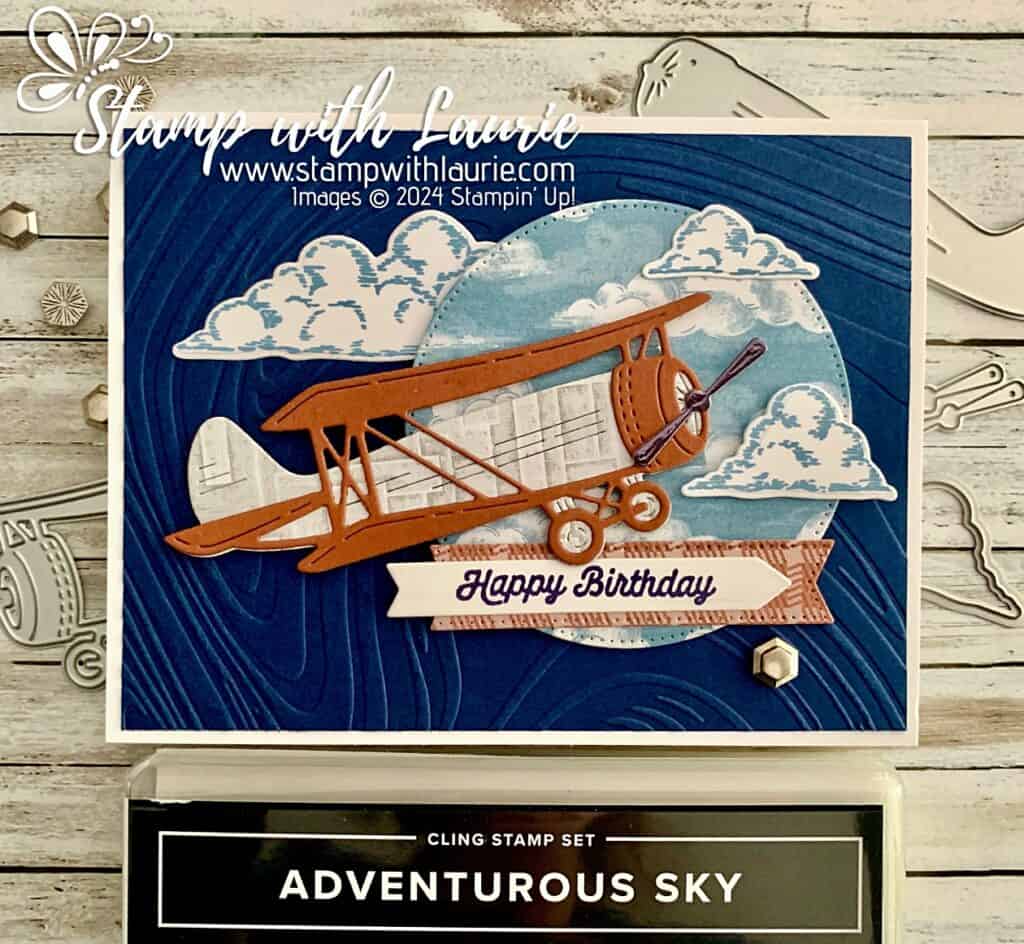
Hello Crafty Friends! Laurie here again! Today is my Father-in-law’s birthday and I know he loves planes! So, I am sharing My Floating Hexagon Card using the Adventurous Sky Bundle by Stampin’ Up! This bundle is retiring and if it was on your wish list, now is the time to get it!
I received a swap card from another Demonstrator recently and she used a Half Hexagon Pop Up Box Card using the Wildflower Birthday Suite Collection, but I thought the Adventurous Sky Bundle would be a fun alternative. When I was researching this fun fold, I discovered that another Demonstrator used this Bundle but made it floating with Window Sheets. So, I combine the two ideas and made my card as a Floating Hexagon Box Card (could also be called a Bandstand Pop Up Card). Don’t you just love all the inspiration out there!
The Details of My Floating Hexagon Card
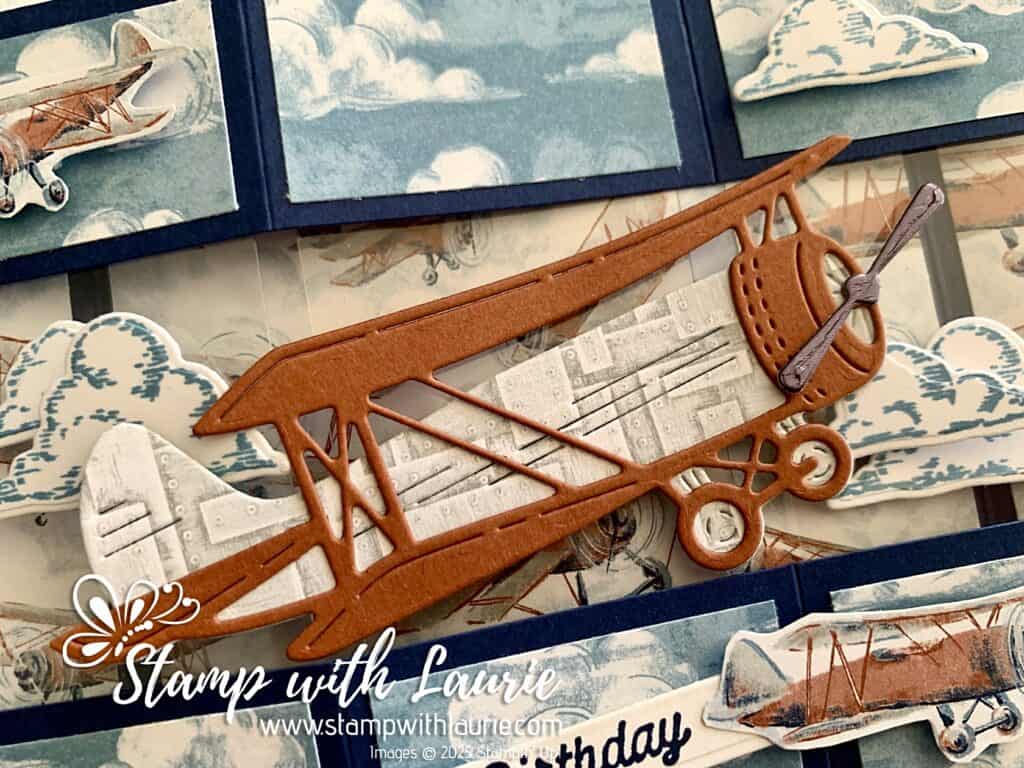
For my card, I decided to use the cloud DSP for the front and side panels and the airplane DSP for the inside panels. I knew that I wanted to use the DSP also for the body of the large die cut plane. I love how it looked on another card that I made (I will post this card at the end). It gives the plane a texture like it was rivetted together.
Side View of Card
Next, I fussy cut two planes from the DSP. I wanted one of them to be pulling the Happy Birthday banner along the bottom of my card.
To create my scene, I used Tear & Tape Adhesive to hold the Window Sheets in place. I tried liquid glue, but it wasn’t strong enough. Then, I decorated them with Boho Blue stamped clouds using liquid glue and then dimensionals for the clouds on top. I added the large plane that I built with liquid glue to the centre window panel with dimensionals.
Top View of Card
The finishing touch was to add another cloud and a fussy cut plane to the top of the panels to balance out the plane and banner below.
I placed a Basic White piece on the back for the message.
Inks: Boho Blue Classic Stampin’ Pad (161650), Night of Navy Classic Stampin’ Pad (147110)
Paper: Night of Navy (100867), Basic White (166780), Copper Clay (161721), Textured Metallic Specialty Paper (163772), Take to the Sky 12” x 12” Designer Series Paper (163436)
Accessories: Window Sheets (142314), Paper Snips (103579), Stampin’ Paper Trimmer (152392), Bone Folder (102300), Stampin’ Dimensionals (104430), Mini Stampin’ Dimensionals (144108), Stampin’ Seal (152813), Tear & Tape Adhesive (154031), Multipurpose Liquid Glue (110755)
Close Up of Focal Point
Measurements:
Night of Navy:
5-3/8” x 4 ¼” scored at ¾” and 4-5/8”
7” x 1 ¼” scored at ¾”, 2 ½”, 4 ½” and 6 ¼” (2 pieces)
Basic White (7 pieces):
3 ¾” x 4” (for Back)
Scrap for Sentiment
Scraps for 5 Clouds
Copper Clay:
Scrap for Large Die Cut Plane
Textured Metallic Specialty Paper:
Scrap for Propeller
Window Sheets (3 pieces)
1 ½” x 4” (2 pieces) and 1 ¾” x 4”
Take to the Sky 12” x 12” Designer Series Paper (12 Pieces):
8 Sky pieces total: 1 ½” x 1” (4 pieces), 1 ¾” x 1” (2 pieces) and ½” x 4” (2 pieces)
3 Plane pieces: 3 ¾” x 4” and ½” x 4” (2 pieces)
Scrap for Large Die Cut Plane
2 Planes Fussy Cut from DSP
More Information on My Floating Hexagon Card
I made a while back another card with this Bundle which you can find here.
My Adventurous Birthday Card
For more of my Stampin’ Up! cards, please click here.
You will find the items listed above in my online store.
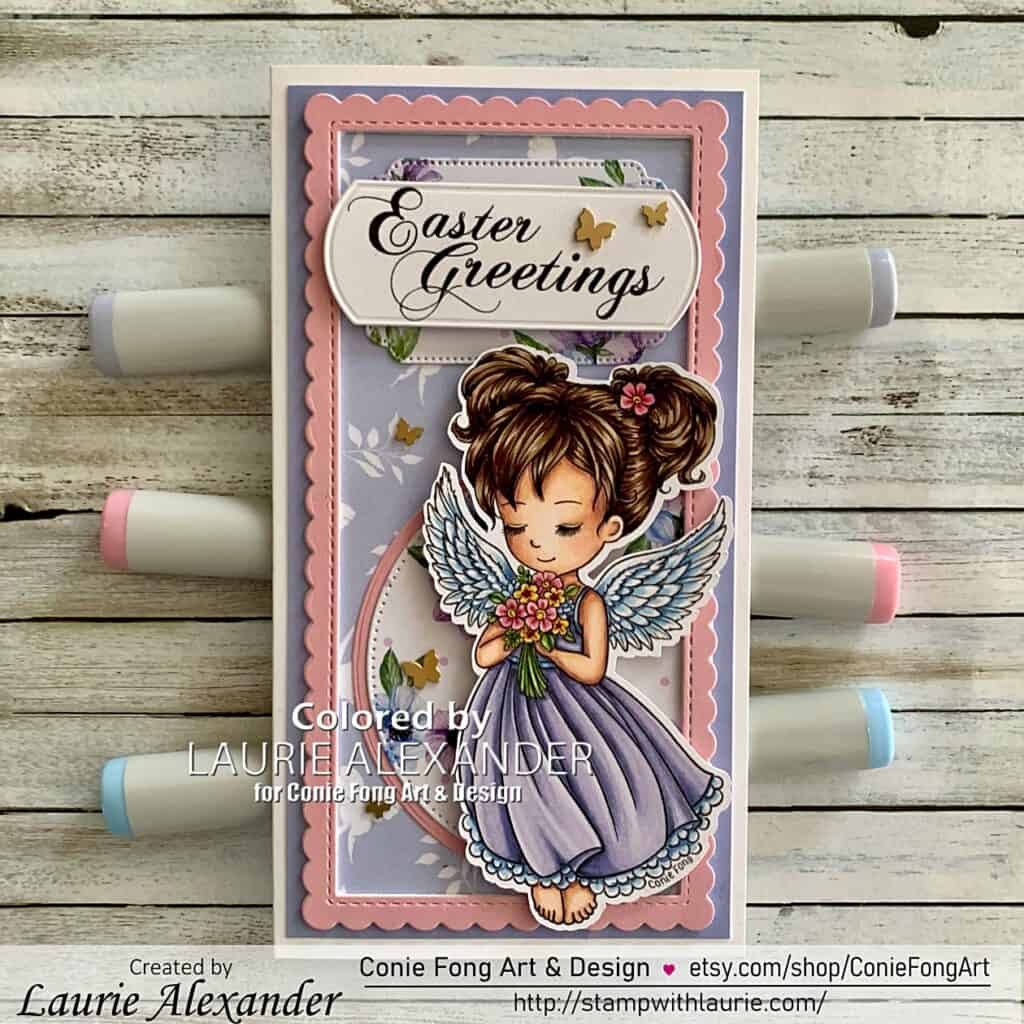
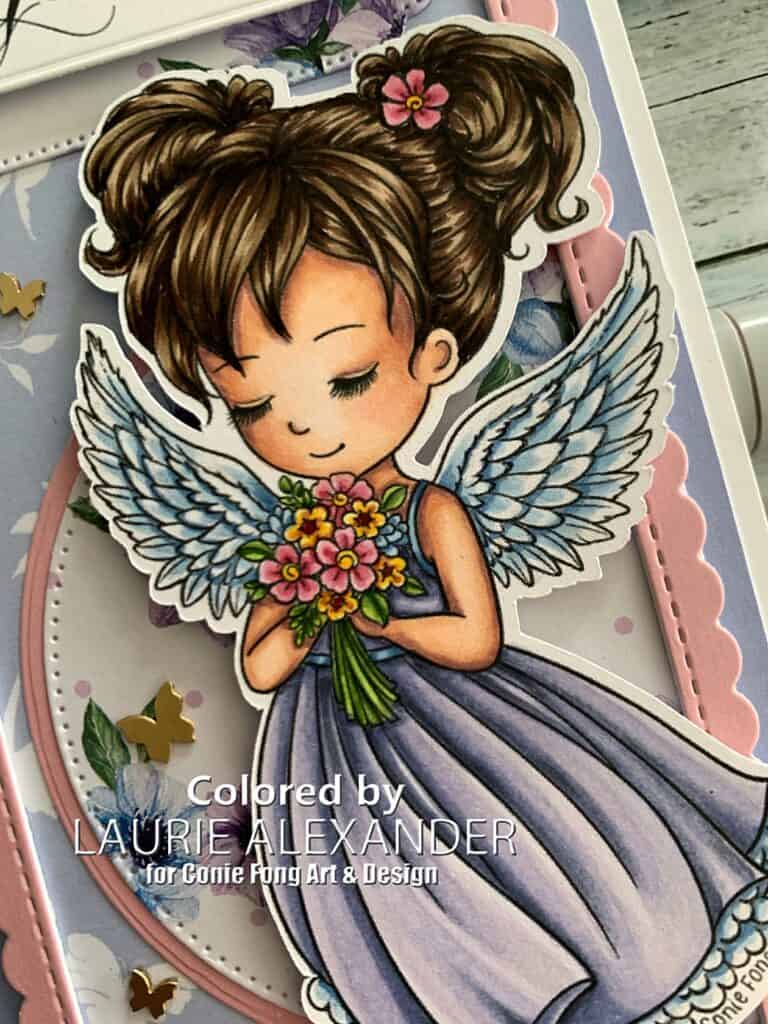
Hello Crafty Friends! It’s Laurie here! I am sharing My Easter Greetings Card as my Design Team Inspiration Card for Conie Fong Art & Design using the sweet Angel Wishes. This purchase includes 2 Images with Angel facing left and right.
The Details of My Easter Greetings Card
For my card, I decided to create a mini slimline Easter card with this sweetie! So, I knew that I wanted to colour her with my Copic markers in soft pastel Easter colours of purples, pinks, yellows and greens. For the purple, I decided to use my BVs instead of my traditional Vs to match the papers. Another big departure for me is that I coloured her wings in B45/B41. I usually use much lighter colours like B000/B00 or BG10/BG11. My colour choices were out of my comfort zone, but I was pleased with how she turned out!
For the designer paper, I used two different paper packs. The butterfly paper in the background was from Spring Whispers and the florals was from Sweet Tweets both by The Paper Boutique. The Spring Whispers Coloured Card Collection made it easy to match my papers!
To anchor my Angel, I added a stitched circle and another circle mat. I had debated about using the Tulip Doily for my card, but decided it was too busy. However, the inside circle die from the Tulip Doily was the perfect fit for the mat of my stitched circle. I offset the circle and trimmed off the excess.
The sentiment was already on my desk leftover from anther card. It was from the Easter Bunny Trio Bundle. I added a stitched die cut behind my sentiment with the same paper to tie in the floral paper behind my focal point.
To add some sparkle, I used my Clear Star Gelly Roll Pen on her wings and the ruffle of her dress. To create a soft look, I smooshed my finger on the ink before it dried.
The finishing touch was a scattering of butterflies to match the butterflies in the designer paper.
————————–
Copic Markers:
Skin: E000/E00/E21/E11/E04/R20 Hair: E49/E47/E44/E43 Dress: BV34/BV31/V20 Wings/Dress Ruffle: B45/B41/Clear Star Gelly Roll Pen Pink Flowers: R85/R83/R81/Y15 Yellow Flowers: Y17/Y15/Y11/E15 Blue Flowers: B45/B41 Leaves/Stems: YG67/YG63/YG03
Close Up of Angel Wishes
————————–
Card Recipe for My Easter Greetings Card:
Angel Wishes, Conie Fong Art & Design Easter Bunny Trio Bundle, Conie Fong Art & Design Paper Basics – Stamper’s Select White Cardstock, Papertrey Ink Spring Whispers Coloured Card Collection, The Paper Boutique Spring Whispers Decorative Papers, The Paper Boutique Sweet Tweets Decorative Papers, The Paper Boutique Mini Slimline Stitched Scalloped Rectangle Die, Pink Fresh Studio Tulip Doily Creatables Die, Marianne Design Unbounded Love Dies, Stampin’ Up! Stylish Shapes Dies, Stampin’ Up! Brushed Brass Butterflies, Stampin’ Up! Clear Star Gelly Roll Pan, Sakura
Finished card size: 6 ½” x 3 ½”
————————–
To view my other Conie Fong Art & Design projects, please click here.
Hope you like my Design Team Inspiration Card using Angel Wishes for Conie Fong Art & Design!
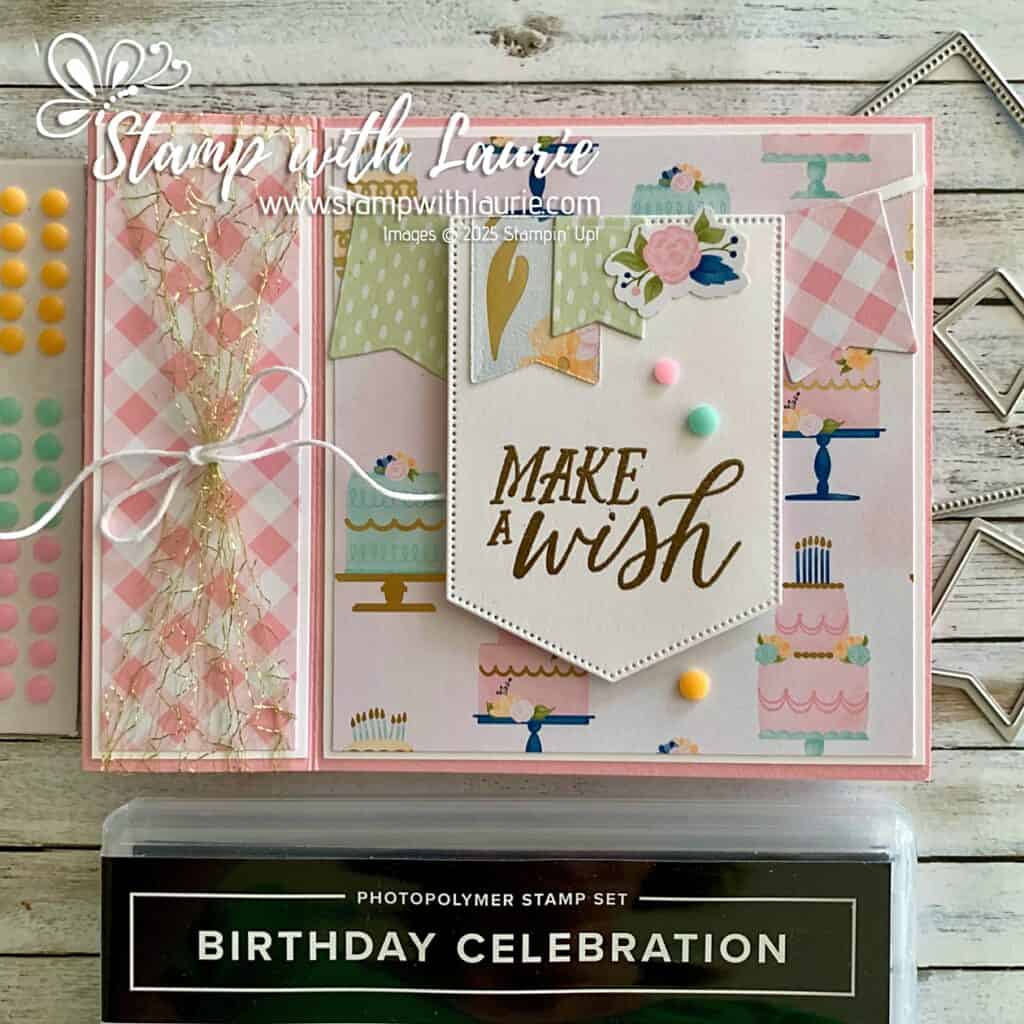
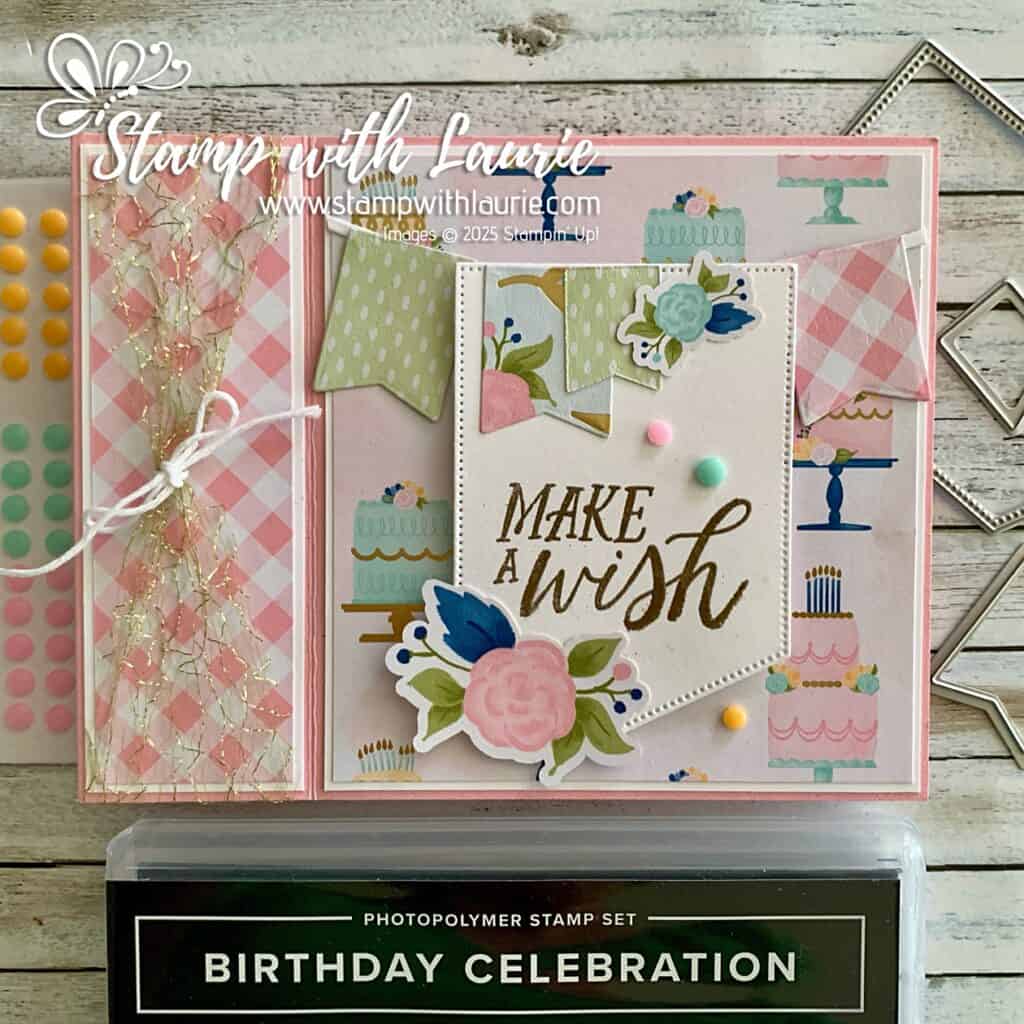
Hello Crafty Friends! Laurie here again! I am sharing My Birthday Wish Card using the Wildflower Birthday Suite Collection by Stampin’ Up! I wanted to try a book binding card, and I thought the Wildflower Birthday Specialty Designer Series Paper would make a very pretty card.
The Details of My Birthday Wish Card
For my card, I used two different pieces of DSP for the “binding” and the “cover”. Since it was a birthday card, I decided to use the birthday cake piece and the pink plaid with Basic White mats to distinguish them from the Pretty in Pink card base.
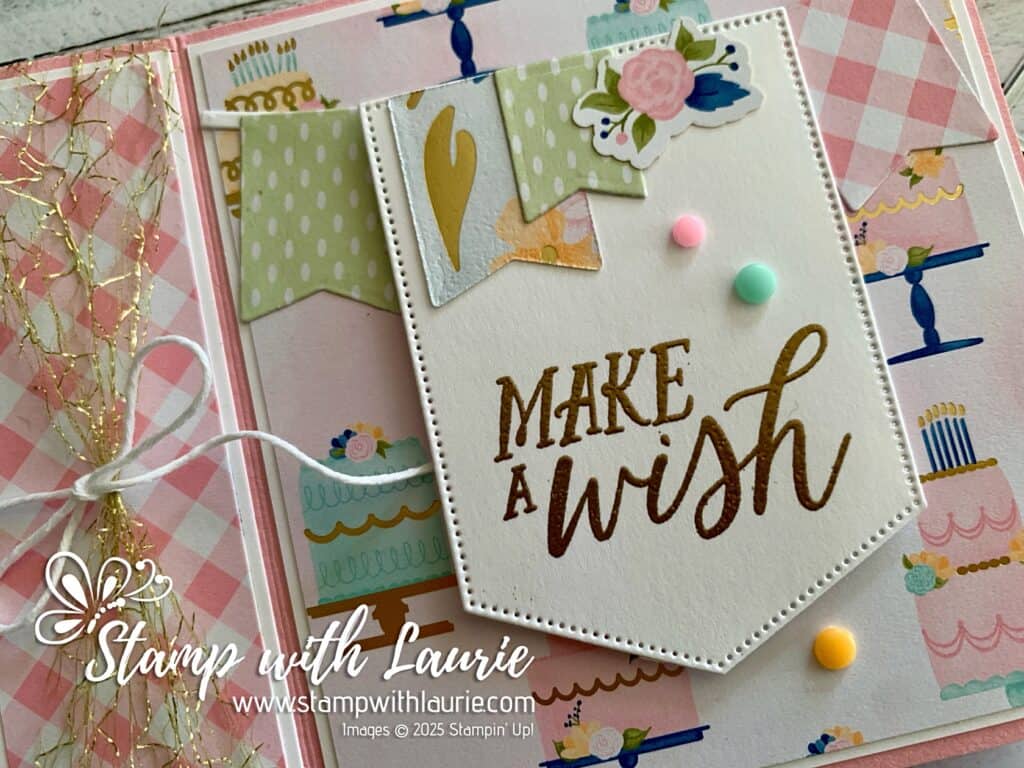
Next, to match the gold accents in the DSP, I heat embossed the sentiment on the Basic White flag. Then, I added two DSP flags and one of the floral die cuts to decorate it. I love that the die cuts make it so easy to decorate your cards! In fact, I made another card with the same style, but added a large floral die cut to the bottom of the flag. Since my cards were for a swap, I didn’t have enough of these die cuts for all of them. So, for my finished card, I omitted it.
Alternative Card
To create my banner, I added a few more flags behind my sentiment flag and had everything hung from a Basic White die cut “rope” that I trimmed with my Paper Snips to fit.
To decorate my card further, I used the Gold Open Weave Trim to match my embossing. The width of the trim just fit, but I thought a White Baker’s Twine bow would help keep it in place.
As a finishing touch to my card, I added some Party Dots in matching colours to my card on and below my flag sentiment.
Supplies:
Stamps/Bundles/Dies: Wildflower Birthday Suite Collection (164604)
Inks: VersaMark Ink (102283)
Paper: Pretty in Pink (163793), Basic White (166780)
Accessories: Baker’s Twine Essentials Pack (155475), Metallics Embossing Powder (165678), Heat Tool (129053), Embossing Additions Tool Kit (159971), Paper Snips (103579), Stampin’ Paper Trimmer (152392), Bone Folder (102300), Stampin’ Dimensionals (104430), Mini Stampin’ Dimensionals (144108), Stampin’ Seal (152813), Mini Glue Dots (103683), Multipurpose Liquid Glue (110755)
Close Up of Focal Point
Measurements:
Pretty in Pink:
11” x 4 ¼” scored at 4” and 5 ½”
Basic White (4 pieces):
3-7/8” x 4-1/8”
1-3/8” x 4-1/8″
2 ¼” x 3” (Banner)
Scrap for “Rope”
Wildflower Birthday Specialty Designer Series Paper (6 Pieces):
1 ¼” x 4”
3 ¾” x 4″
Scraps for 4 Flags
Floral Die Cut
More Information on My Birthday Wish Card
For more of my Stampin’ Up! cards, please click here.
You will find the items listed above in my online store.
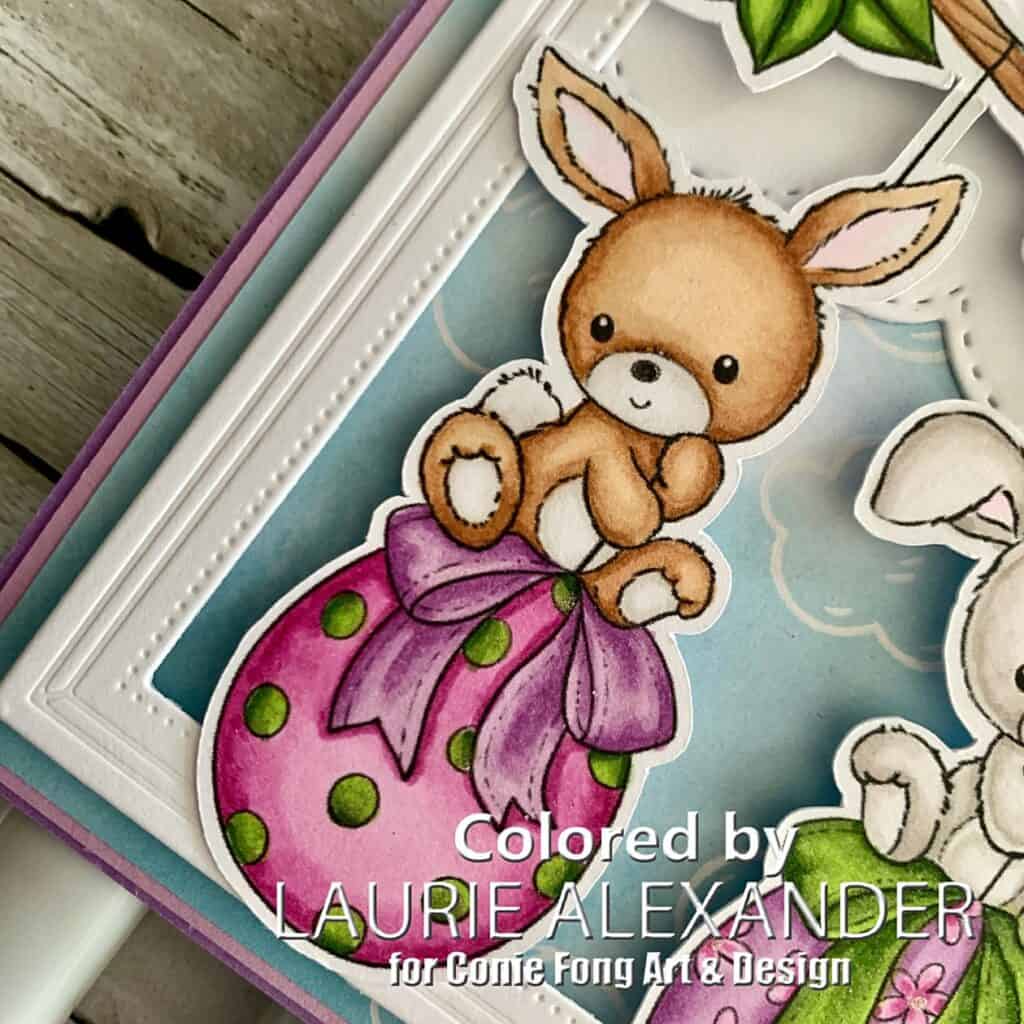
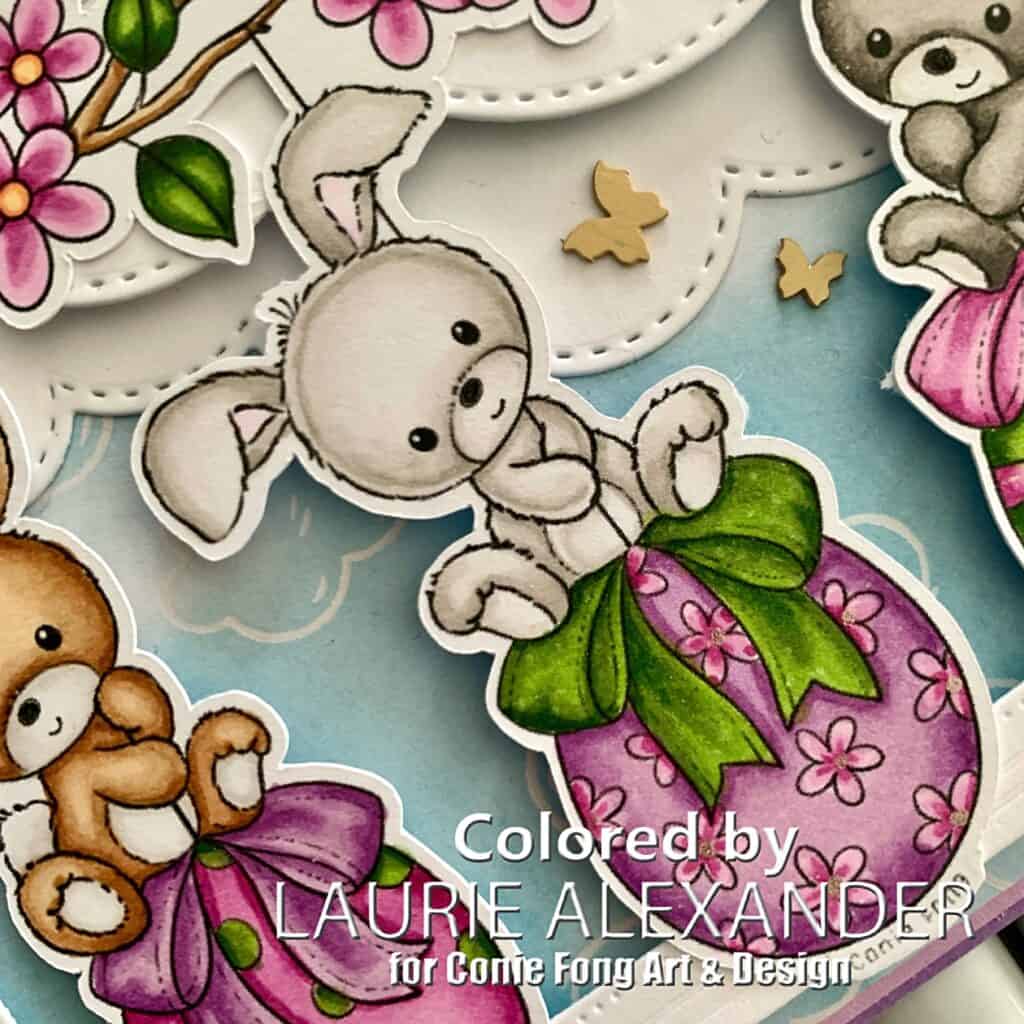
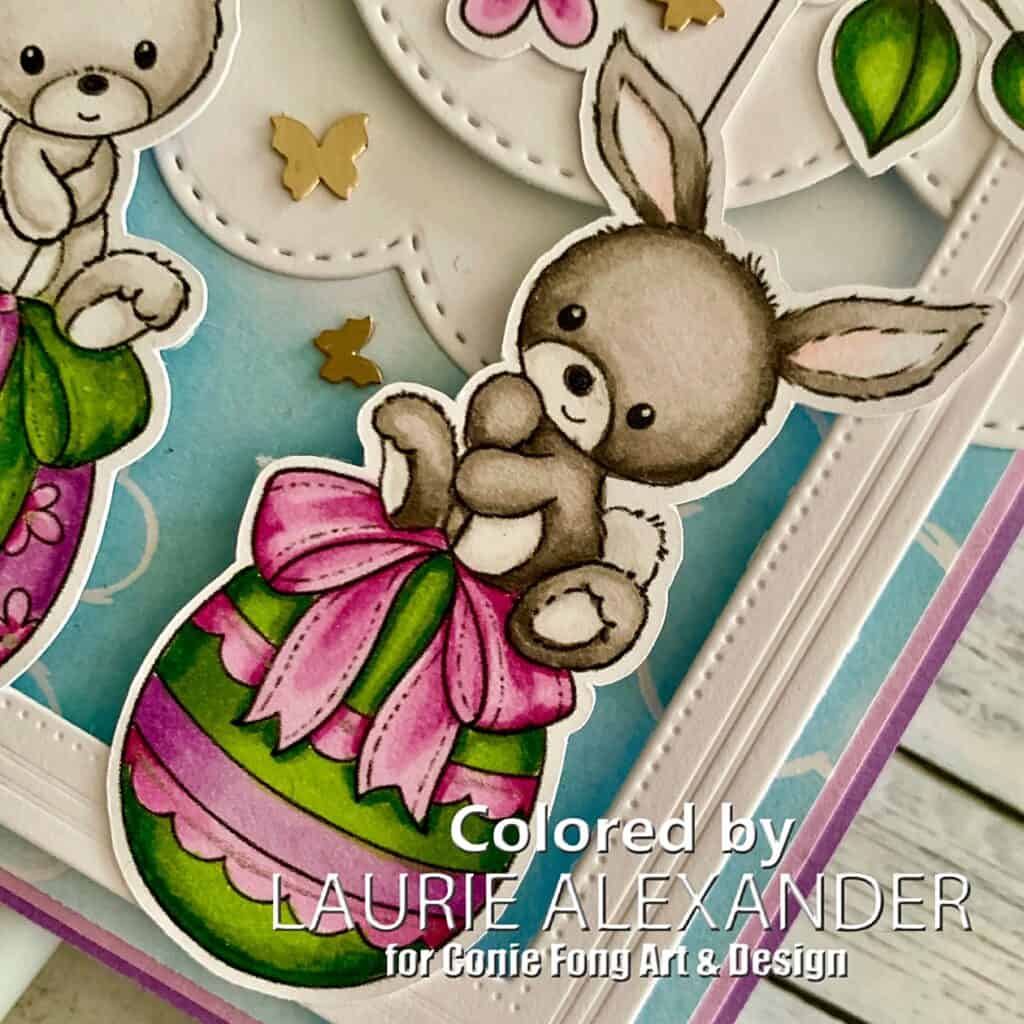
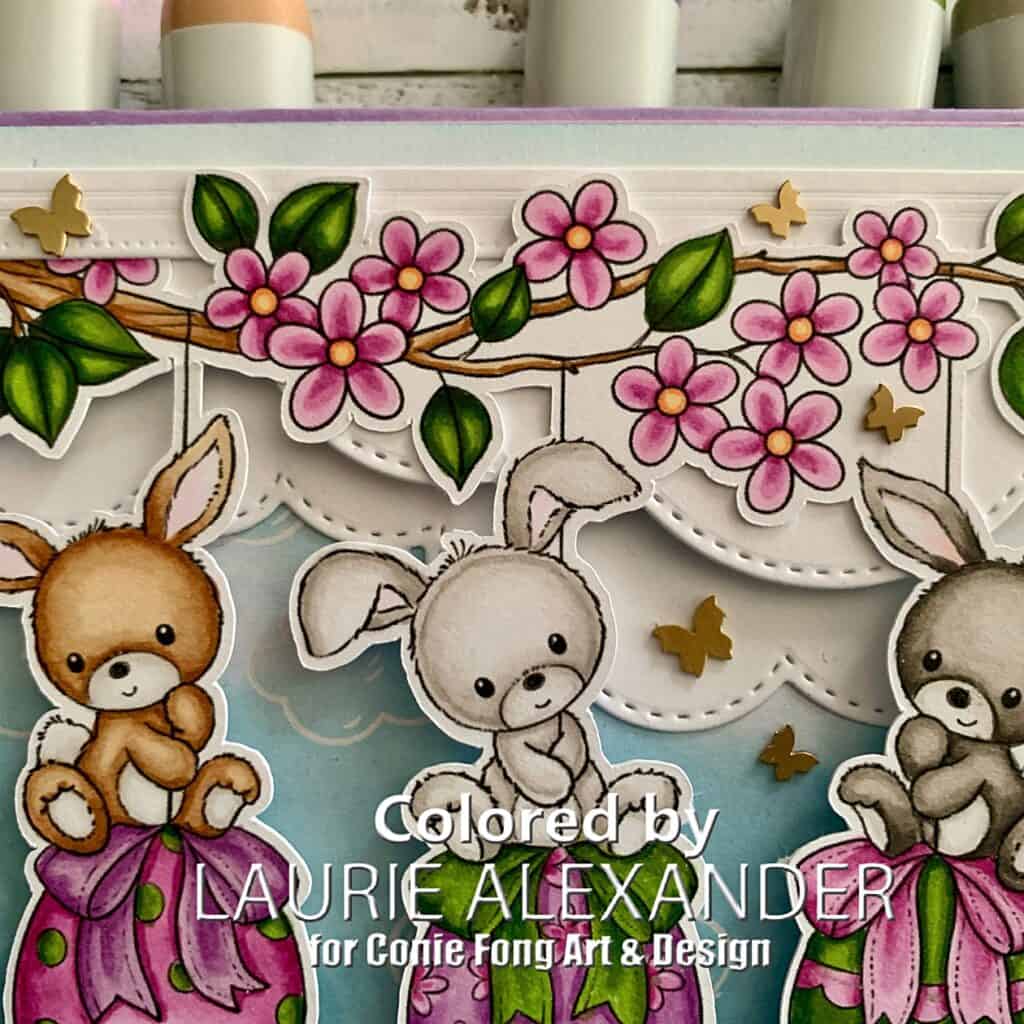
Hello Crafty Friends! It’s Laurie here! Easter is coming! So, I am sharing my Easter Bunny Trio Card as my Design Team Inspiration Card for Conie Fong Art & Design using the Easter Bunny Trio Bundle. This purchase includes 8 Images:
Easter Bunny Trio with Branch PNG
Easter Bunny Double PNG (this image includes 2 bunnies hanging on eggs as shown)
Easter Bunny Trio PNG (this image does not have the branch)
Easter Bunny 1, 2, and 3 PNG (Three individual image of the bunnies (right, middle, left) with longer string for layering images)
Sentiment: Some Bunny Loves You – PNG
Sentiment: Happy Easter – PNG
The Details of My Easter Bunny Trio Card
I had so much fun colouring with my Copic markers the bunnies’ fur in different colours and their eggs in Easter colours of pink, purple and green. I knew that I wanted the flowers in the tree to look like cherry blossoms in pinks with yellow centres.
For my card, I decided to create an Easter scene that is bursting from the frame. Literally! Lol! So, I die cut some stitched clouds and brushed some Balmy Blue Ink along the top edges of the clouds and where the two clouds over lap. This allowed the frame to pop out from the clouds and gave the clouds dimension.
Once the clouds were done, I picked out some DSP that had sky and clouds. The clouds on the DSP have a UV coating for a fun shine!
Next, was to find the perfect frame for my focal point of the bunnies. I decided to go with a frame smaller than my scene to give my card a fun whimsical feel. I tucked the top of the branch underneath the frame, but had the rest of the branch, flowers and bunnies poking out.
To add sparkle to my card, I used my Wink of Stella on the ribbons and Clear Star Gelly Roll Pen on the accents, like the polka dots, flowers and scallops on the eggs. For the bunnies’ noses, I used a Black Gelly Roll Pen to make them stand out.
A finishing touch was to add a scattering of brass butterflies around my card.
————————–
Copic Markers:
Brown Bunny Bunny: E35/E33/E31/E30/W3/W1/0 RV00 Egg: RV66/RV63/RV52/YG67/YG63/YG03 Ribbon: V15/V12/V01
Brown Bunny
White Bunny Bunny: W3/W2/W0/0/RV00 Egg: RV66/RV63/RV52/V15/V12/V01 Ribbon: YG67/YG63/YG03
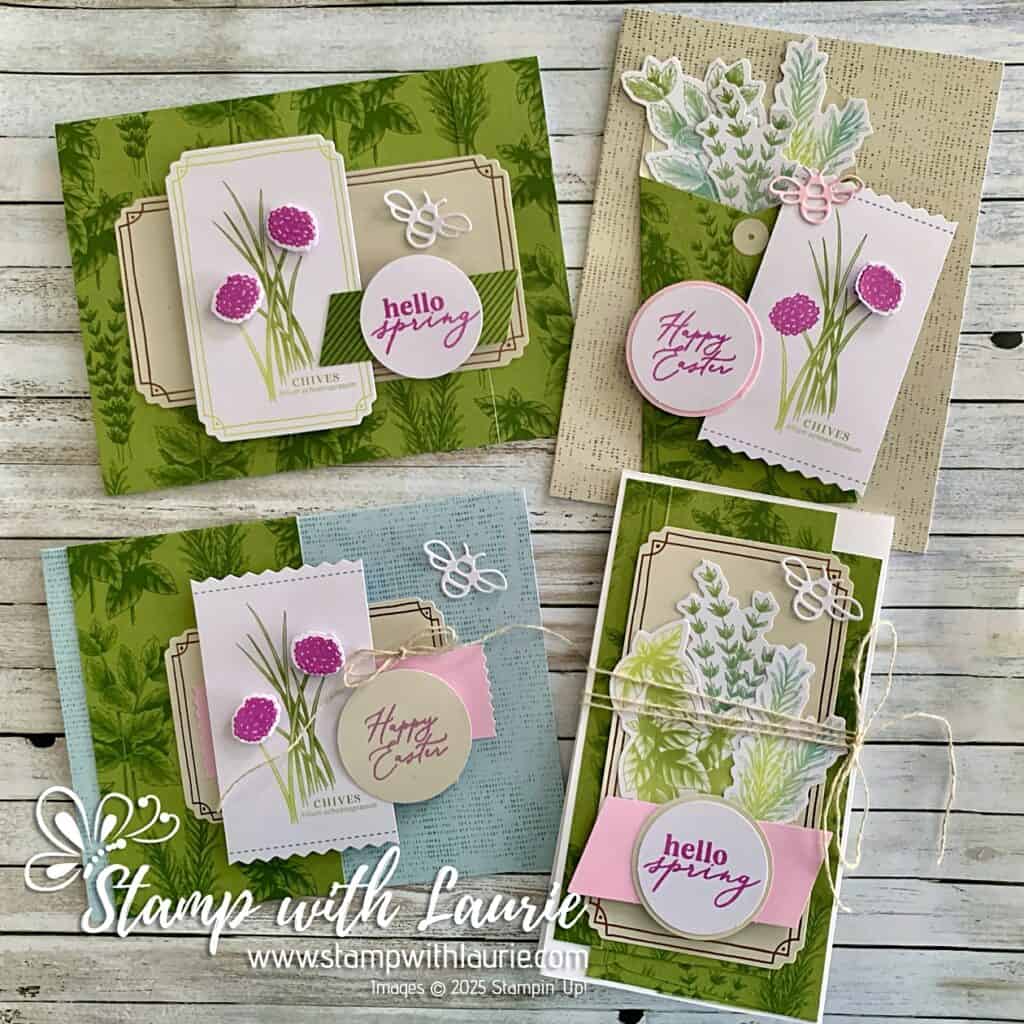
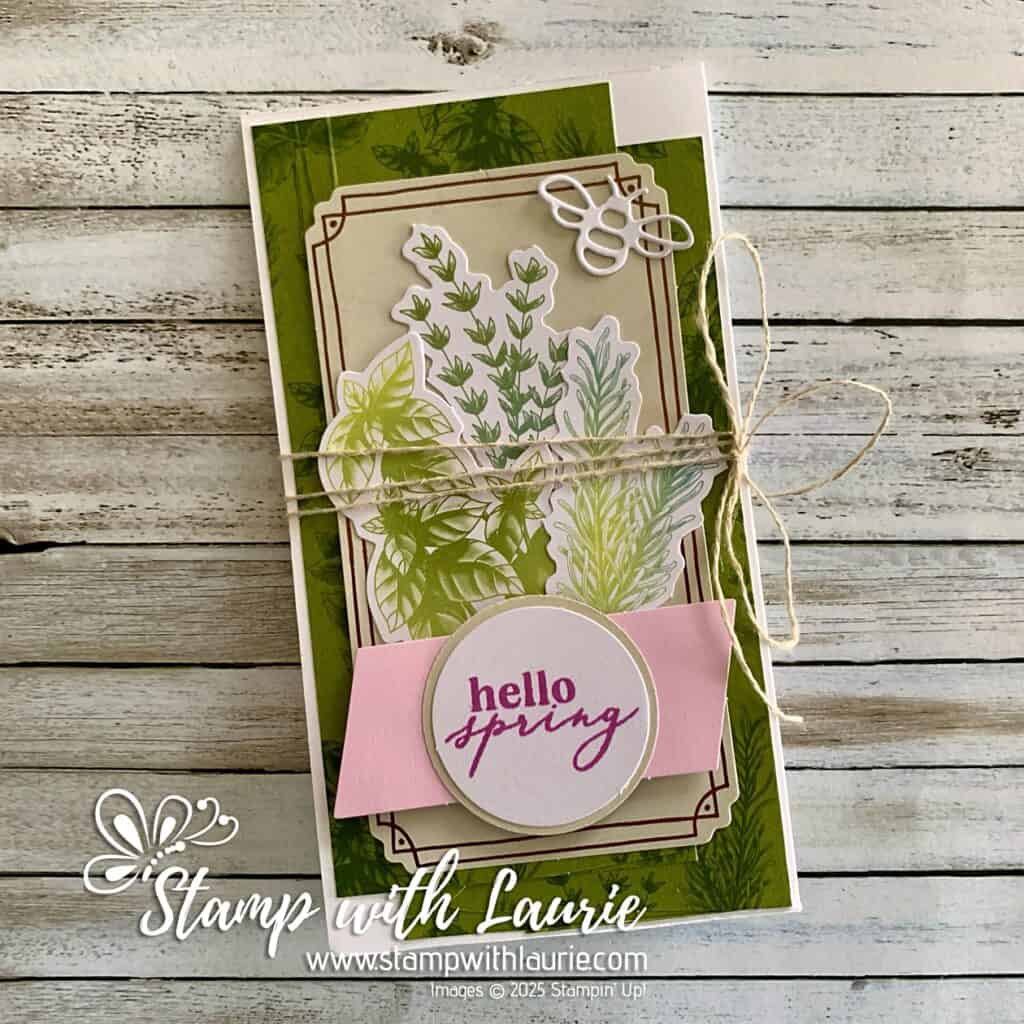
Hello Crafty Friends! Laurie here again! I am sharing my Hello Spring Alternative Cards using the Hello Spring February 2025 Paper Pumpkin Kit by Stampin’ Up! I am so over winter and ready for Spring. So, these cards helped to put me in the mood for new growth and warmer weather. I had so much fun with this Kit that I made 4 cards including a slimline quad fold pocket card and a triple panel bridge card!
But, first, here are the three cards that the kit makes. Perfect for this time of year in their bright cheery colours!
Hello Spring February 2025 Paper Pumpkin Kit
The Details of My Hello Spring Alternative Cards
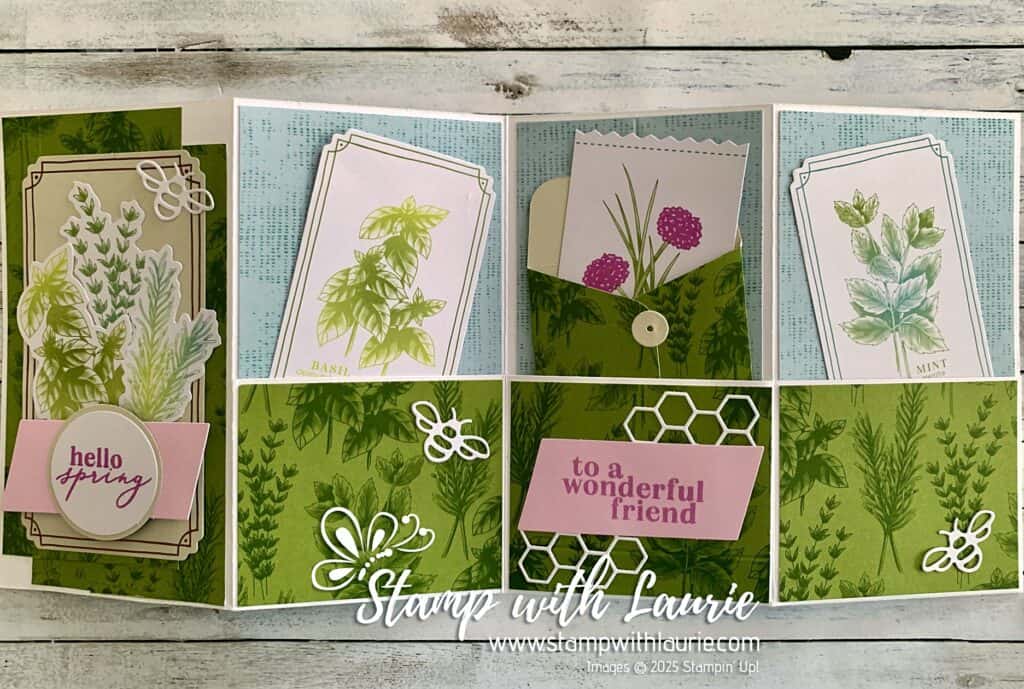
My Slimline Quad Fold Card
For my first alternative card, I thought it would be fun to create a slimline card with pockets into which the seed cards would fit. I even used the Grow with Love Dies to cut down one of the envelopes that came in the kit to create an envelope for my Chives card.
My Slimline Quad Fold Card
For the front, I used the leftover pieces from two envelopes (see Card 4 for second leftover piece) to create some interest behind my Bronze Foil Piece. I thought a bouquet of herbs sprouting from the sentiment would be fun! I used a 1 ½” circle punch to punch out a Basic Beige circle from the Bronze Foil Piece and matted it behind the sentiment. Since the herbs were in front of it, you couldn’t see the missing part. Finally, I added a bee from the Spring Is in the Air Dies.
My Slimline Quad Fold Card Laid Flat
For the inside, I used two card bases to line my pockets. More bees and honeycomb from the Spring Is in the Air Dies decorated the inside along with a sentiment.
The finishing touch was the linen wrapped three times around the card to hold it closed and tied in a bow.
Measurements:
Basic White Card Base:
8” x 12” – scored at 3”, 6”, 9” along 12” side and 5 ½” along 8” side
Scraps for bees and honeycomb
Blue Card Base (3 pieces):
2-7/8” x 3 ½”
Green Card Base (3 pieces):
2-3/8” x 2-7/8”
Envelope Leftovers (2 pieces):
5” x 2-3/8”
Other Pieces from Kit:
Herb Precut Paper Pieces
Herb Cards
Bronze Foil Piece
Sentiment Pieces
Linen Thread
Seed Packet Envelope
My Triple Panel Card
For my second alternative card using the Hello February 2025 Paper Pumpkin Kit, I made a triple panel card. I love it when the card is closed, and the insides are hidden creating a nice surprise as the recipient opens the card!
My Triple Panel Card
So, I cut the green card base at 1” on either side to create the struts to which the bridge will be adhered. The larger Bronze Foil Piece from the kit fitted the bridge perfectly! Then, using the scraps from the precut paper pieces, I stamped and die cut the flower heads and another bee from the Spring Is in the Air Dies.
For the middle panel, I punched a 1 ½” circle from another Bronze Foil Piece and layered it behind my sentiment and the mint precut paper piece.
Middle Panel of Triple Panel Card
For the final panel, I stamped the textured stamped multiple time in Petunia Pop on Petunia Pop card stock for a tone-on-tone look. Then, I layered the smaller Bronze Foil Piece with the basil precut paper piece leaving room for a message.
Last Panel of Triple Panel Card
Measurements:
Green Card Base:
Cut at 1” and 4 ½”
Basic White:
Scraps for Bees and Flower Heads
Petunia Pop:
4” x 5 ¼”
Other Pieces from Kit:
Chives Card
Herb Precut Paper Pieces on Inside
Bronze Foil Pieces
Green Diagonal Strip Piece
Sentiment Pieces
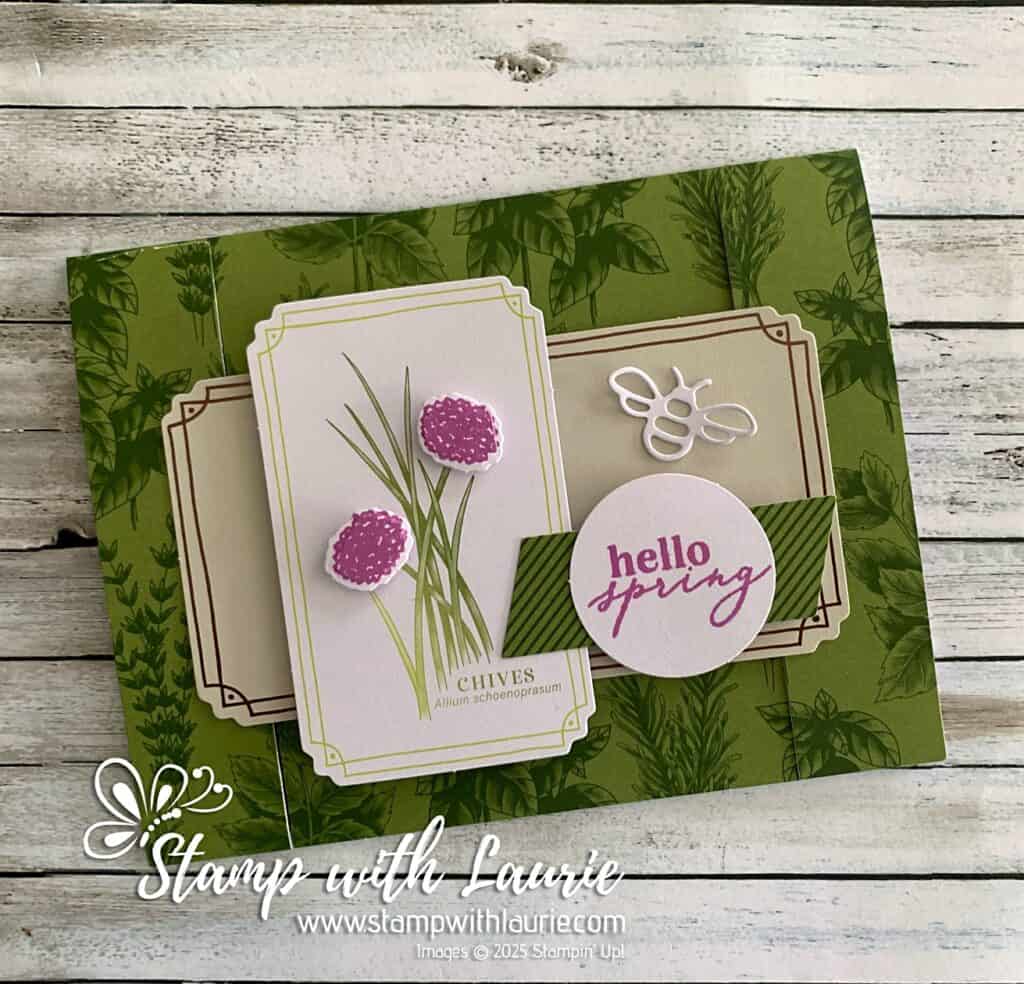
My Happy Easter Card
For my next alternative card, I decided to use the green card base scrap left over from another card. This created a nice band on the left side.
My Happy Easter Card
For my focal point, I layered several elements from the Kit. Again, I used my 1 ½” punch to punch a circle from the Bronze Foil Piece making sure to have it on the left side and hidden by the Chives card.
Next, I stamped and die cut the flower heads and another bee from the Spring Is in the Air Dies. I just love these dies, especially that bee!
Measurements:
Green Card base:
2 ½” x 4 ¼”
Basic White:
Scraps for Bees and Flower Heads
Other Pieces from Kit:
Blue Card Base
Chives Card
Bronze Foil Piece
Sentiment Pieces
Linen Thread
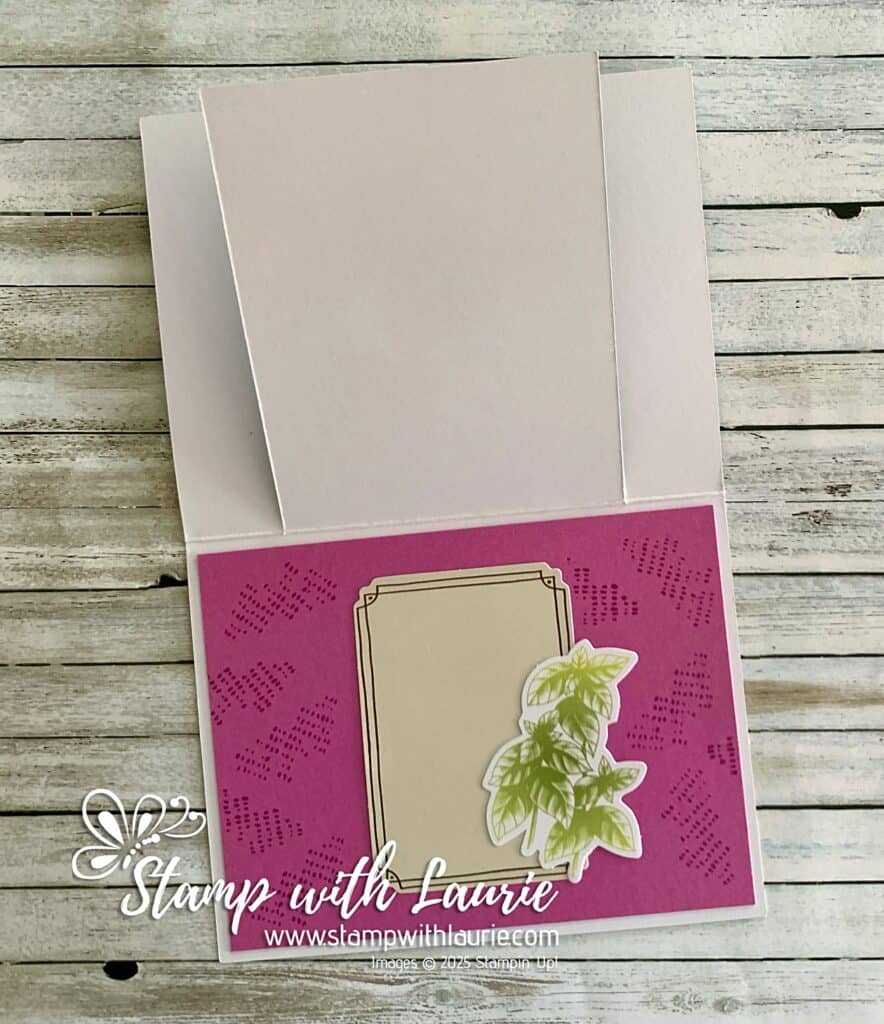
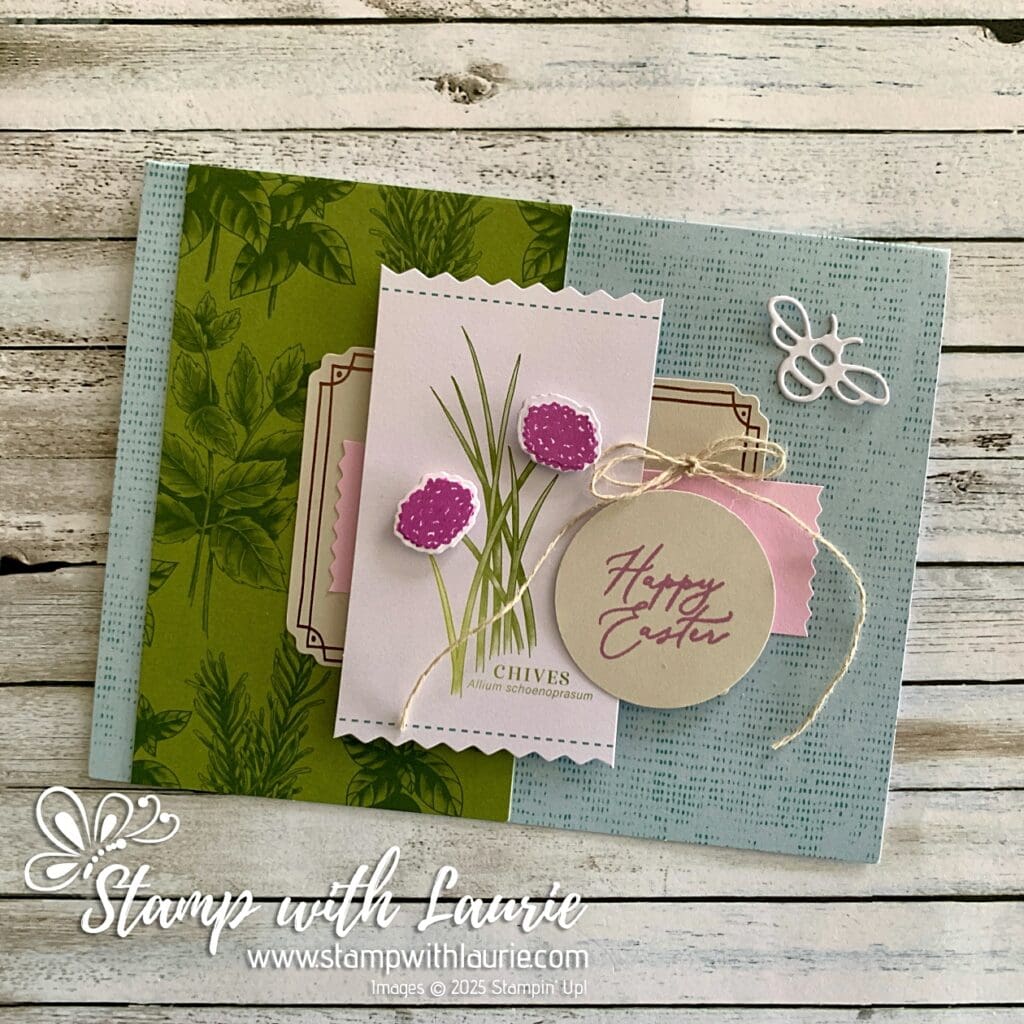
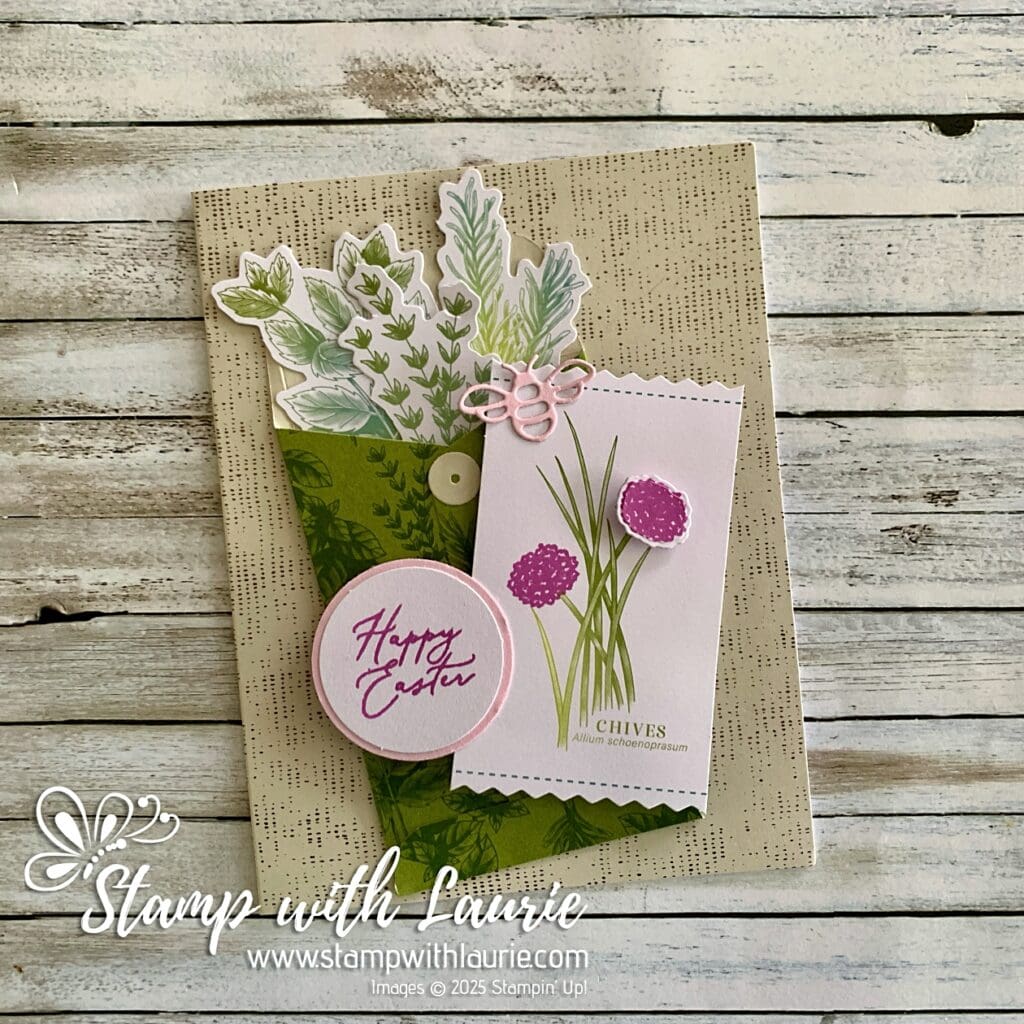
My Happy Easter Pocket Card
For my last alternative card, I decided it would be fun to die cut another mini envelope from the seed packet envelopes (use the scraps from this one for the Slimline Quad Fold Card) and have the herbs sprouting from it.
My Happy Easter Pocket Card
So, I used the used the Grow with Love Dies to create my envelope. The Beige fastener was die cut from leftover scraps of the envelope.
I stamped the sentiment and added a Bubble Bath mat to it. To match the mat, I die cut another butterfly using the Spring Is in the Air Dies, but this time in Bubble Bath.
I decided to only stamp and die cut one flower hear to give the image dimension to it.
Measurements:
Basic White:
Scraps for Flower Head
Bubble Bath:
1 ½” Circle
Scraps for Bee
Other Pieces from Kit:
Beige Card Base
Chives Card
Herb Precut Paper Pieces
Sentiment Piece
Seed Packet Envelope
More Information on My Hello Spring Alternative Cards
For more of my Stampin’ Up! paper Pumpkin cards, please click here.
You will find the items listed above in my online store.
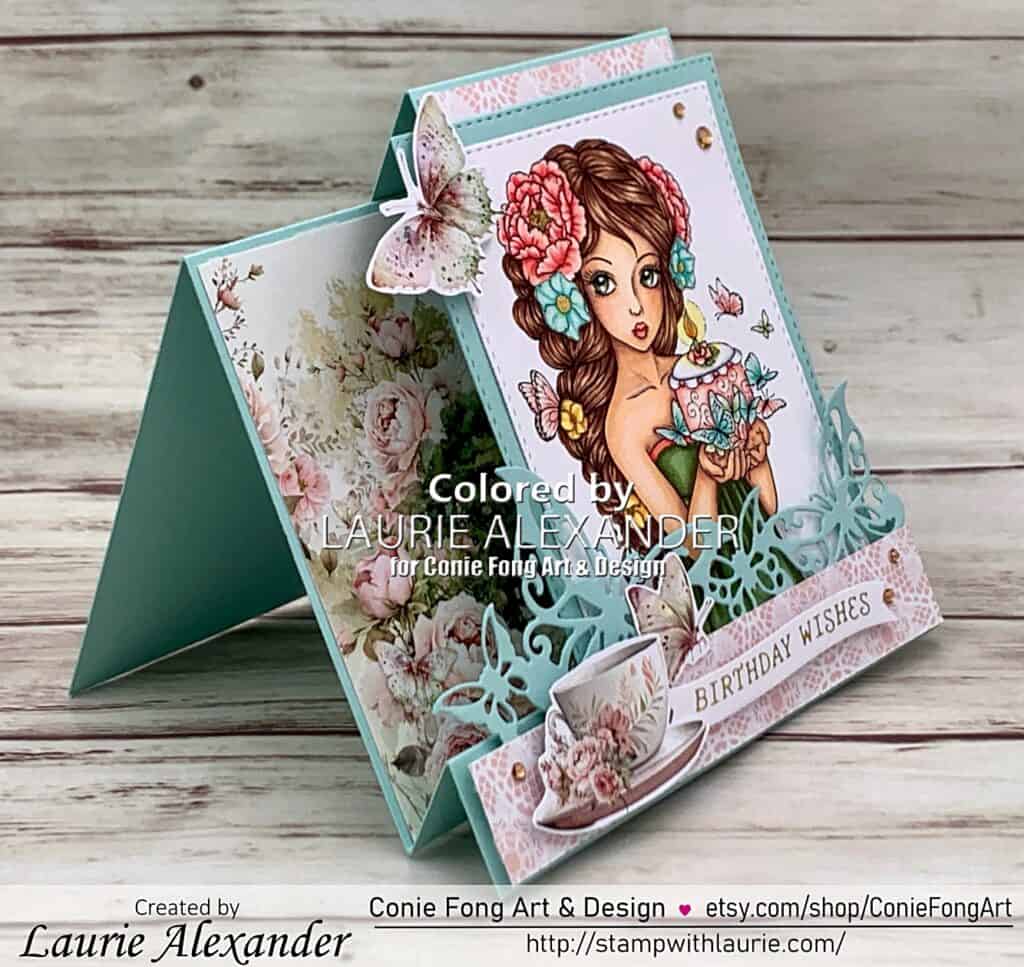
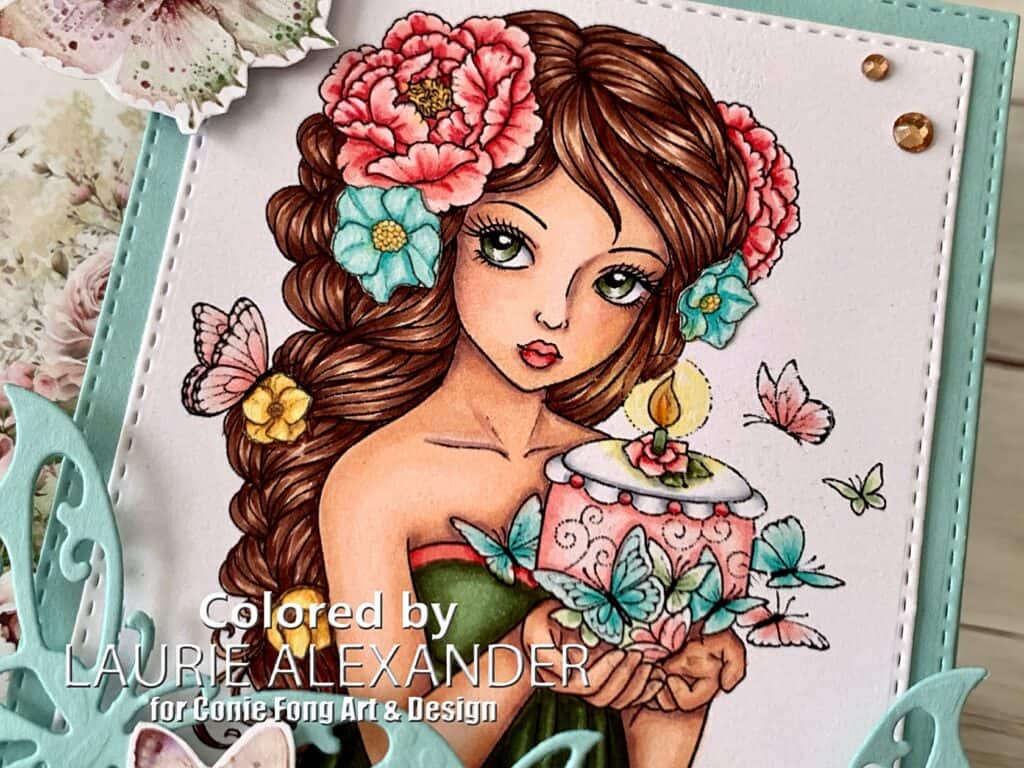
Hello Crafty Friends! It’s Laurie here! I am sharing My Butterfly Wishes Card as my Design Team Inspiration Card for Conie Fong Art & Design using the Butterfly Wishes image from the Butterfly Wishes Kisses Bundle. She is perfect for those birthday cards we all need! This purchase includes 2 Images:
Title1: Butterfly Wishes
Title2: Butterfly Kisses
The Details of My Butterfly Wishes Card
I had a lot of fun colouring the Butterfly Wishes image from the bundle with my Copic markers to match my Mintay paper. I thought the Peony Garden paper suited the image since she had peonies in her hair. Finally, I added Wink of Stella to the butterflies to make them shimmer and Glossy Accents to the candle flame.
For my card, I decided to go with a faux-step card so that the beautiful Mintay paper can be visible on the background layer, even behind my focal point. I had a scrap of that paper left over. So, I trimmed it down, turned it over, and added to my front panel where the sentiment was located. Next, I tucked in a Butterfly Border behind this panel since it was perfect for my butterfly motif and added a fun whimsical feel.
Faux-Step Side View
For the birthday sentiment, I used my Glimmer Hot Foil System (a new toy!) and die cut it out. Then I fussy cut the tea cup and two of the butterflies from the Mintay paper. I love that these images match the papers! I tucked in the sentiment and one of the butterflies around the tea cup to create my sentiment cluster. The other butterfly was added to the top left of my coloured image so that it hung over the edge between the layers.
The finishing touch was a scattering of rhinestones to add even more sparkle to my card.
Butterfly Wishes Kisses Bundle, Conie Fong Art & Design Paper Basics – Stamper’s Select White Cardstock, Papertrey Ink Peony Garden 8” x 8” Paper Pad, Mintay Papers Curved Everyday Sentiments Hot Foil Plate & Die Set, Spellbinders Paper Arts Glimmer Hot Foil System, Spellbinders Paper Arts Gold Foil Paper, Spellbinders Paper Arts 3 ¾” and 3 ½” Layering Stitched Rectangles, Memory Box Champagne Rhinestones Basic Jewels, Stampin’ Up! Butterfly Border Die, Joy Crafts Paper Snips, Stampin’ Up! Wink of Stella, Stampin’ Up! Glossy Accents, Ranger
Finished card size: 5 ½” x 5 ½”
————————–
To view my other Conie Fong Art & Design projects, please click here.
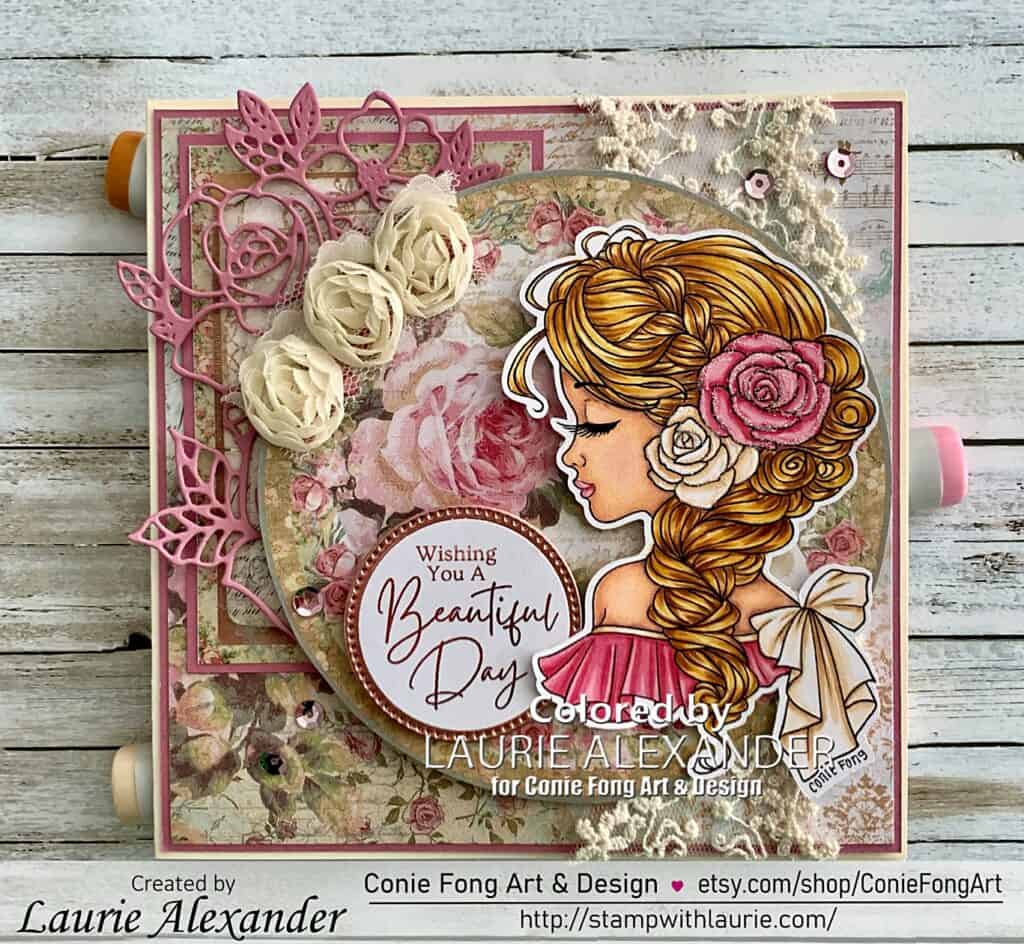
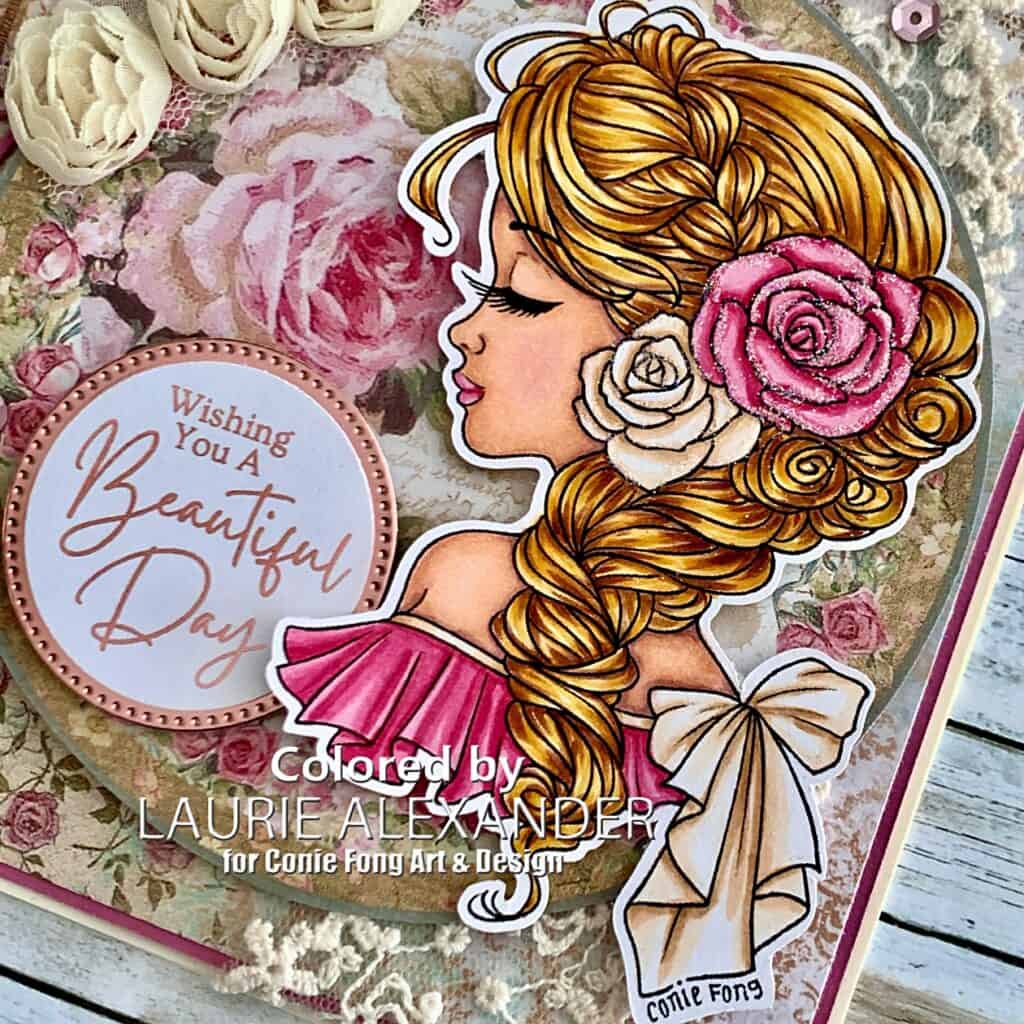
Hello Crafty Friends! It’s Laurie here! I am sharing My Beautiful Day Card as my Design Team Inspiration Card for Conie Fong Art & Design using the stunning Bella Rose. This purchase includes 4 Images:
Bella Rose Left (girl facing left in JPEG format)
Bella Rose Right (girl facing right in JPEG format)
Rose Bonus image JPEG
Rose Bonus image PNG
The Details of My Beautiful Day Card
For my card, I decided to go with a soft vintage Victorian theme and the Stamperia paper was perfect for it! The paper is so pretty with its roses and vintage wallpaper designs! There was one piece that had a circle with roses in it that suited Bella Rose! Since I wanted to add layers to my card, I used my Paper Snips to cut out the circle part to use for my focal point.
But first, I coloured Bella Rose with my Copic markers in soft colours to match my theme. I even added glitter to the roses in her hair to make them shimmer. I positioned Bella on the circle so that the rose on the layer below peeked through…almost like she was smelling the rose.
Next, I decided to create a rose gold foiled sentiment with a matching rose gold stitched mat. So, I used my laser printer and printed out a pretty scripty sentiment. Then, I foiled it using my laminator. This is something new to me and I hope to do more of it! Once this was done, I punched it out with a circle punch and added my mat.
To balance out my card, I used a tag that I tucked in behind my focal point opposite Bella. Then, I tucked in a beautiful detail rose die cut from Paper Roses on top of the tag. I thought the die cut roses matched the roses in Bella’s hair beautifully!
Finally, to add to the Vintage Victorian theme, I used some wide lace ribbon in a soft cream colour. To mirror this, I added three material roses in a matching colour opposite Bella on the circle.
The finishing touch was a scattering of sequins that matched my colour scheme and added sparkle to my card.
————————–
Copic Markers:
Skin: E000/E00/E21/E11/E04/R20 Hair: E25/YR24/Y26/Y21 Pink Flower: R85/R83/R81/Glitter White Flower and Bow: E53/E51/E50/0/Glitter
Close Up of Bella Rose
————————–
Card Recipe for My Beautiful Day Card:
Bella Rose, Conie Fong Art & Design Paper Basics – Stamper’s Select White Cardstock, Papertrey Ink Precious 8” x 8” Paper Pad, Stamperia Rose Gold Foil Paper, Stampin’ Up! Rose Bloom Metal Die, Paper Roses Stylish Shapes Dies, Stampin’ Up! 2 1/6” Lace Ribbon, Michael’s Art & Crafts Vanilla Flower Trim, Stampin’ Up! Black Laser Printer Sweet Birthday 2nd Birthday Kit, Sassy’s LLC Rose Gold Foil Laminator 1 ½” Circle Punch, Stampin’ Up! Paper Snips, Stampin’ Up! Pink Sequins, From my Stash Glamour Dust Glitter, DecoArt
Finished card size: 5 ½” x 5 ½”
————————–
To view my other Conie Fong Art & Design projects, please click here.
Hope you like my Design Team Inspiration Card using Bella Rose for Conie Fong Art & Design!
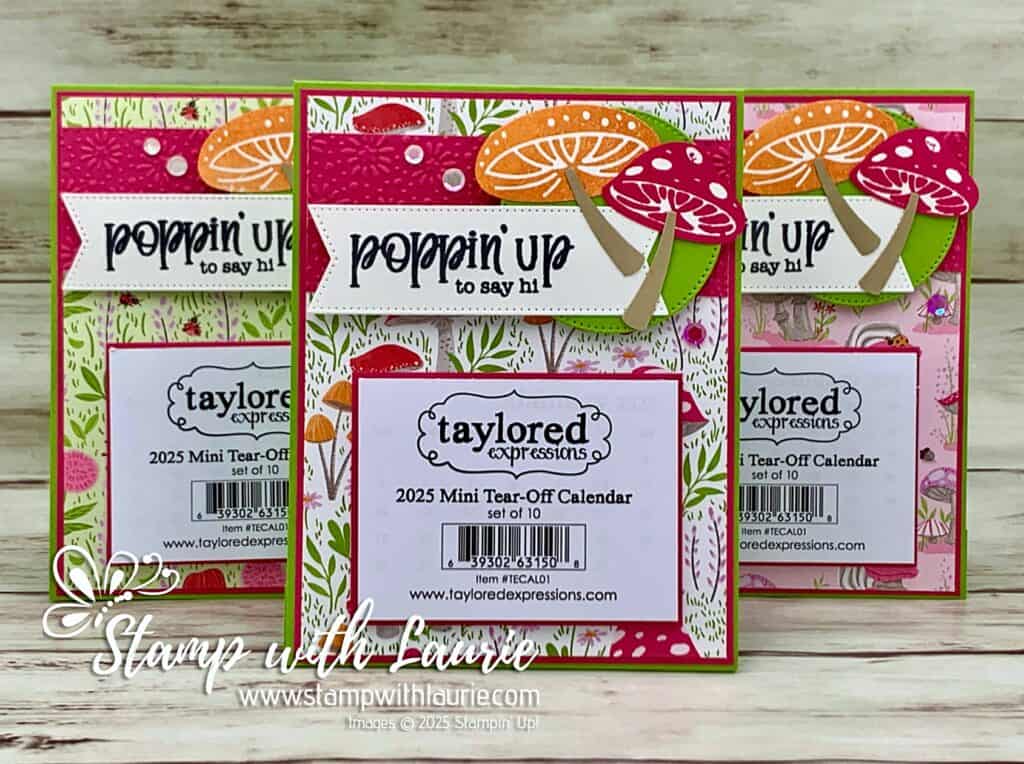
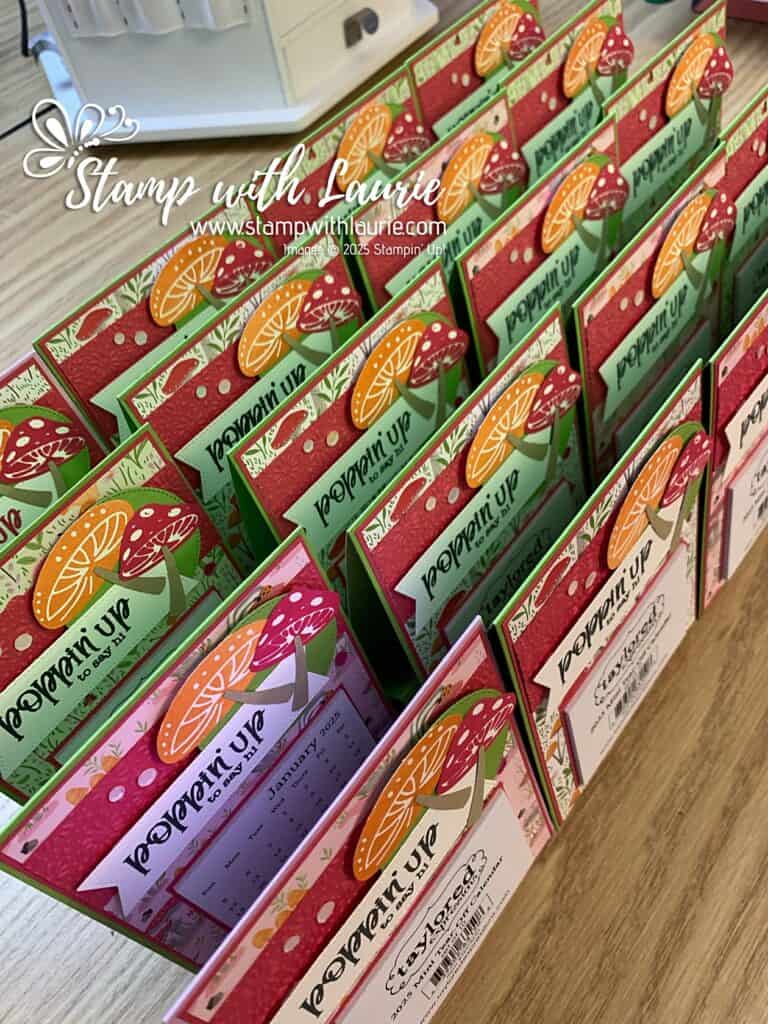
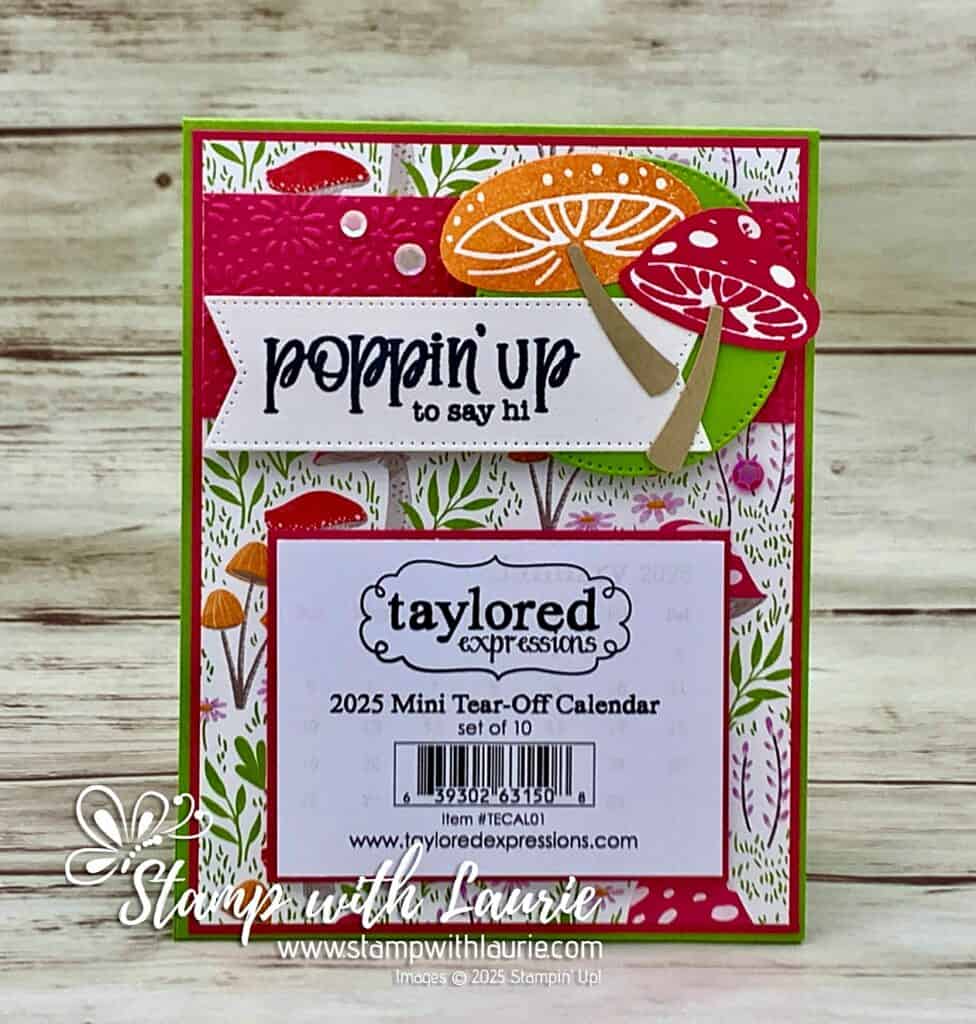
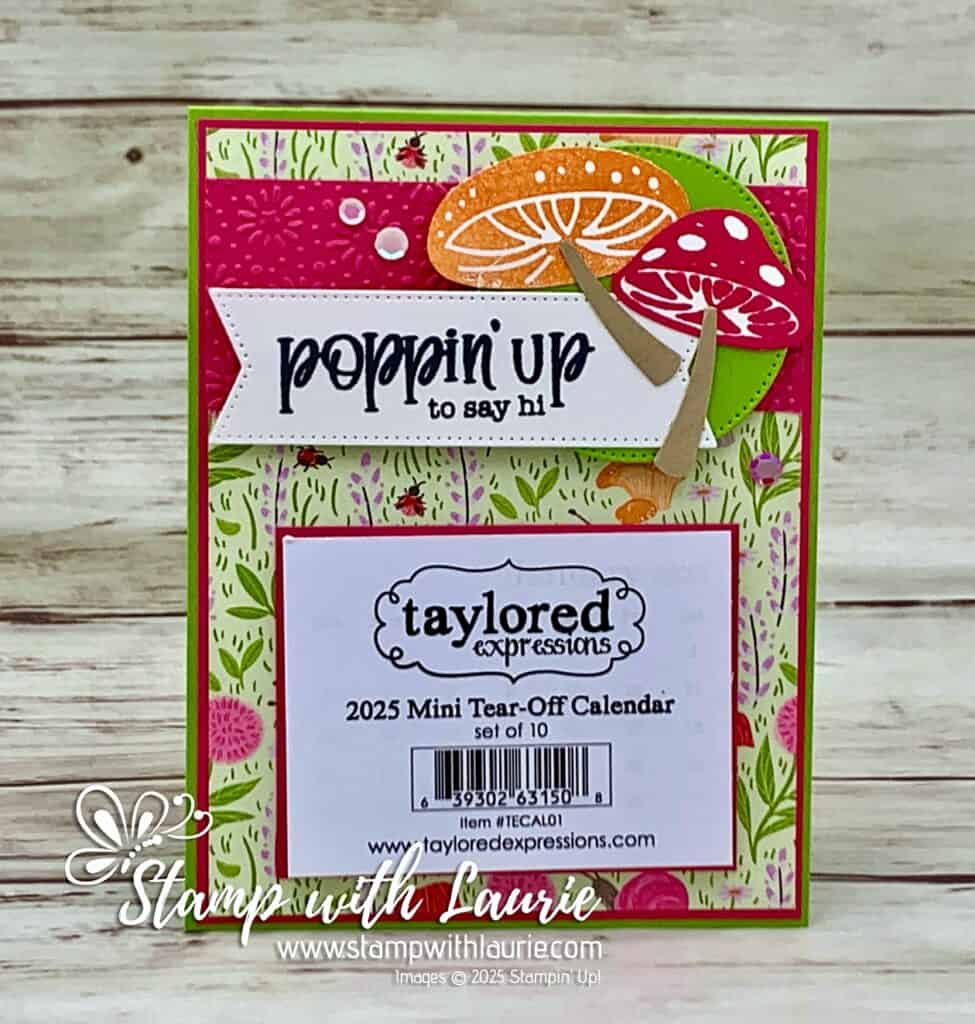
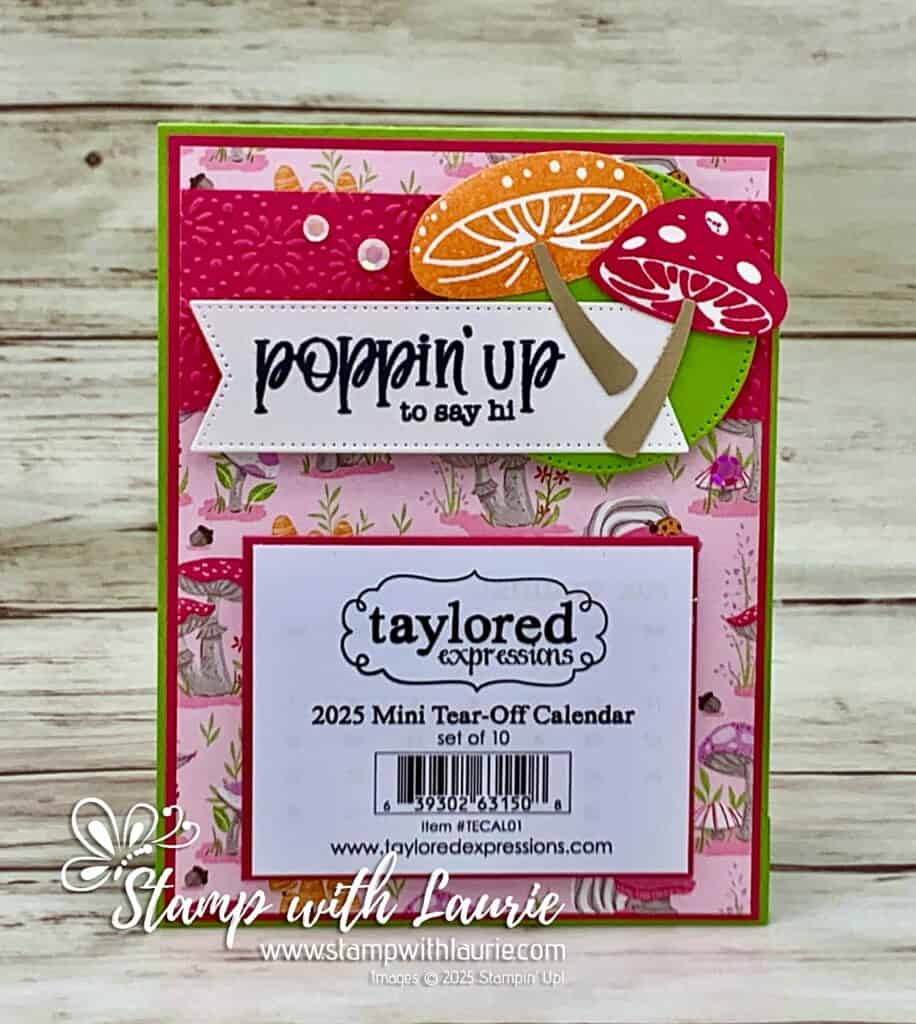
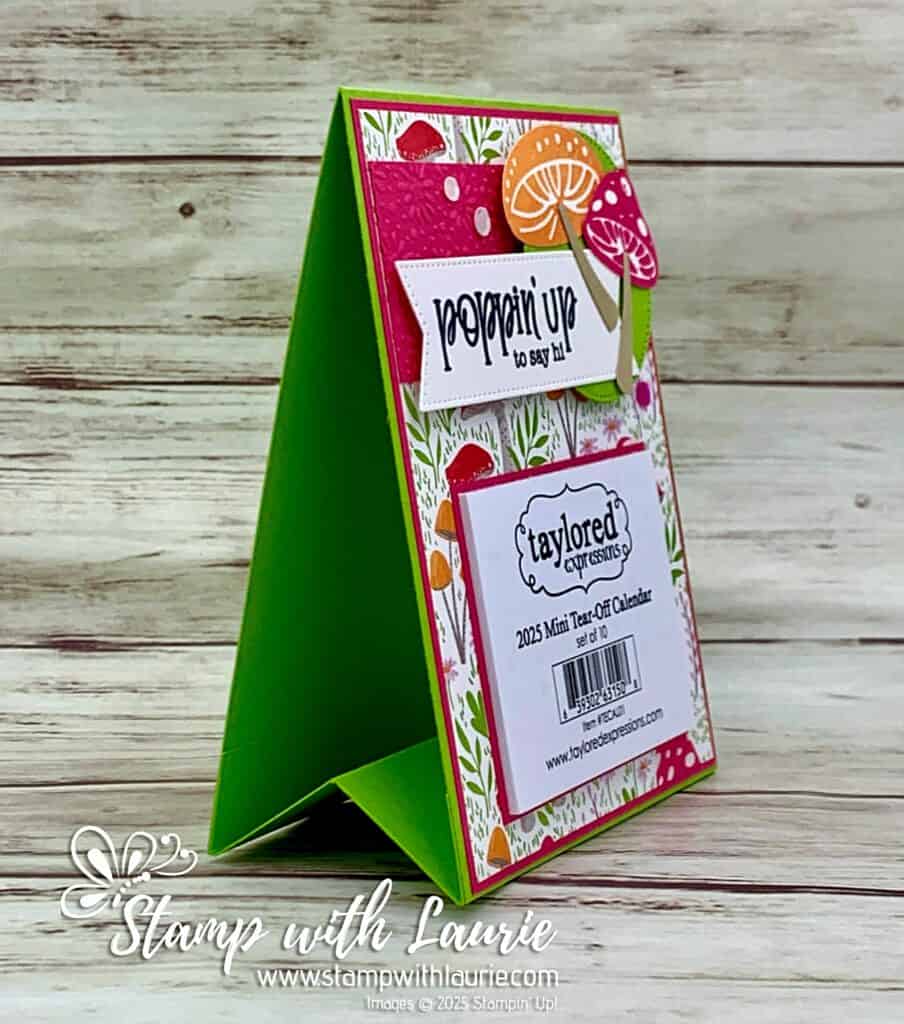
Hello Crafty Friends! Laurie here again! I am sharing my Poppin’ Up! 2025 Calendars using the Terrific Toadstools Bundle and three Sale-a-Bration items including the Toadstool Gardens 6″ x 6″ Designer Series Paper, the Purple Adhesive-Backed Sequins and, the Starstruck Embossing Folder by Stampin’ Up! Canada Post went on strike right before Christmas and no Christmas cards were mailed. So, instead, I decided to send calendars again this year. I made 20 calendars for my customers.
20 Calendars!
The Details of My Poppin’ Up! 2025 Calendars
For my calendars, I decided to create one design with different colours of DSP. I matched the card stock colours to the DSP colours trying different colours together. I ended up using Melon Mambo and Granny Apple Green. I’m not a Melon Mambo person…so, these colours were out of my comfort zone. Lol!
Calendar #1 with White Background DSP
Once I decided on the colours, I stamped the mushrooms in Pumpkin Pie and Melon Mambo and punched them out with the matching punch. I decided to keep the stems simple with just punched out Crumb Cake card stock.
Calendar #2 with Green background DSP
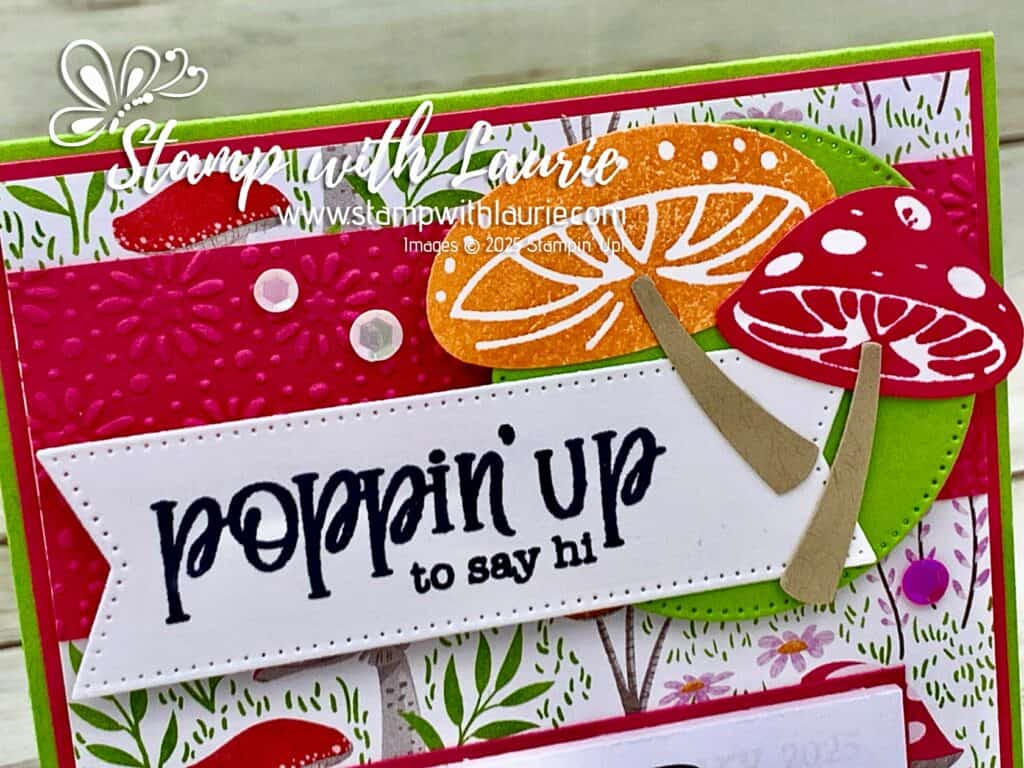
Next, I stamped the sentiment in black and die cut it out with the large flag from the Stylish Shaped Dies.
To add interest to the Melon Mambo banner, I embossed it with the free Sale-a-Bration Starstruck Embossing Folder.
Calendar #3 with Pink Background DSP
Time to assemble all the layers of the banner. I added a stitched circle behind my mushrooms and tucked in my sentiment. Then, I layered the embossed banner piece behind everything.
Next, I added a Melon Mambo mat to the calendar and adhered it to the base.
Finally, I added some of the free Sale-a-Bration Purple Adhesive-Backed Sequins around my focal point.
Supplies:
Stamps/Bundles/Dies: Terrific Toadstools Bundle (164790), Stylish Shapes Dies (159183)
Inks: Melon Mambo Classic Stampin’ Pad (147051), Pumpkin Pie Classic Stampin’ Pad (147086), Tuxedo Black Memento Ink Pad (132708)
Paper: Granny Apple Green (146990), Melon Mambo (115320), Crumb Cake (120953), Basic White (159276), Toadstool Gardens 6″ x 6″ Designer Series Paper (164942)
Accessories: Purple Adhesive-Backed Sequins (164970), Starstruck Embossing Folder (164972), Paper Trimmer (152392), Bone Folder (102300), Stampin’ Dimensionals (104430), Mini Stampin’ Dimensionals (144108), Stampin’ Seal (152813), Mini Glue Dots (103683), Taylored Expression Calendars
Close Up of Banner
Measurements:
Granny Apple Green (4 pieces):
11” x 4 ¼” scored at 5 ½”
4” x 4 ¼” scored at ¾”, 2” and 3 ¼” along 4” side
2 ¼” x 2 ¼”
Melon Mambo:
4-1/8” x 5-3/8”
4” x 1 ½”
3-1/8” x 2-7/8” (for behind calendar)
Basic White:
3 ½” x 1 ¼” (Sentiment)
Scraps for mushroom caps
Crumb Cake:
Scrap
Toadstool Gardens Designer Series Paper:
4” x 5 ¼”
Side View of Calendar
More Information on My Poppin’ Up! 2025 Calendars
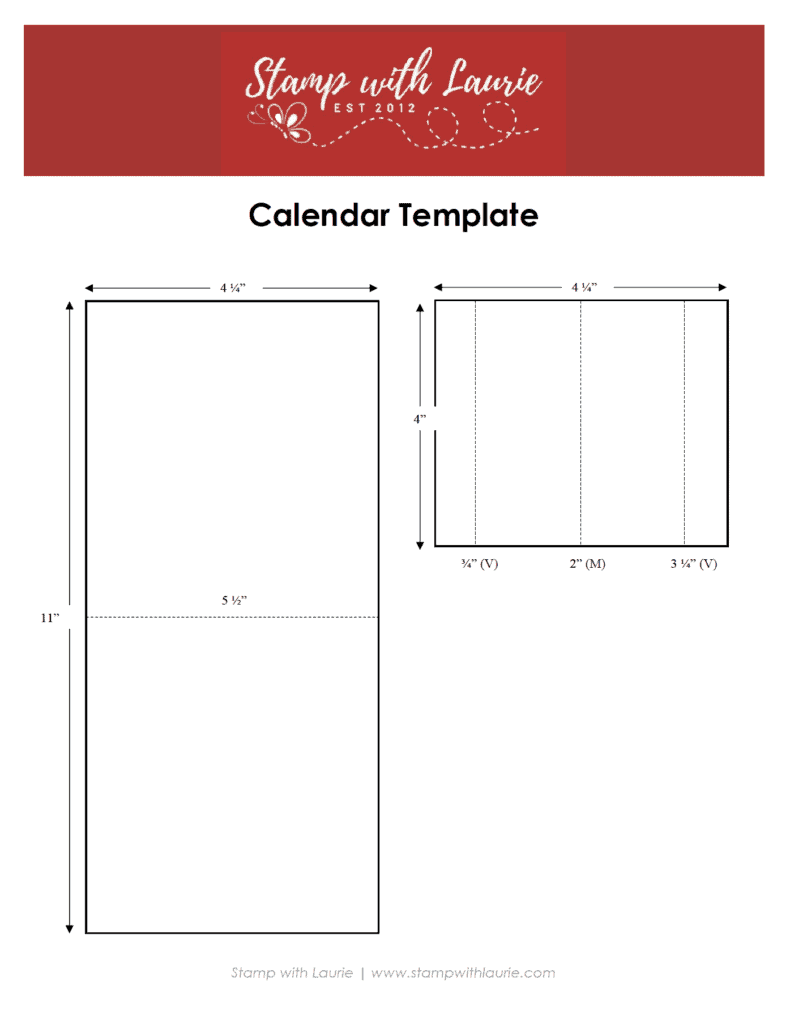
Downloadable Calendar Template
To download a PDF of the Calendar Template, please click here or on the picture.
Downloadable Calendar Template
For more of my Stampin’ Up! cards, please click here.
You will find the items listed above in my online store.
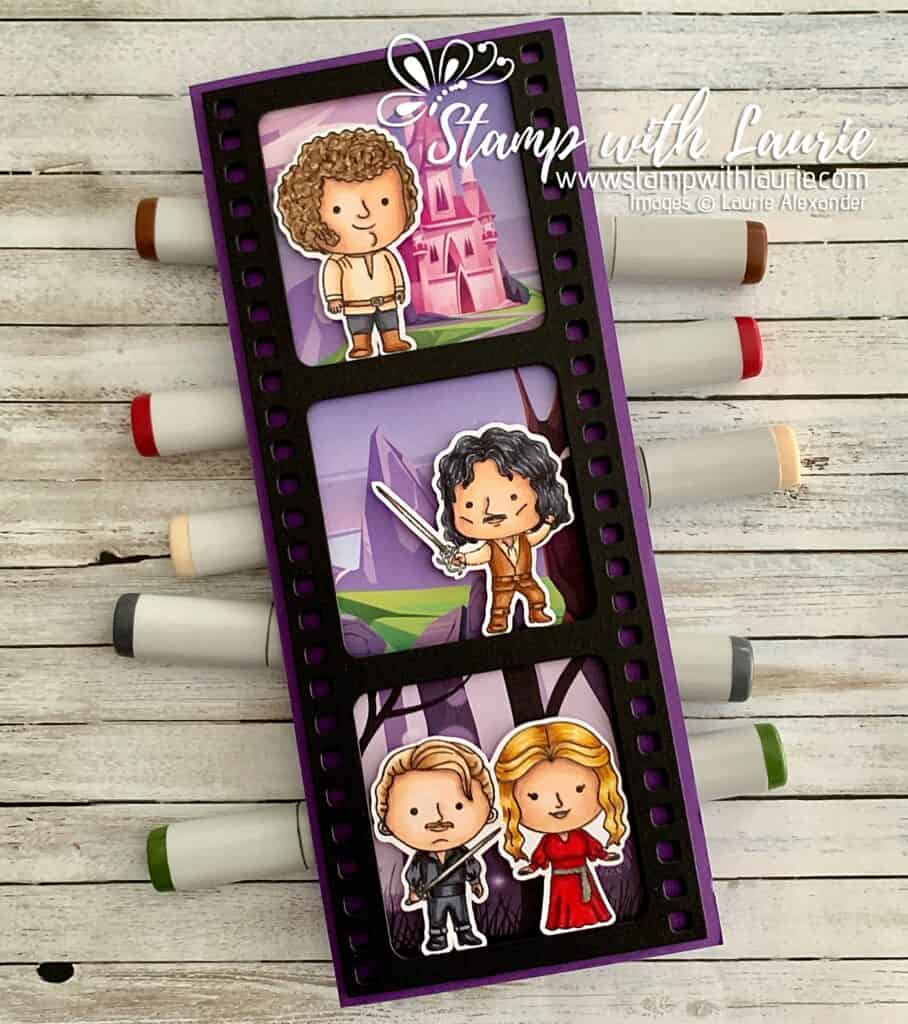
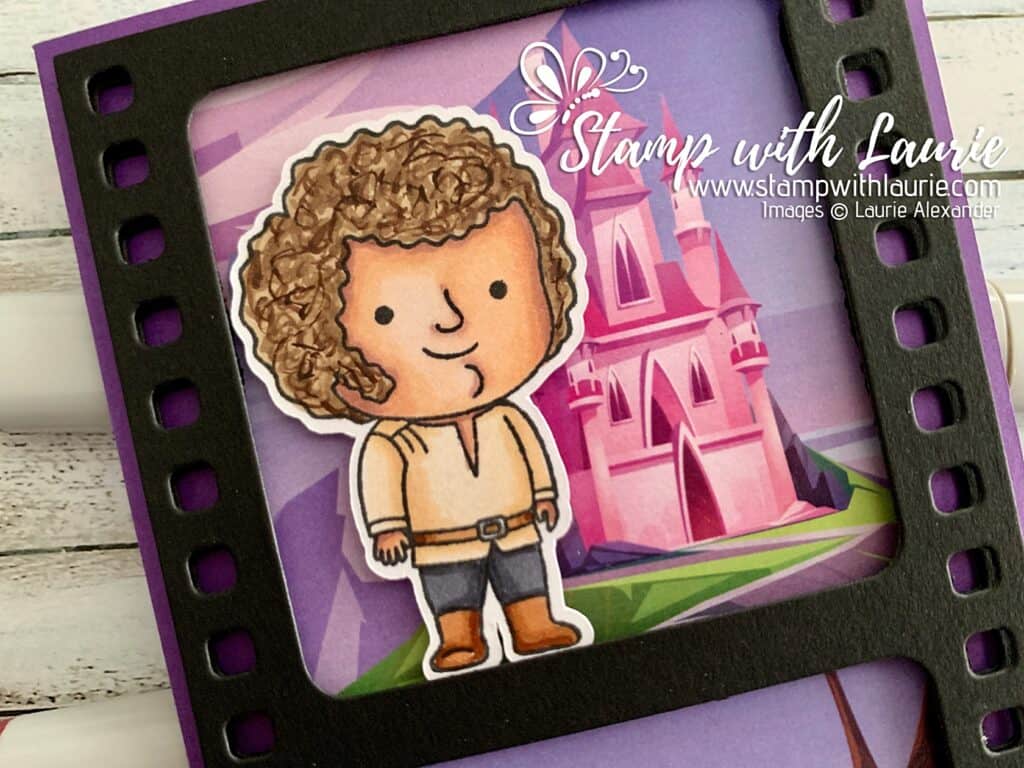
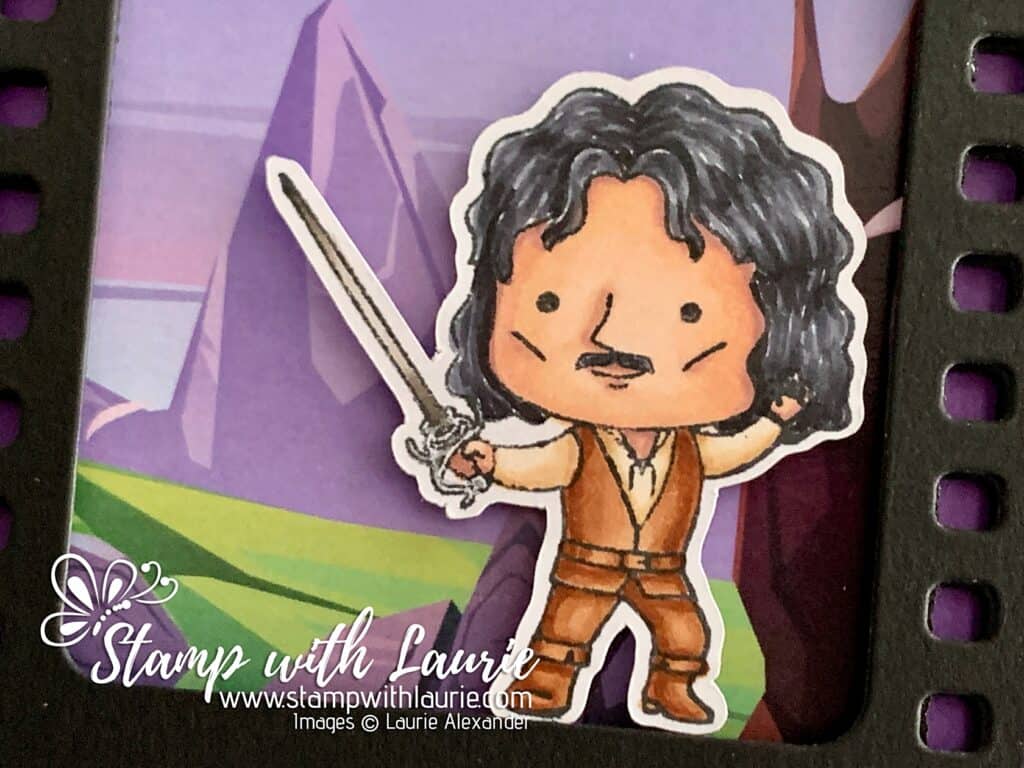
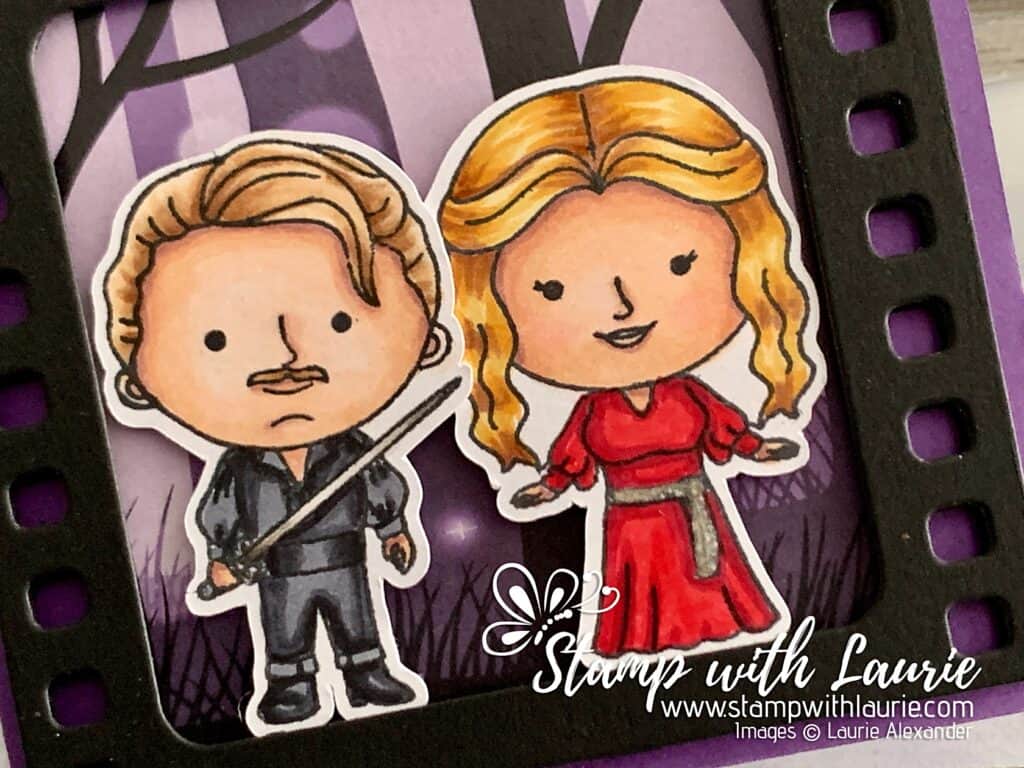
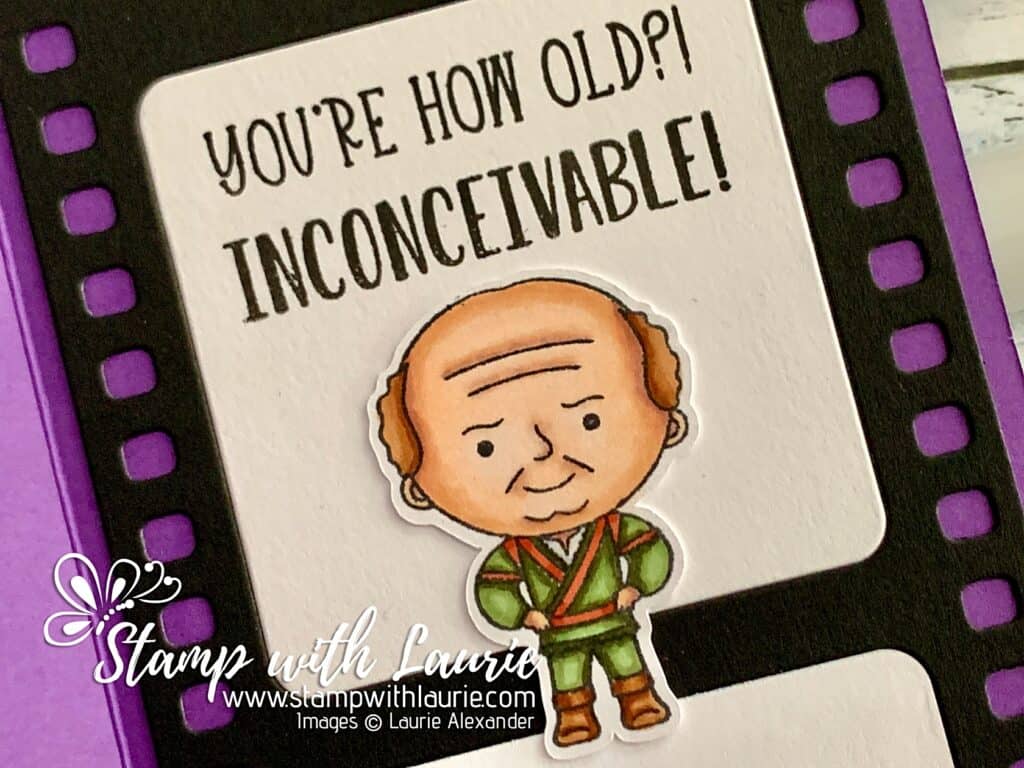
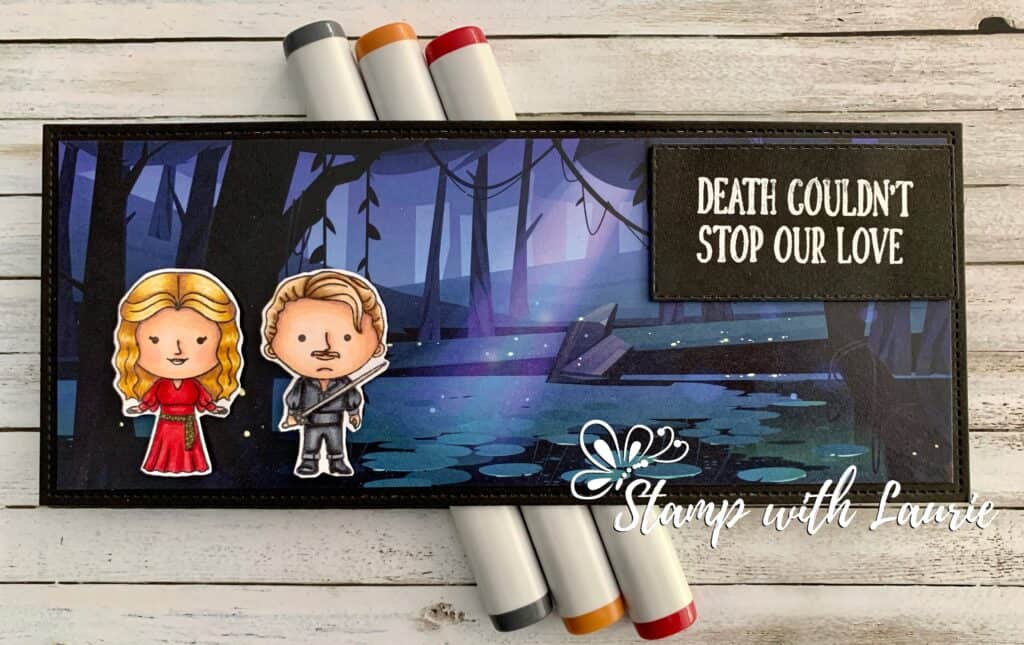
Hello Crafty Friends! It’s Laurie here to share My Inconceivable Birthday Card using the Twoo Luv Stamp Set by Kindred Stamps. A good friend’s birthday was recent, and he loves a certain movie and book. So, I couldn’t resist creating this card for him with scenes from the movie!
The Details of My Inconceivable Birthday Card
For my card, I thought it would be fun to create a slimline card with the Film Strip Die by Whimsy Stamps. Each windows had a scene from the movie including the castle for The Giant since he is part of the Brute Squad, the Cliffs of Insanity for the big sword fight with the Fencer and the escape of the two sweethearts in the Fire Swamp.
But first, I coloured all the characters with my Copic markers and cut them out with my Brother Scan n’ Cut.
Once that was done, I pulled out my Whimsy Slimline papers to find the perfect backdrops for my scenes. I had to cut the papers down to fit the windows. So, I ended up using two different papers from two different paper packs. The top two windows were from the Enchanted Kingdom Slimline Paper Pack and the last window was from the Enchanted Forest Slimline Paper Pack.
Next, I decorated the inside of my card with another die cut film strip. For this one I did some stamping using the stamp set in the windows. The “Hello my name is”, I placed at the top so that I can add my friend’s name. Then, I added the final character, the Sicilian whose favourite word was “inconceivable” beneath the sentiment.
————————–
Copic Markers:
The Giant (aka Fezzik) Skin: E000/E00/E21/E11/E04 Hair: E49/E47/E44/E43 Shirt: E53/E50 Pants: C7/C6/C4 Boots/Belt: E37/E35/E33/ Silver Gelly Roll Pen on Belt Buckle
For more of my Kindred Stamps cards, please click here.
Hope you like my Inconceivable Birthday Card using the Twoo Luv Stamp Set by Kindred Stamps!
Here is another slimline card that I made using this stamp set a few years ago. Perfect for a Valentine’s Day or an anniversary card! To find out more on this card, please click here.
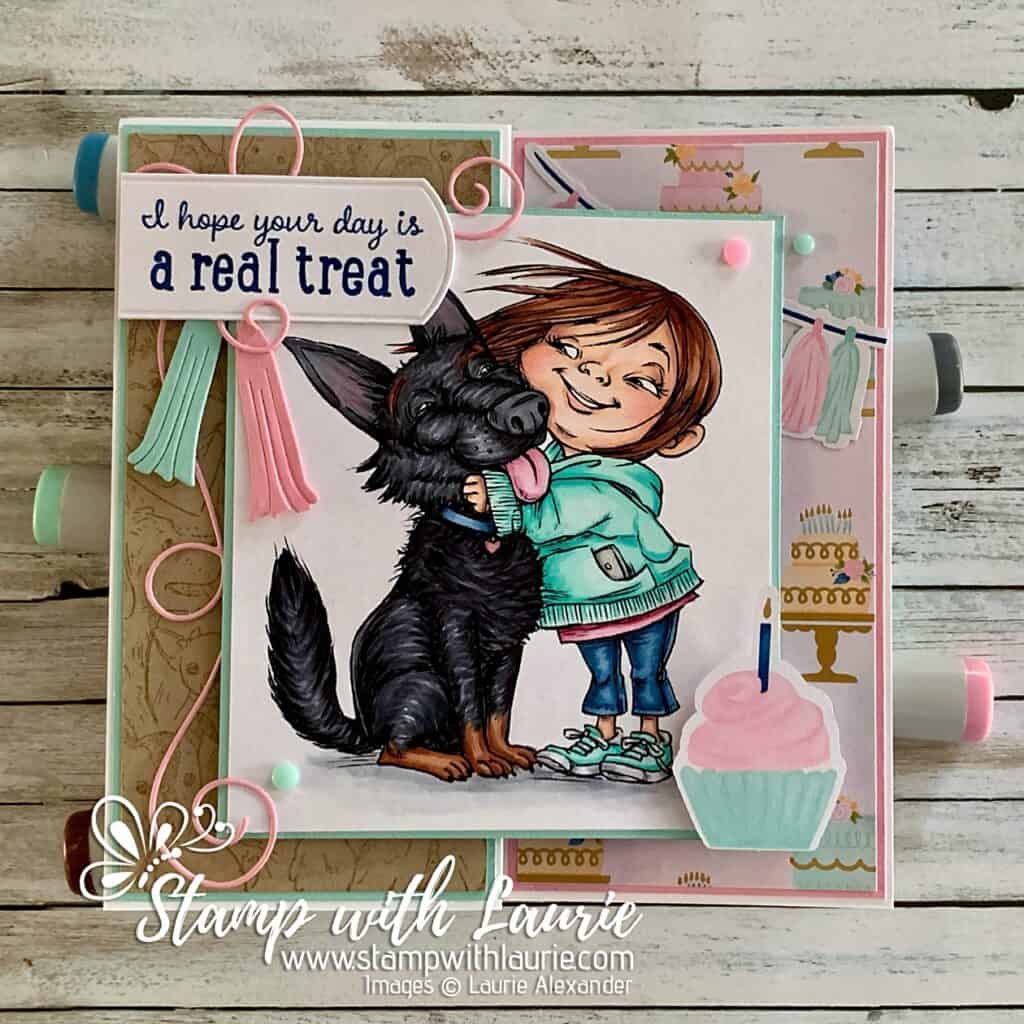
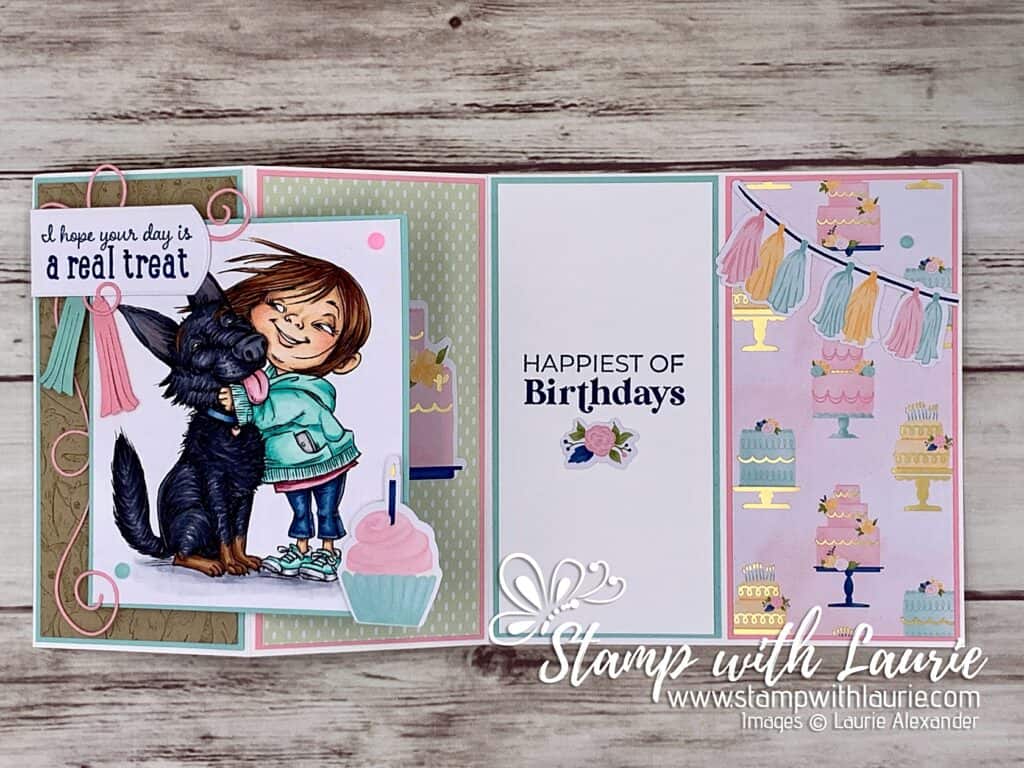
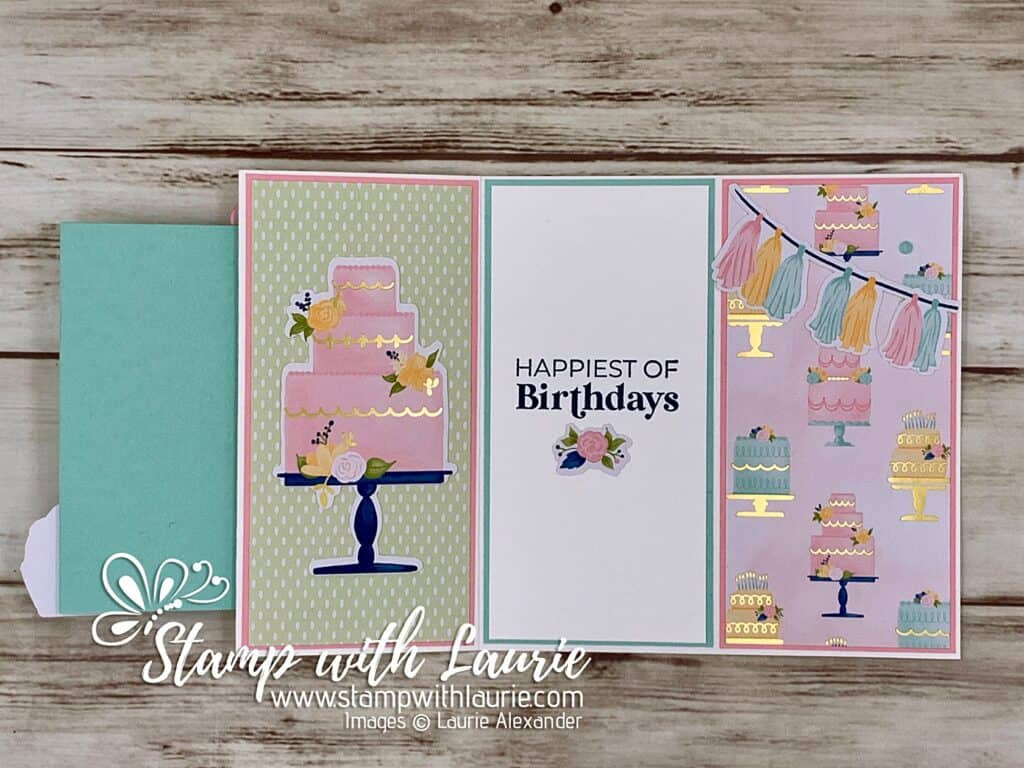
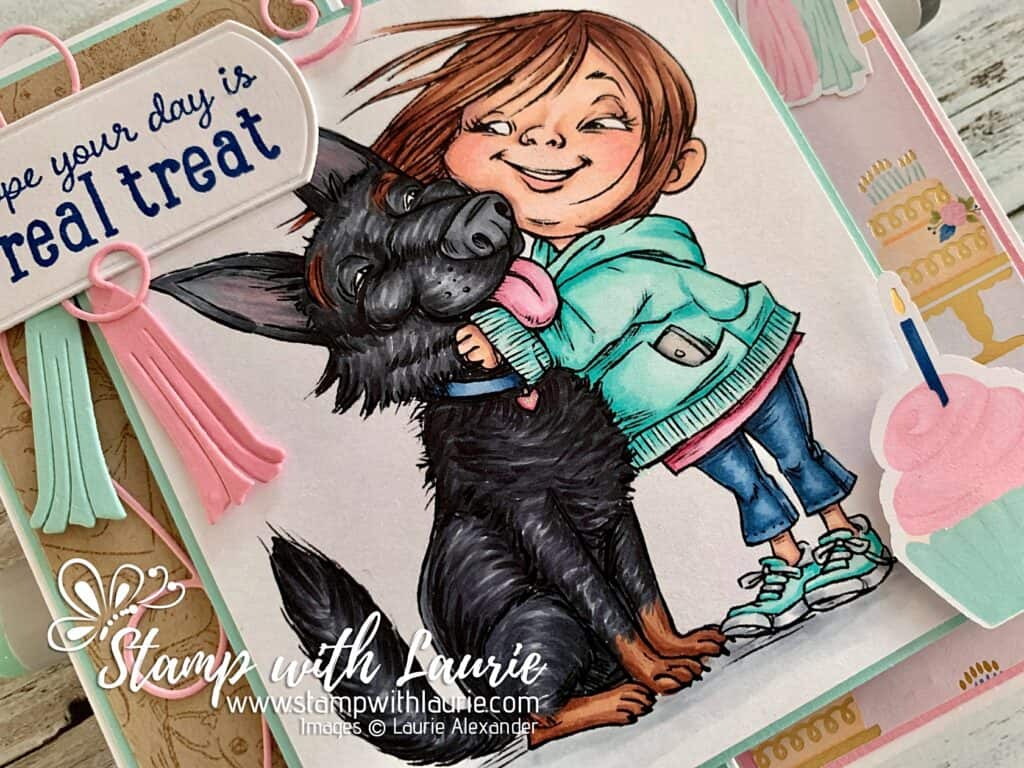
Hello Crafty Friends! It’s Laurie here! I am sharing My Birthday Treat Card using the sweet Daisy and Me by Mo’s Digital Pencil. I have a birthday twin whose birthday is the same day as mine! She loves her dogs and when I saw this new digital stamp, I knew it was perfect for her birthday card!
The Details of My Birthday Treat Card
For my card, I decided to create a Z-fold card so that I could decorate all the panels with the gorgeous Wildflower Birthday Specialty Designer Series Paper by Stampin’ Up! The ready-to-use die cuts that are included in the DSP were perfect for my birthday theme!
But first, I coloured with my Copic markers the dog and girl to look like my friend and her dog, Rocky! He has very distinctive marking including eyebrows! Lol. I added Glossy Accents to her phone and Clear Star Gelly Roll Pen to the heart tag on Rocky’s collar.
Z-Fold
To add to the birthday celebrations, I used the Birthday Celebration Dies by Stampin’ Up!, as well as, a bow Corner Die from Memory Box on the front panel of the card. The cupcake was from the DSP ready-to-use die cuts and matched my colour scheme perfectly!
The sentiment was from the retired Pampered Pets Stamp Set and stamped in Blueberry Bushel before die cutting it with one of the Unbounded Love Dies.
Inside Panels of Card
For the inside, I decorated the panels with the DSP and die-cuts. Don’t you love that cake and banner! So festive! The inside sentiment was from the Throughout the Year Stamp Set by Stampin’ Up! and stamped in Blueberry Bushel as well. A floral die cut was the finishing touch to the sentiment panel.
For embellishments, I added some Party Dots on the front to matched my colour scheme.
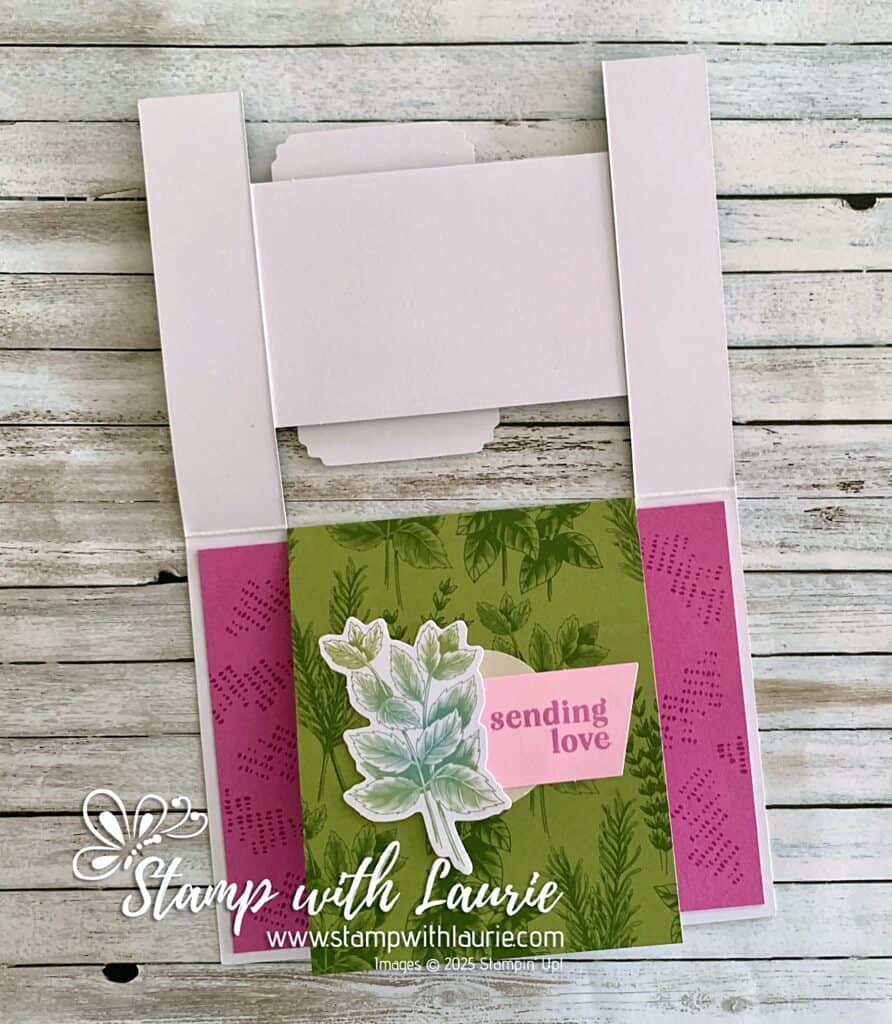
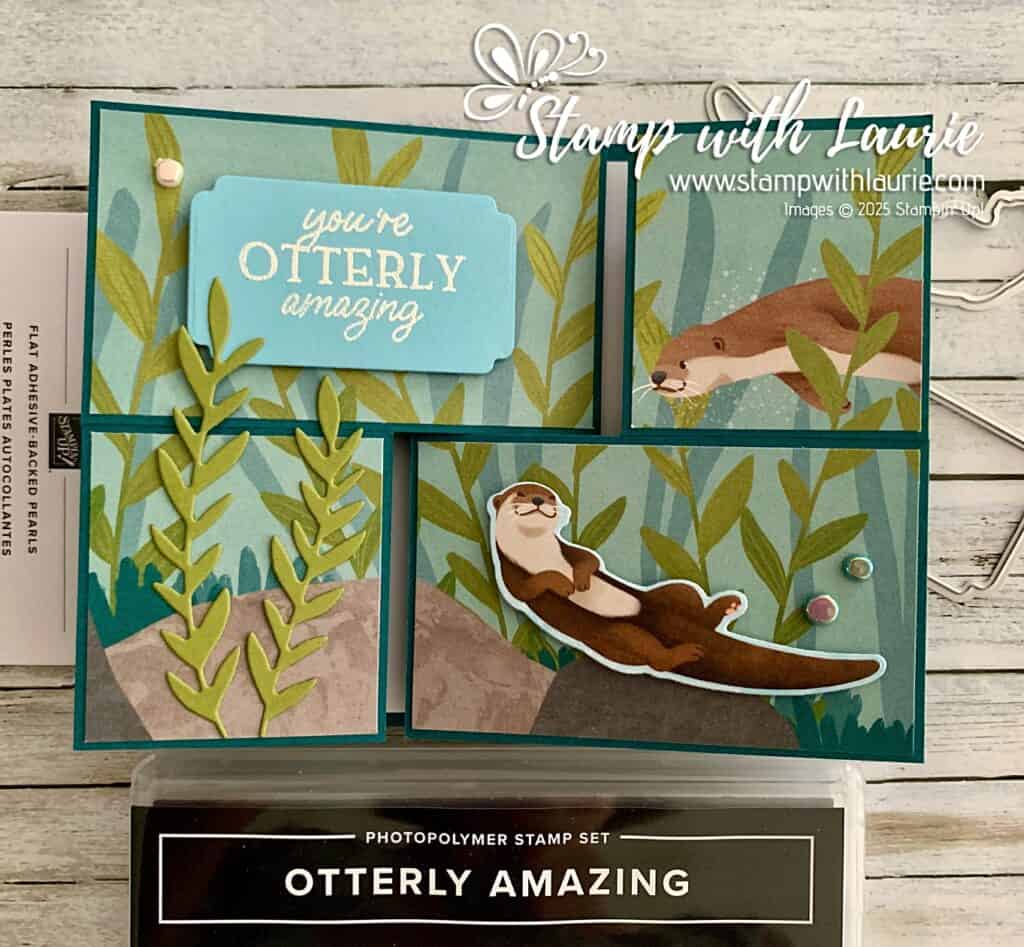
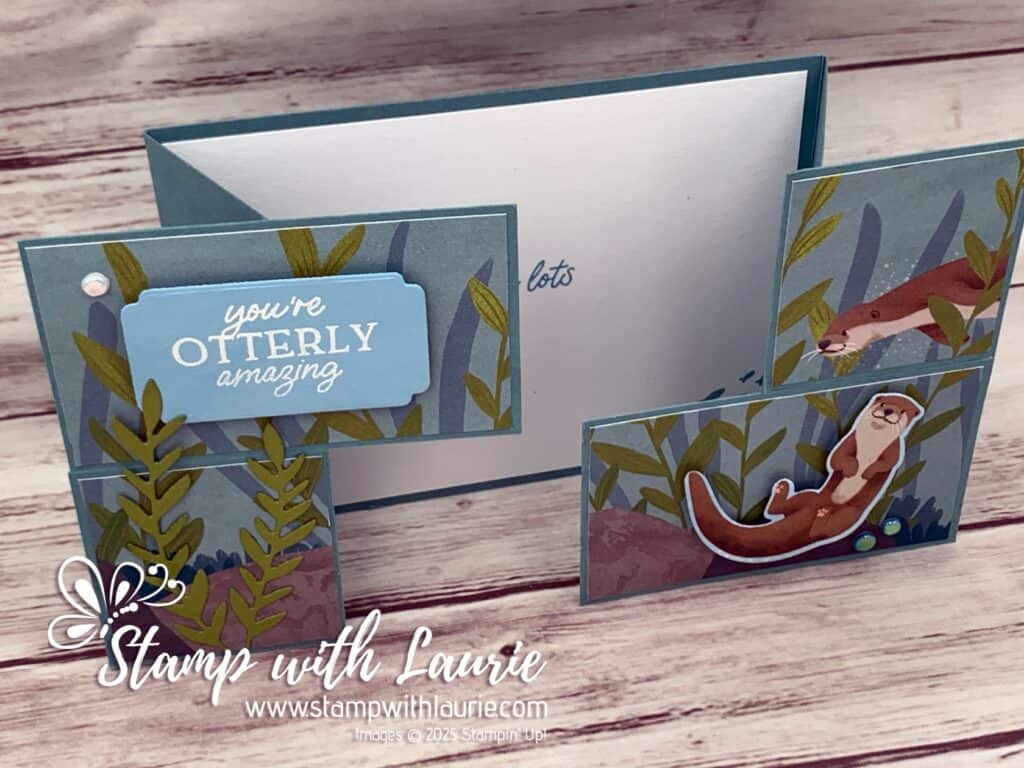
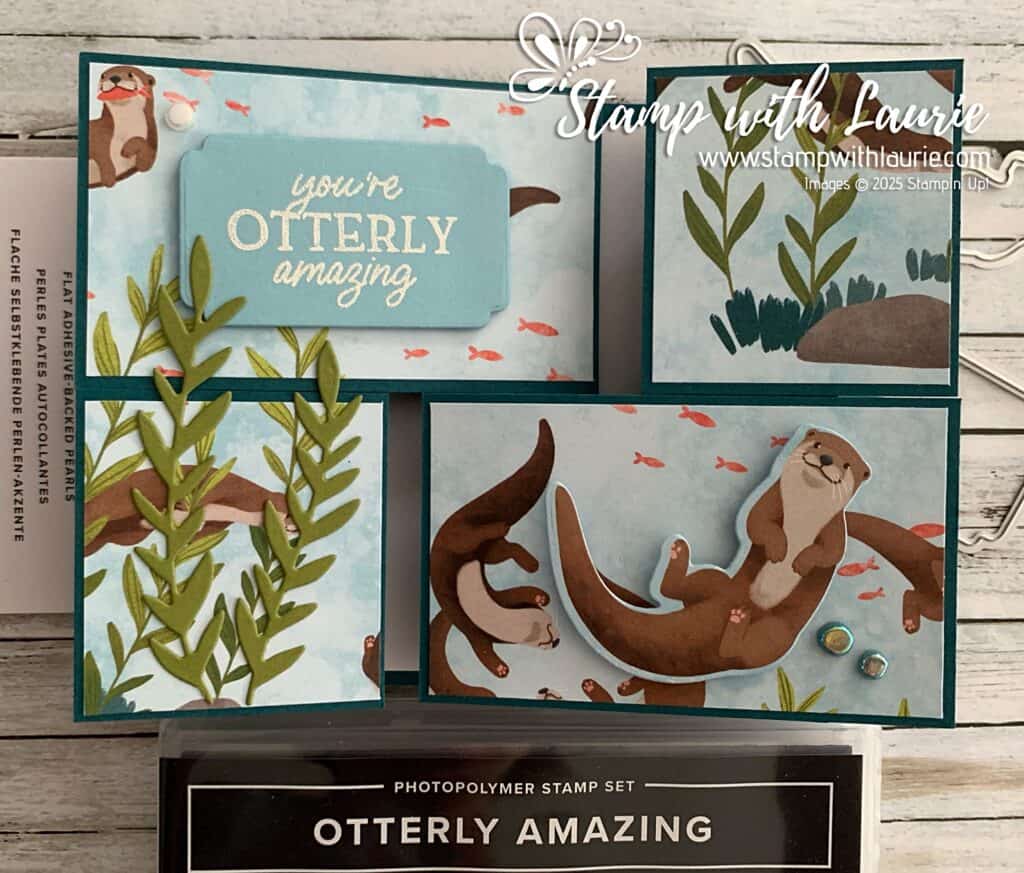
Hello Crafty Friends! Laurie here again! I am sharing My Otterly Amazing Card using the Otterly Amazing Bundle which includes the Otterly Amazing Stamp Set and the Otterly Amazing Dies by Stampin’ Up!
The Details of My Otterly Amazing Card
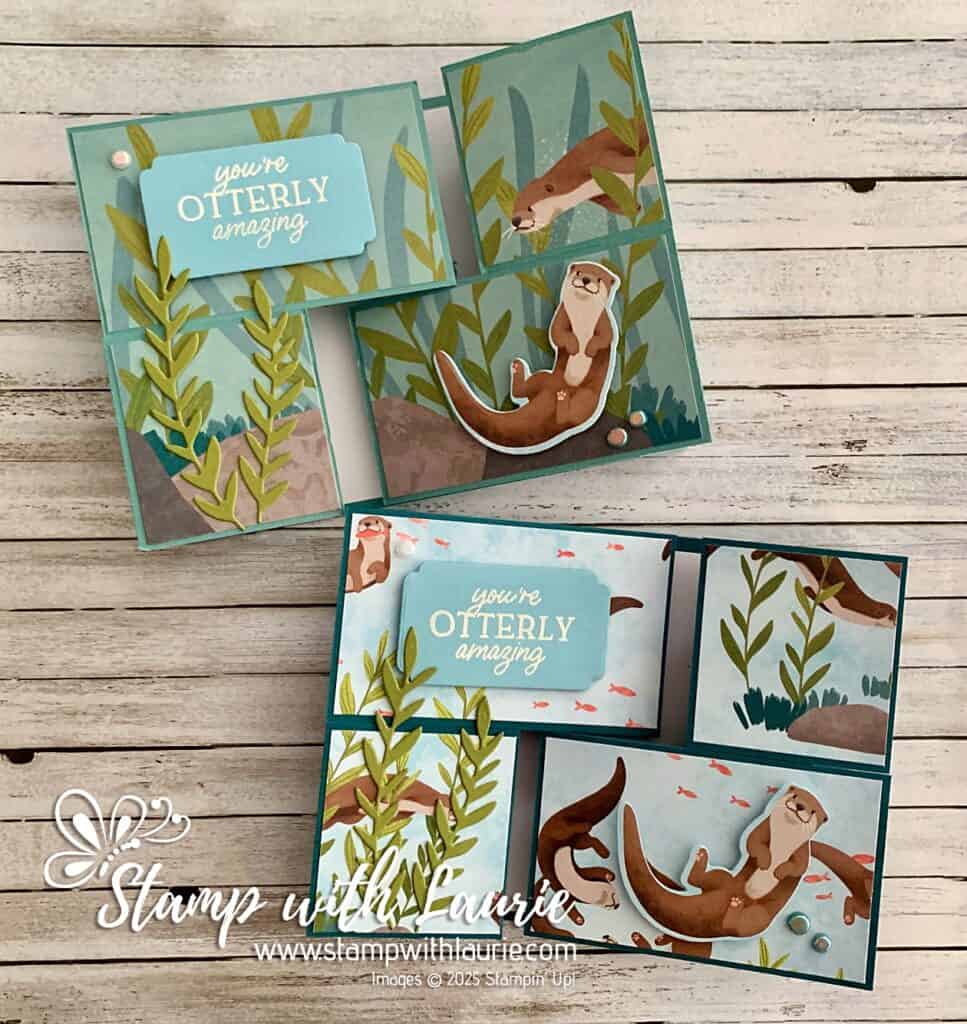
I received a fun puzzle card in a swap back in October and thought this fun fold would work well with the Otterly Adorable Designer Series Paper, especially the pages with the scene. But this card was for a swap, and I didn’t have enough papers with the scene. So, I used other playful aquatic scenes as well to complete my swaps.
Two of my Cards with Different Scenes
For my card, I took a 11” x 4 ¼” Pretty Peacock piece and scored it according to the instructions below. Then, I cut a to 5 ½” x 4 ¼” piece to the measurements below. Tip: once the base is folded, adhere the smaller piece to the front when it is closed so that everything lines up.
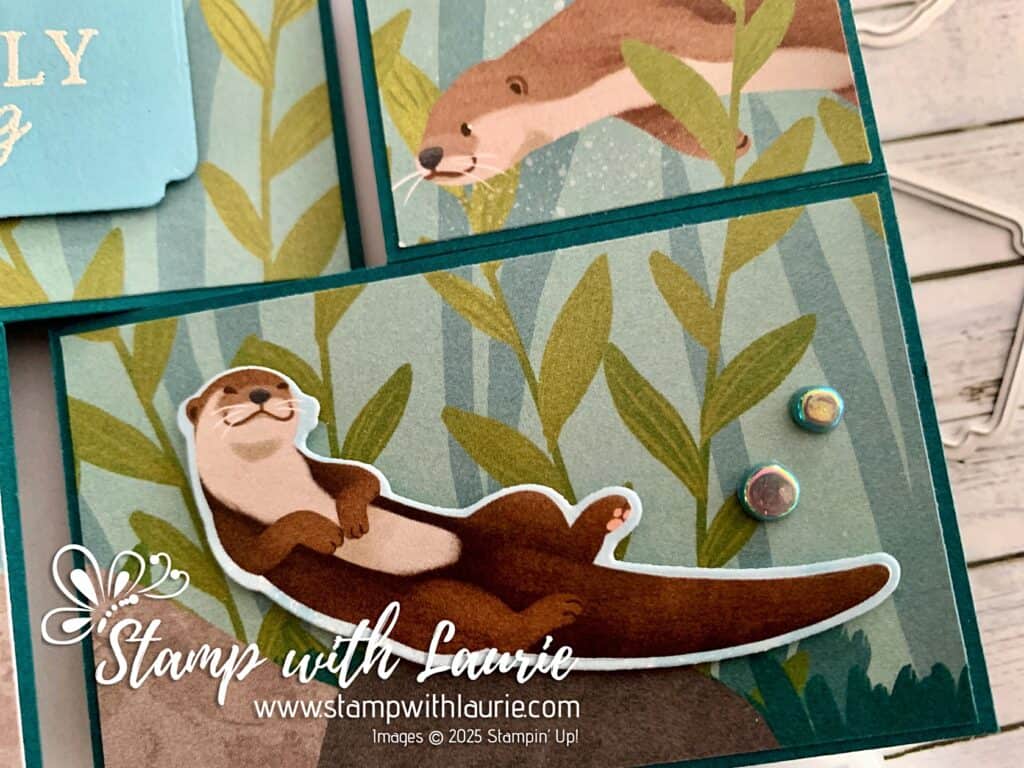
Next, I added my DSP to the appropriate squares to create my scene. I love that the dies cut out several otters from the DSP. So, instead of colouring them (I know gasp! Lol!), I die cut one for each card.
To add to my scene, I die cut some seaweed from Old Olive card stock and added it to the left side of card, overlapping the sentiment.
For the sentiment, I white embossed it on a piece of Balmy Blue and die cut it out with the smallest rectangle from the Something Fancy Dies.
View of Card from Top
For the inside, I added a piece of Basic White with the fish and sentiment stamped in Lost Lagoon.
As a finishing touch to the front of my card, I added a scattering of Riverside Irregular Pearls.
Supplies:
Stamps/Bundles/Dies: Otterly Amazing Bundle (164933), Something Fancy Dies (160424)
Inks: VersaMark Ink (102283), Lost Lagoon Classic Stampin’ Pad (161678)
Paper: Pretty Peacock (150880), Basic White (159276), Balmy Blue (146982), Old Olive (100702), Otterly Adorable 12” x 12” Designer Series Paper (164183)
Accessories: Basics Embossing Powder (165679), Riverside Irregular Pearls (164937), Heat Tool (129053), Embossing Additions Tool Kit (159971), Stampin’ Paper Trimmer (152392), Bone Folder (102300), Stampin’ Dimensionals (104430), Mini Stampin’ Dimensionals (144108), Stampin’ Seal (152813), Multipurpose Liquid Glue (110755)
Close Up of Otter
Measurements:
Pretty Peacock:
11” x 4 ¼” scored at 1”, 2 ¾”, 8 ¼”, 10”
5 ½” x 4 ¼” – cut horizontally at 2-1/8” and then the 2 pieces vertically at 3 ½”
Basic White (for inside):
5 ¼” x 4”
Balmy Blue:
Scrap
Old Olive:
Scraps
Otterly Adorable Designer Series Paper:
5 ¼” x 4” – cut horizontally at 2” and then vertically cut top piece at 3-3/8” and bottom piece at 1-7/8”
One of the otters from the DSP
More Information on My Otterly Adorable Card
Here is the other card that I made using the same using Pretty Peacock card stock and the other playful aquatic scenes.
My Other Card
For more of my Stampin’ Up! cards, please click here.
You will find the items listed above in my online store.